This chapter describes how to prepare the systems and storage shelves for TruCluster products, including how to connect devices to a shared SCSI bus for the TruCluster Available Server Software and TruCluster Production Server Software products. This chapter does not provide detailed information about installing devices; it describes only how to set up the hardware in the context of the TruCluster product. Therefore, you must have the documentation that describes how to install the individual pieces of hardware. This documentation should arrive with the hardware.
For the TruCluster MEMORY CHANNEL Software product, you only need to install the MEMORY CHANNEL hardware. An available server environment (ASE) is not supported for use with TruCluster MEMORY CHANNEL Software so a shared SCSI bus is not needed.
For the Available Server product you will install at least one shared SCSI bus to form an ASE. You can have up to 30 shared SCSI buses, but there can be only one ASE (all member systems are connected to the same shared SCSI bus(es) and the same network(s)).
For a Production Server configuration, if you have four or more systems, you can have multiple ASEs. Each member system in the ASE must be connected to the same shared SCSI buses. All systems in the cluster must be connected via the cluster interconnect (MEMORY CHANNEL).
Note
For Production Server, a cluster member does not have to be a member of an ASE, but there must be at least one ASE in the cluster.
Before you connect devices to a shared SCSI bus, you must:
Plan your hardware configuration, determining which devices will be connected to each shared SCSI bus, which devices will be connected together, and which devices will be at the ends of each bus.
This is especially critical if you will install tape devices on the shared SCSI bus. Some tape loaders can only be installed at the end of a shared SCSI bus.
Place the devices as close together as possible and ensure that shared SCSI buses will be within length limitations.
Prepare the systems and storage shelves for the appropriate bus connection, including installing SCSI controllers and connecting Y cables, trilink connectors, or SCSI signal converters.
After you install all necessary cluster hardware and connect the shared SCSI buses, be sure that the systems can recognize and access all the shared disks (see Section 4.3.1.2 or Section 4.4.3 as appropriate). You can then install the Available Server or Production Server software as described in TruCluster Software Products Administration manual.
Read Section 4.1 and Section 4.2 then proceed to the designated section as follows:
If you are installing hardware for the TruCluster Available Server Software or TruCluster Production Server Software product using a peripheral component interconnect (PCI) SCSI adapter, see Section 4.3 and Table 4-2.
If you are installing hardware for the TruCluster Available Server Software product using a PMAZC, KZTSA, or KZMSA SCSI controller, see Section 4.4 and Table 4-4.
If you are installing hardware for use with TruCluster MEMORY CHANNEL Software, see Chapter 5 for information on installing MEMORY CHANNEL hardware.
Before you set up a TruCluster hardware configuration, you must plan a configuration to meet your performance and availability needs. You must determine the following components for your configuration:
Number and type of member systems, and for Production Server, the number of ASEs.
You can use two to four member systems for TruCluster Available Server Software and two to eight member systems for TruCluster Production Server Software. A greater number of member systems connected to shared SCSI buses gives you better application performance and more availability. However, all the systems compete for the same buses to service I/O requests, so a greater number of systems decreases I/O performance.
For Production Server, if you have four or more systems, you can set up two or more ASEs. All systems in the ASE must be connected to the same shared SCSI bus(es).
Each member system must have a supported SCSI adapter for each shared SCSI bus connection. Available Server configurations must have at least one network adapter for cluster communications. For Production Server, there must be enough PCI slots for the cluster interconnect(s) (MEMORY CHANNEL) and SCSI adapters. The number of available PCI slots depends on the type of AlphaServer system.
You need only one cluster interconnect in a cluster. For Production Server, the cluster interconnect is the MEMORY CHANNEL; for Available Server the interconnect is the network. However, you can use redundant cluster interconnects to protect against an interconnect failure and for easier hardware maintenance.
For Production Server, if you have more than two member systems, you must have one MEMORY CHANNEL hub for each interconnect.
If you have multiple network adapters for Available Server, a failure of the primary
network adapter will cause communications to fail over to another network
adapter.
You can have up to four network adapters monitored for failover
by TruCluster Available Server Software.
They are set up by the
asemgr.
See the
TruCluster Software Products
Administration
manual for more information.
Number of shared SCSI buses in each ASE and the storage on each shared bus.
You can set up only one ASE in Available Server or a Production Server hardware configuration that has two or three member systems. You can set up two or more ASEs if your Production Server configuration has four or more member systems. Multiple SCSI buses increase your storage capacity in an ASE. You can connect up to 30 shared buses in each ASE.
In addition, DEC RAID array controllers allow you to increase your storage capacity and protect against disk and controller failures. Mirroring data across shared buses by using the Logical Storage Manager (LSM) provides you with more reliable and available data.
Presence of highly available tape devices.
If you will be using highly available tape devices with either the TruCluster Available Server Software or TruCluster Production Server Software products, you must use a KZPSA PCI-to-SCSI adapter for the shared SCSI bus. The use of highly available tape devices is not supported on a shared SCSI bus with a PMAZC, KZTSA, or KZMSA SCSI controller.
TruCluster Available Server Software and TruCluster Production Server Software do not support the ML200-xx series of Prestoserve NVRAM hardware.
You cannot use Prestoserve in a TruCluster Available Server Software or TruCluster Production Server Software environment to cache I/O operations for shared SCSI disks associated with AS services (such as distributed raw disk (DRD)). Because data in the Prestoserve buffer cache of one member is not accessible to other member systems, TruCluster software cannot provide correct failover when Prestoserve is being used.
Table 4-1 describes how to maximize performance, availability, and storage capacity in your TruCluster hardware configuration. For example, if you want greater application performance without decreasing I/O performance, you can increase the number of member systems and, for Production Server, you can set up two ASEs.
| To increase: | You can: |
| Application performance | Increase the number of member systems. |
| I/O performance | Increase the number of shared buses. |
| Set up two ASEs (Production Server only). | |
| Member system availability | Increase the number of member systems. |
| Cluster interconnect availability | Use redundant cluster interconnects. |
| Disk availability | Mirror disks across shared buses. |
| Use a DEC RAID array controller. | |
| Shared storage capacity | Increase the number of shared buses. |
| Use a DEC RAID array controller. | |
| Increase disk size. |
You may be required to update the system or SCSI controller firmware during an Available Server or Production Server installation, so you may need the firmware release notes. Obtain the firmware release notes from the current Alpha Systems Firmware Update CD-ROM.
Note
To obtain the firmware release notes from the Firmware Update Utility CD-ROM, your kernel must be configured for the ISO 9660 Compact Disk File System (CDFS).
To obtain the release notes for the firmware update:
At the console prompt, or using the system startup log if the DIGITAL UNIX operating system is running, determine the drive number of the CD-ROM.
Boot the DIGITAL UNIX operating system if it is not already running.
Log in as root.
Place the Alpha Systems Firmware Update CD-ROM applicable to the DIGITAL UNIX version installed (or to be installed) into the drive.
Mount the CD-ROM as follows (/dev/rz4c
is used as an example CD-ROM drive):
# mount -rt cdfs -o noversion /dev/rz4c/mnt
Copy the appropriate release notes to your system disk. In this example, obtain the firmware release notes for the AlphaServer 4000/4100 from the Alpha Firmware Update 3.9 CD-ROM:
# cp /mnt/doc/alpha4100_v48_fw_relnote.txt as4100-rel-notes
Unmount the CD-ROM drive.
# umount /mnt
Print the release notes.
Both Available Server and Production Server member systems may be connected to a shared SCSI bus with a peripheral component interconnect (PCI) SCSI adapter. Before you install a PCI SCSI adapter into a PCI slot on a member system, ensure that the module is at the correct hardware revision. See the TruCluster Software Products Release Notes and check for the revisions supported by the TruCluster products.
Follow the steps in Table 4-2 to start the procedure for TruCluster hardware installation. For Available Server or Production Server Version 1.5, the table only includes the KZPSA PCI-to-SCSI adapter. Note that you would install only MEMORY CHANNEL for TruCluster MEMORY CHANNEL Software. For TruCluster Available Server Software, skip the first step as you do not use MEMORY CHANNEL. Also, you may save time by installing the MEMORY CHANNEL adapters, redundant network adapters (if applicable), and KZPSA SCSI adapters all at the same time.
Follow the directions in the referenced documentation, or the steps in the referenced tables for the particular PCI SCSI adapter, returning to Table 4-2 when you have completed the steps in the referenced table.
The last step of Table 4-2 directs you to the procedures for highly available tape device installation. In general, tape devices on the shared SCSI must be on the end of the shared SCSI bus. Also, highly available tape devices are only supported on a shared SCSI bus attached to a KZPSA PCI-to-SCSI adapter.
Caution
Static electricity can damage modules and electronic components. DIGITAL recommends using a gounded antistatic wrist strap and a grounded work surface when handling modules.
| Step | Action | Refer to: |
| 1 | Install the MEMORY CHANNEL module(s), cables, and hub(s) (if a hub is required). | Chapter 5 [Footnote 7] [Footnote 8] [Footnote 9] |
| 2 | Install network adapters if required to provide network failover for TruCluster Available Server Software. | |
| Install Ethernet or FDDI network adapters. | User's guide for the applicable Ethernet or FDDI adapter, and the user's guide for the applicable system | |
| Install ATM adapters if using ATM. | Section 4.7 and ATMworks 350 Adapter Installation and Service | |
| 3 | Install a PCI SCSI adapter for each shared SCSI bus in each member system. [Footnote 10] | |
| Install a KZPSA PCI-to-SCSI adapter. | KZPSA PCI-to-SCSI Storage Adapter Installation and User's Guide, Section 4.3.1, and Table 4-3 | |
| 4 | Attach a BN21W-0B Y cable to each KZPSA SCSI adapter. | |
| 5 | Install the remaining SCSI bus hardware (DWZZA(B), storage shelves, cables, and terminators). | Section 4.5 |
| Preparing a BA350 storage shelf. | Section 4.5.1 | |
| Preparing a BA353 storage shelf. | Section 4.5.2 | |
| Preparing a non-Ultra BA356 storage shelf. | Section 4.5.3 | |
| Preparing an Ultra BA356 storage shelf. | Section 4.5.4 | |
| Preparing a DEC RAID controller on a shared SCSI bus. | Section 4.5.5 | |
| 6 | Install the highly available tape device hardware and cables on the shared SCSI bus as follows: | Section 4.6 |
| TZ88 | Section 4.6.1 | |
| TZ89 | Section 4.6.2 | |
| TZ885 | Section 4.6.3 | |
|
||
The KZPSA PCI-to-SCSI bus adapter is installed in a PCI slot of the supported member system.
The KZPSA is a fast, wide differential adapter with only a single port, so only one differential shared SCSI bus can be connected to a KZPSA adapter.
The KZPSA operates at fast or slow speed and is compatible with narrow or wide SCSI. The fast speed is 10 MB/sec for a narrow SCSI bus and 20 MB/sec for a wide SCSI bus. For the TruCluster Production Server Software product, the KZPSA must be set to fast speed.
Use the steps in Table 4-3 to set up the KZPSA for an Available Server or Production Server configuration.
| Step | Action | Refer to: |
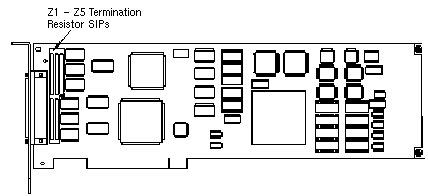
| 1 | Remove the KZPSA internal termination resistors, Z1, Z2, Z3, Z4, and Z5. | KZPSA PCI-to-SCSI Storage Adapter Installation and User's Guide and Figure 4-1 |
| 2 | Install a KZPSA PCI-to-SCSI bus adapter in the PCI slot corresponding to the logical bus to be used for the shared SCSI bus. | KZPSA PCI-to-SCSI Storage Adapter Installation and User's Guide |
| 3 | Power up the system and use the
show
console commands to display the installed devices and information
about the KZPSAs on the AlphaServer systems.
|
Section 4.3.1.2, Example 4-1, Example 4-2, Example 4-3, and Example 4-4 |
| 4 | If necessary, update the KZPSA firmware to the appropriate revision. | Firmware release notes for the system (see Section 4.2) and Section 4.3.1.3 |
| 5 | Set the KZPSA bus speed and SCSI bus ID as appropriate. | Section 4.3.1.4 |
| 6 | Use the
show
console commands, and ensure that all SCSI adpaters for a shared SCSI
bus are at different SCSI IDs by checking the SCSI ID on each member
system. |
Section 4.3.1.2 |
|
||
| 7 | Return to step 4 of Table 4-2. | |
The following sections describe how to install a KZPSA adapter in more detail.
The KZPSA internal termination is disabled by removing termination resistors Z1 through Z5, as shown in Figure 4-1.
Use the console commands to display information
about your system configuration.
For example, use the
show
config
and
show device
console commands to
display some or all the following information:
Firmware and hardware revision, SCSI ID, and bus speed for each installed SCSI bus adapter
Disk firmware revisions
Example 4-1
shows the output from the
show config
console command entered on an AlphaServer
8200 system.
>>> show config
        Name            Type    Rev    Mnemonic
TLSB
 4++    KN7CC-AB        8014    0000    kn7cc-ab0
 5+     MS7CC           5000    0000    ms7cc0
 8+     KFTIA           2020    0000    kftia0

 C0  Internal PCI connected to kftia0   pci0
 0+  QLogic ISP1020 10201077    0001    isp0
 1+  QLogic ISP1020 10201077    0001    isp1
 2+  DECchip 21040-AA  21011    0023  tulip0
 4+  QLogic ISP1020 10201077    0001    isp2
 5+  QLogic ISP1020 10201077    0001    isp3
 6+  DECchip 21040-AA  21011    0023  tulip1

 C1  PCI connected to kftia0
 0+  KZPAA             11000    0001  kzpaa0
 1+  QLogic ISP1020 10201077    0005    isp4
 2+  KZPSA             81011    0000  kzpsa0
 3+  KZPSA             81011    0000  kzpsa1
 4+  KZPSA             81011    0000  kzpsa2
 7+  DECpci MC        181011    000B     mc0

.
.
.
Example 4-2
shows the output from the
show device
console command entered on an AlphaServer
8200 system.
>>> show device
polling for units on isp0, slot0, bus0, hose0...
polling for units on isp1, slot1, bus0, hose0...
polling for units on isp2, slot4, bus0, hose0...
polling for units on isp3, slot5, bus0, hose0...
polling for units kzpaa0, slot0, bus0, hose1...
pke0.7.0.0.1      kzpaa4        SCSI Bus ID 7
dke0.0.0.0.1      DKe0                RZ28    442D
dke200.2.0.0.1    DKe200              RZ28    442D
dke400.4.0.0.1    DKe400              RRD43   0064

polling for units isp4, slot1, bus0, hose1...
dkf0.0.0.1.1      DKf0               HSZ50-AX X29Z
dkf1.0.0.1.1      DKf1               HSZ50-AX X29Z
dkf2.0.0.1.1      DKf2               HSZ50-AX X29Z

polling for units on kzpsa0, slot 2, bus 0, hose1...
kzpsa0.4.0.2.1   dke     TPwr 1 Fast 1 Bus ID 7   F01 A10
dkg100.1.0.2.1   DKg100                  RZ26N   0586
dkg200.2.0.2.1   DKg200                  RZ26    392A
dkg300.3.0.2.1   DKg300                  RZ26N   0586

.
.
.
Example 4-2 shows that the system has a KZPSA PCI-to-SCSI adapter installed, with fast SCSI bus speed enabled, a SCSI ID of 7, hardware revision level F01, and firmware revision A10 (which needs to be updated). The example also shows three disks on the SCSI bus.
The indication that TPwr equals 1 indicates that the KZPSA is providing termination power to the SCSI bus, which is the correct configuration. All SCSI bus adapters in a TruCluster configuration should be generating termination power.
Example 4-3
shows the output from the
show device
console command entered on an AlphaServer
2000.
P00 >>>show device
dka0.0.0.1.0          DKA0        RZ28              D41C
dka100.1.0.1.0        DKA100      RZ28              D41C
dka200.2.0.1.0        DKA200      RZ28              D41C
dka300.3.0.1.0        DKA300      RZ28              D41C
dka600.6.0.1.0        DKA600      RRD43             1084
dkb0.0.0.6.0          DKB0        HSZ40-Bx          V21Z
dkb100.1.0.6.0        DKB100      RZ28              D41C
dkb300.3.0.6.0        DKB300      RZ28B             0006
dva0.0.0.1000.0       DVA0        RX26
ewa0.0.0.0.0          EWA         08-00-2B-E2-7C-81
pka0.7.0.1.0          PKA0        SCSI Bus ID 7
pkb0.6.0.6.0          PKB0        SCSI Bus ID 4     F01  A10
P00>>>
Example 4-3
shows that the firmware for KZPSA
pkb
is also at revision A10 and needs to be updated.
Also, the SCSI bus speed is not shown in the
show device
output for the AlphaServer 2000.
To obtain the bus speed for
this system, use the
show pkb*
console command as shown
in
Example 4-4.
Note
We are not interested in
pkaas that is the internal SCSI bus.
show pkb* CommandP00 >>>show pkb* pkb0_fast 0 pkb0_host_id 4 pkb0_termpwr 1 P00>>>
Example 4-4
shows that the bus speed is slow
(pkb0_fast
is equal to 0).
The
pkb0_termpwr
variable being equal to 1 indicates that
the KZPSA is generating termination power to the SCSI bus (as it should
be).
You must check, and update as necessary, the system and SCSI adapter firmware. The firmware may be out of date. Read the release notes for the applicable system/SCSI adapter.
If the Standard Reference Manual console (SRM), Advanced RISC Computing
console (ARC), or KZPSA firmware is not current, as the KZPSA in the
previous examples, read the firmware release notes, then boot the Loadable
Firmware Update (LFU) utility from the Alpha Systems Firmware Update
CD-ROM.
Choose the
update
entry from the list of LFU
commands.
LFU can update all devices or any particular device you
select.
When you boot the Systems Firmware Update CD-ROM, you can
read the firmware release notes.
After booting has completed,
enter
read_rel_notes
at the
UPD>
prompt.
You can also copy and print the release notes as
shown in
Section 4.2.
To update the firmware, boot the LFU utility
from the Alpha Systems Firmware Update CD-ROM.
It is not necessary to use the
-flag
option to the
boot
command.
Insert the Alpha
Systems Firmware Update CD-ROM and boot.
For example, to boot from DKA600:
P00>>> boot dka600
The boot sequence provides firmware update overview information. Use Return to scroll the text, or Ctrl/C to skip the text.
After the overview information has been displayed, the name of the
default boot file is provided.
If it is the correct boot file, press
Return at the
Bootfile:
prompt.
Otherwise, enter the name of the file you wish to boot from.
The firmware images are copied from the CD-ROM and the LFU help message shown in the following example is displayed:
      *****Loadable Firmware Update Utility*****

-------------------------------------------------------------
Function       Description
-------------------------------------------------------------
Display        Displays the system's configuration table.
Exit           Done exit LFU (reset).
List           Lists the device, revision, firmware name and
               update revision
Readme         Lists important release information.
Update         Replaces current firmware with loadable data
               image.
Verify         Compares loadable and hardware images.
? or Help      Scrolls this function table.
The
list
command indicates, in the
device
column,
which devices it can update.
Use the
update
command to update all firmware, or
you can designate a specific device to update; for example, KZPSA
pkb0:
UPD> update pkb0
After updating the firmware and verifying this with the
verify
command, reset the system by cycling the power.
If the SCSI ID is not correct, or if it was reset to 7 by the firmware
update utility, or you need to change the KZPSA speed, use the
set
console command for most AlphaServers.
Use the LFU utility for
the AlphaServer 8200/8400s.
Select the
modify
command
(for instance
modify kzpsa2).
Set the SCSI bus ID with the
set
command as
shown in the following example:
>>> set pkn_0_host_id #
The
n
specifies the KZPSA ID, which you
obtain from the
show device
console command.
The number
sign (#) is the SCSI bus ID for the KZPSA.
Set the bus speed with the
set
command as shown
in the following example:
>>> set pkn0_fast #
The number sign (#) specifies the bus speed. Use a 0 for slow and a 1 for fast.
Example 4-5
shows how to determine the present
SCSI ID and bus speed, and then set the KZPSA SCSI ID to 6 and bus speed to
fast for
pkb0.
P00>>> show pkb0_host_id
4
P00>>> show pkb0_fast
0
P00>>> set pkb0_host_id 6
P00>>> set pkb0_fast 1
P00>>> show pkb0_host_id
6
P00>>> show pkb0_fast
1
This section describes how to set up the TruCluster Available Server Software hardware for installations that use the PMAZC, KZTSA, or KZMSA SCSI controllers.
Note
The use of a highly available tape device is not supported with PMAZC, KZTSA, or KZMSA SCSI controllers.
To begin your configuration, find the SCSI controller in the left column of Table 4-4 and refer to information shown in the right column. Read the preparatory text and follow the steps in the table to generate the specified hardware configuration.
You will install and set up the SCSI controller, and then go to a section that covers the type of storage you are using.
If you have a configuration with different types of SCSI controllers, you will have to use a different procedure for each controller.
Also, if you are using multiple types of storage, you will have to address each type individually.
| If your controller is: | Refer to: |
| PMAZC | Section 4.4.1 and Table 4-5 |
| KZTSA | Section 4.4.4 and Table 4-6 |
| KZMSA | Section 4.4.5 and Table 4-8 |
Note
If you have a TruCluster Available Server Software configuration that includes a PMAZC SCSI controller, you can have only three systems in the configuration.
Table 4-5 covers the steps necessary to configure PMAZC SCSI controllers in an Available Server configuration.
| Step | Action | Refer to: |
| 1 | For each system using a PMAZC on the shared bus, shut down the system and install the PMAZC. | Dual SCSI Module (PMAZC-AA) |
If necessary, install jumper W1 to enable
the
setld
console utility to set the PMAZC SCSI ID, bus
speed, or to update the firmware. |
Figure 4-2 | |
| 2 | Turn on the system power and set the PMAZC SCSI ID and speed as necessary. | Section 4.4.3, Example 4-6, Example 4-7, and Example 4-8 |
| 3 | If the firmware has to be updated, boot from the Alpha Systems Firmware CD-ROM. | Firmware release notes for the system (see Section 4.2) |
| 4 | Turn off the system power and remove PMAZC jumper W1. Store it on an empty jumper rest. | Figure 4-2 |
| If your shared SCSI bus will be single-ended (no DWZZAs), disable the PMAZC internal termination by removing the jumper for the appropriate port (W2 (port A) and W3 (port B)). | ||
| If the shared SCSI bus will be differential, ensure that the appropriate PMAZC termination jumpers (W2 (port A) or W3 (port B)) are installed to provide termination for one end of each single-ended SCSI bus. | ||
| 5 | Install any network adapters, if required, to provide network failover. | |
| Install the Ethernet or FDDI network adapters. | User's guide for the applicable Ethernet or FDDI adapter, and the user's guide for the applicable system | |
| 6 | Install the cables, DWZZAs, DWZZBs, trilinks (or Y cables) to create the shared SCSI bus with the storage shelves as follows: | |
| Preparing a BA350 storage unit. | Section 4.5.1 | |
| Preparing a BA353 storage unit. | Section 4.5.2 | |
| Preparing a Non-Ultra BA356 storage unit. | Section 4.5.3 | |
| Preparing an Ultra BA356 storage unit. | Section 4.5.4 | |
| Preparing a DEC RAID controller on a shared SCSI bus. | Section 4.5.5 |
Figure 4-2 shows the jumpers on a PMAZC SCSI controller.
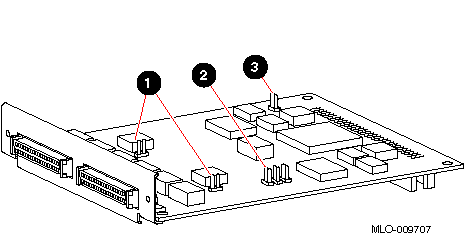
The following list explains the callouts in Figure 4-2:
W2 and W3 terminator jumpers. When installed, these jumpers provide the required termination to one end of the two SCSI buses. W2 is for port A, and is the leftmost jumper in the figure. W3 is for port B. They are shown as being removed.
Jumper rests used to store jumpers that have been removed.
W1 is the flash memory write jumper.
Do not install it
except to update the ROM code or when using the
setid
utility to change the SCSI ID or bus speed.
This section provides examples to display and change the SCSI ID or bus speed for a PMAZC or KZTSA TURBOchannel SCSI controller.
To display the SCSI ID and bus speed for a PMAZC or KZTSA SCSI ID,
shut down the system.
Use the console
show config
command to determine the PMAZC or KZTSA configurations.
Example 4-6
shows that the DEC 3000 Model 500 has
PMAZC-AA SCSI controllers in two TURBOchannel slots, TC0 and TC1, and a
KZTSA in TURBOchannel slot TC3.
>>>show config
                    DEC 3000  -  M500
              Digital Equipment Corporation
     VPP PAL X5.48-82000101/OSF PAL X1.35-82000201 -
                    Build on 20-JUL-1994 11:07:03.31
TCINFO      DEVNAM       DEVSTAT
------      --------     -------
                 CPU     OK KN15-AA  -V5.1-5748-t19D-sV;.?
                                     -DECchip 21064 P2.1
                 OSC     150 MHZ
                ASIC     OK
                 MEM     OK
8
                 CXT     OK
7
                 NVR     OK
                 SCC     OK
                  NI     OK
                ISDN     OK
6
                SCSI     OK
1-PMAZC-AA      TC1
0-PMAZC-AA      TC0
3-KZTSA-AA      TC3
To display the SCSI ID or bus speed for a specific PMAZC or KZTSA,
use the
t tc# cnfg
console command shown in
Example 4-7
and
Example 4-9.
In this command, the number sign
(#) specifies the TURBOchannel slot number.
Example 4-7
shows that the PMAZC-AAs in
TURBOchannel slot 0 and slot 1 both have SCSI IDs of 7 and are set to slow
speed.
>>> t tc0 cnfg
DEC PMAZC-AA V2.0  Port A Slow  Port B Slow (Dual SCSI [53CF96])
 BOOTDEV   ADDR   DEVTYPE   NUMBYTES   RM/FV   WP   DEVNAM   REV
 -------   ----   -------   --------   -----   --   ------   ---
..HostID.. A/7    INITR
..HostID.. B/7    INITR
>>> t tc1 cnfg
DEC PMAZC-AA V2.0  Port A Slow  Port B Slow (Dual SCSI [53CF96])
 BOOTDEV   ADDR   DEVTYPE   NUMBYTES   RM/FX   WP   DEVNAM   REV
 -------   ----   -------   --------   -----   --   ------   ---
..HostID.. A/7    INITR
 DKB000    B/0/0   DISK          1GB      FX        RZ26    T386
 DKB100    B/1/0   DISK          1GB      FX        RZ26    392A
..HostID.. B/7    INITR
To set the SCSI ID or bus speed for both PMAZC ports, use the following
t
command; for example:
>>> t tc# setid x y
The number sign (#) is the TURBOchannel
slot,
x
is the SCSI ID or speed (s = slow and f = fast)
for port A and
y
is the SCSI ID or speed for port B.
Example 4-8 shows the commands to set the SCSI ID to 6 for both ports and to set the speed to fast for the PMAZC in TURBOchannel slot 1, and to then verify the changes.
Note
If the PMAZC W1 jumper is not on, you will receive the "Put JMPR ON..." console message.
>>> t tc1 setid 6 6
Precharging
..............................................................
Erasing
..............................................................
Programming
..............................................................
Checksum GOOD
>>> t tc1 setid f f
Precharging
..............................................................
Erasing
..............................................................
Programming
..............................................................
Checksum GOOD
>>> t tc1 cnfg
DEC PMAZC-AA V2.0  Port A Fast Port B Fast (Dual SCSI [53CF96])
 BOOTDEV   ADDR   DEVTYPE   NUMBYTES   RM/FV  WP   DEVNAM   REV
 -------   ----   -------   --------   -----  --   ------   ---
..HostID.. A/6    INITR
..HostID.. B/6    INITR
Example 4-9 shows how to display the SCSI ID for the KZTSA in TURBOchannel slot TC3 (from Example 4-6). Note that the KZTSA only has one port.
>>> t tc3 cnfg
DEC KZTSA-AA A09           (SCSI = 7, Slow)

--------------------------------------------------
DEV      PID             VID      REV     SCSI DEV
======= ================ ======== ======= ========
dka0000 HSZ40-Bx (C) DEC DEC      V21Z    DIR
dka0100 RZ28     (C) DEC DEC      442D    DIR
dka0300 RZ28B    (C) DEC DEC      0006    DIR
>>>
Set the KZTSA SCSI ID or bus speed as you did with a PMAZC. Note however, that the KZTSA has only one port. Example 4-10 shows how to set the SCSI ID to 5 and set the bus speed to fast for the KZTSA in TURBOchannel slot 1.
Note in
Example 4-10, that after you change
the KZTSA SCSI ID, you must reset the SCSI bus (init) to
effect the ID change.
A SCSI bus reset is not needed to change the speed.
>>> t tc3 setid 5
>>> t tc3 setid f
>>> t tc3 cnfg
DEC KZTSA-AA A09           (SCSI = 7, Fast)

--------------------------------------------------
DEV      PID             VID      REV     SCSI DEV
======= ================ ======== ======= ========
dka0000 HSZ40-Bx (C) DEC DEC      V21Z    DIR
dka0100 RZ28     (C) DEC DEC      D41C    DIR
dka0300 RZ28B    (C) DEC DEC      0006    DIR
>>> init
>>> t tc3 cnfg
DEC KZTSA-AA A09           (SCSI = 5, Fast)

--------------------------------------------------
DEV      PID             VID      REV     SCSI DEV
======= ================ ======== ======= ========
dka0000 HSZ40-Bx (C) DEC DEC      V21Z    DIR
dka0100 RZ28     (C) DEC DEC      D41C    DIR
dka0300 RZ28B    (C) DEC DEC      0006    DIR
>>>
This section is specific to a Available Server configuration using KZTSA TURBOchannel-to-SCSI adapters. The KZTSA is a differential single-channel SCSI adapter. Using a KZTSA in a DEC 3000 system simplifies hardware configuration and reduces the total number of required DWZZAs. When used with a DEC RAID subsystem, you do not have to use a DWZZA in the Available Server configuration.
Use Table 4-6 to set up a Available Server configuration using KZTSA TURBOchannel-to-SCSI adapters.
| Step | Action | Refer to: |
| 1 | For each DEC 3000 system that will have a KZTSA on the shared SCSI bus, shut down the system and install the KZTSA. | KZTSA SCSI Storage Adapter Installation and User's Guide |
| Disable the KZTSA internal SCSI termination by removing the J1, J2, J3, J6, and J7 terminator packs. | Figure 4-3 | |
| 2 | Install any network adapters, if required, to provide network failover. | |
| Install the Ethernet or FDDI network adapters. | User's guide for the applicable Ethernet or FDDI adapter, and the user's guide for the applicable system | |
| 3 | The default SCSI ID for a KZTSA is 7. Turn on the system power and set the KZTSA SCSI ID if necessary. | Example 4-6, Example 4-9, and Example 4-10 |
| 4 | If the firmware has to be updated, boot from the Alpha Systems Firmware Update CD-ROM and update the firmware. | Firmware release notes (see Section 4.2) |
| 5 | Install a BN21W-0B Y cable or H885-AA trilink connector on the external SCSI connector of each KZTSA. | |
| 6 | Install the cables, DWZZAs, DWZZBs, trilinks (or Y cables) to create the shared SCSI bus with the storage shelves as follows: | |
| Preparing a BA350 storage unit. | Section 4.5.1 | |
| Preparing a BA353 storage unit. | Section 4.5.2 | |
| Preparing a Non-Ultra BA356 storage unit. | Section 4.5.3 | |
| Preparing an Ultra BA356 storage unit. | Section 4.5.4 | |
| Preparing a DEC RAID controller on a shared SCSI bus. | Section 4.5.5 |
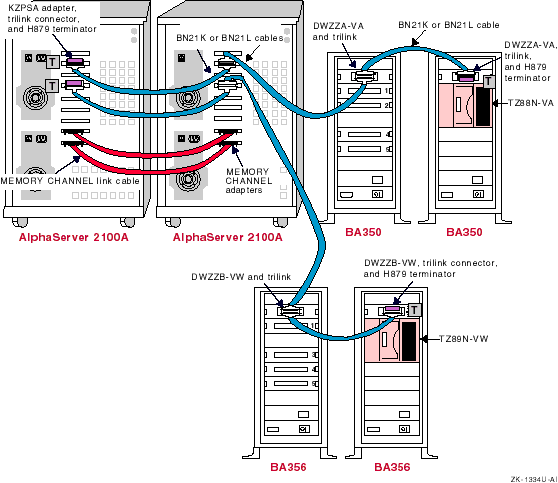
Figure 6-5 shows a configuration that is similar to a configuration with two DEC 3000/500 systems using KZTSA TURBOchannel SCSI adapters. Replace the AlphaServers with two DEC 3000/500 systems with installed KZPSAs and connect the trilinks to the KZTSAs. All cabling is the same.
Figure 6-6 shows an Available Server configuration with two AlphaServer 2100 systems with KZPSA PCI SCSI adapters on a shared bus with a BA350 storage shelf. The only difference for a DEC 3000/500 with a KZTSA TURBOchannel SCSI adapter is to swap the AlphaServer 2100 systems for the DEC 3000 systems and connect the trilink connectors to the KZTSAs.
The KZTSA jumpers and LEDs are shown in Figure 4-3.
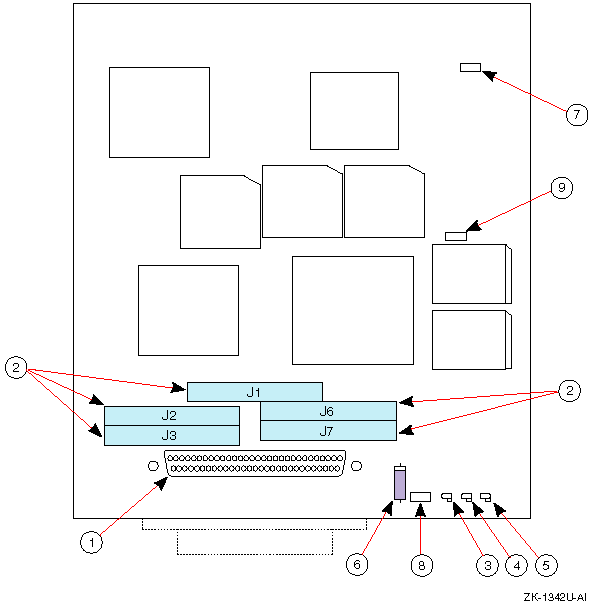
The following list describes the callouts in Figure 4-3:
Internal SCSI bus P-connector
Near-end SCSI bus terminator packs
Yellow LED--Power-on self-test passed
Red LED--Power-on self-test failed
Green LED--SCSI bus terminator power is functional
Jumper W1--Installed: Inline fuse that protects the onboard SCSI bus terminator power supply
Jumper W2--Not installed: Manufacturing use only
Jumper W3--Installed: Enables terminator power onto the SCSI bus
Jumper W4--Not installed: Manufacturing use only
The KZMSA is an XMI-to-SCSI adapter used in DEC 7000 or DEC 10000 systems. It is a dual channel, single-ended SCSI controller. You cannot remove the KZMSA internal termination. It must be used with a DWZZA-AA signal converter to provide the proper SCSI bus termination, and to allow a KZMSA and its associated system to be isolated for maintenance purposes. When using a KZMSA for a shared SCSI bus in an Available Server configuration, make sure that you are connecting the bus to the same KZMSA channel as on other KZMSA or PMAZC SCSI controllers.
Each KZMSA used for a shared SCSI bus in an Available Server configuration must have the revision F03 boot ROM. If necessary, a revision F01 or F02 boot ROM must be replaced with a revision F03 boot ROM. Table 4-7 shows the part numbers for the various revisions of KZMSA boot ROMs.
| Part Number | Revision |
| 23-368E9-01 | F01 |
| 23-386E9-01 | F02 |
| 23-419E9-01 | F03 |
You can determine the KZMSA hardware revision by booting the LFU utility and using the console commands, or by examining the 23-class part number printed on the boot ROM located at module position E7. The LFU utility is covered in Section 4.4.6.
You can only use KZMSAs with Revision D NCR 53C710 chips in an Available Server configuration. The chip must have part numbers 609-3400546 or 609-3400563.
Follow the steps in Table 4-8 to set up an Available Server configuration using KZMSA XMI-to-SCSI adapters.
Note
You can have only three systems in an Available Server configuration that include a KZMSA XMI-to-SCSI adapter.
| Step | Action | Refer to: |
| 1 | For each DEC 7000 or DEC 10000 system using a KZMSA on the shared bus, shut down the system and install the KZMSA in an XMI slot. | KZMSA Adapter Installation Guide |
| 2 | Install the Ethernet or FDDI network adapters, as required, to provide network failover. | User's guide for the applicable Ethernet or FDDI adapter and the user's guide for the applicable system |
| 3 | Boot the Loadable Firmware Update (LFU) utility to configure the KZMSA hardware. | Firmware release notes for the system (see Section 4.2), Section 4.4.6, and Example 4-11 |
| Update the KZMSA firmware if necessary. | Example 4-12 and Example 4-13 | |
| Set the SCSI IDs for the KZMSA. | Example 4-12 and Example 4-14 | |
Enable the
Disable Reset
configuration option for any KZMSA channel that will be used for a shared
SCSI bus, and disable the option for any channel not used on a shared SCSI
bus. |
Example 4-12 and Example 4-14 | |
| Enable (disable) fast SCSI speed for the KZMSA. | Example 4-12 and Example 4-14 | |
| 4 | Because the KZMSA internal termination cannot be removed, you will need a DWZZA-AA for each KZMSA XMI-to-SCSI adapter in the Available Server configuration. | |
| For the DWZZA-AA to be connected to the KZMSA, ensure that the single-ended SCSI jumper, J2, is installed and remove the five differential terminator resistor SIPs. | ||
| 5 | For each KZMSA used in the Available Server configuration, install a BN21R or BN23G cable between the KZMSA connector for the appropriate channel and the DWZZA-AA single-ended connector. | |
| 6 | Install the cables, DWZZAs, DWZZBs, trilinks (or Y cables) to create the shared SCSI bus with the storage shelves as follows: | |
| Preparing a BA350 storage unit. | Section 4.5.1 | |
| Preparing a BA353 storage unit. | Section 4.5.2 | |
| Preparing a Non-Ultra BA356 storage unit. | Section 4.5.3 | |
| Preparing an Ultra BA356 storage unit. | Section 4.5.4 | |
| Preparing a DEC RAID controller on a shared SCSI bus. | Section 4.5.5 |
Figure 6-4 shows an Available Server configuration with a DEC 7000 system with a KZMSA XMI-to-SCSI adapter on a shared bus with a DEC 3000/500 with PMAZC TURBOchannel SCSI controller and a BA350 storage shelf.
Figure 6-7 shows an Available Server with two DEC 7000 systems with KZMSA XMI SCSI adapters on a shared bus with an HSZ40 unit.
If you are using a DEC 7000 or DEC 10000 system with a KZMSA in an Available Server
configuration, you may have to update the KZMSA firmware, change the SCSI
ID or bus speed, or enable or disable the
Disable Reset
option.
For the DEC 7000 and DEC 10000 systems, use the Loadable Firmware Update (LFU) utility to perform these hardware tasks. Shut down the system then load the LFU, as shown in Example 4-11.
>>> show device kzmsa0    [1]
polling for units on kzmsa0, slot2, xmi0...
dka100.1.0.2.0 dka100 RRD42
>>> boot -flag 0,80 DKA100    [2]
>>> kzmsa_lfu.exe    [3]
Booting...

****** Loadable Firmware Update Utility ******

--------------------------------------------------------------
Function    Description
--------------------------------------------------------------

Display     Displays the system's configuration table.
Exit        Returns to loadable offline operating environment.
List        Lists the device types and firmware revisions
            supported by this revision of LFU.
Modify      Modifies port parameters and device attributes.
Show        Displays device mnemonic, hardware and firmware
            revisions.
Update      Replaces current firmware with loadable data image.
Verify      Compares loadable and device images.
? or Help   Scrolls the function table.
--------------------------------------------------------------

Function?     [4]
The following list describers the callouts in Example 4-11:
At the console prompt, use the
show device kzmsa0
command to determine the name of the RRD42 drive.
Load the CD-ROM into an RRD42 caddy and insert the caddy into the RRD42
drive.
The CD-ROM that includes both the LFU utility and the KZMSA revision
5.6 firmware has the label
Alpha Systems Firmware Update 4.0.
[Return to example]
Boot the LFU utility. [Return to example]
When prompted, specify the name of the
secondary bootstrap file,
kzmsa_lfu.exe.
[Return to example]
At the LFU
Function?
prompt, enter the command for the task you want to perform.
[Return to example]
You can display information about the hardware configuration with
the LFU utility using the
display
command, as shown in
Example 4-12.
Function? display    [1]
    Name      Type     Rev      Mnemonic FW Rev   HW Rev
LSB
0+  KN7AA     (8001)   0000     kn7aa0   1.0      E04
5+  MS7AA     (4000)   0000     ms7aa0   N/A      A01
7+  MS7AA     (4000)   0000     ms7aa1   N/A      A01
8+  IOP       (2000)   0001     iop0     N/A      A

C0 XMI                xmi0
8+  DWLMA     (102A)   A5A6     dwlma0   N/A      A
B+  KZMSA     (0C36)   5143     kzmsa0   4.3      F01    [2]
C+  KZMSA     (0C36)   5143     kzmsa1   4.3      F01    [2]
E+  DEMNA     (0C03)   060B     demna0   6.8

C1 XMI
1+  KZMSA     (0C36)   5343     kzmsa2   4.3      F03    [3]
2+  KZMSA     (0C36)   5343     kzmsa3   4.3      F03    [3]
8+  DWLMA     (102A)   A5A6     dwlma1   N/A      A
Function?
The following list describes the callouts in Example 4-12:
Enter the
display
command to display the configuration.
[Return to example]
KZMSA0
and
KZMSA1
have the revision 4.3 firmware and the revision F01 hardware.
[Return to example]
KZMSA2
and
KZMSA3
have the revision 4.3 firmware and the revision F03 hardware.
[Return to example]
If the KZMSA firmware is not up to the correct revision, use the LFU
utility
update
command to update it.
Note that the CD-ROM
containing the firmware must be installed in the RRD42.
The
update
command has the following format:
update kzmsa #
The number sign (#) indicates the number of the KZMSA, which is to have the firmware updated.
Example 4-13
shows how to update the
firmware for
KZMSA2
to Version 5.6.
Function? update kzmsa2    [1]

Update kzmsa2? [Y/(N)] [Return]

WARNING: updates may take several minutes to
         complete for each device.

DO NOT ABORT!
kzmsa2 Updating to 5.6... Reading Device...
       Verifying 5.6... PASSED.

Function?  display    [2]
    Name      Type     Rev      Mnemonic FW Rev   HW Rev
LSB
0+  KN7AA     (8001)   0000     kn7aa0   1.0      E04
5+  MS7AA     (4000)   0000     ms7aa0   N/A      A01
7+  MS7AA     (4000)   0000     ms7aa1   N/A      A01
8+  IOP       (2000)   0001     iop0     N/A      A

C0 XMI                xmi0
8+  DWLMA     (102A)   A5A6     dwlma0   N/A      A
B+  KZMSA     (0C36)   5143     kzmsa0[3] 4.3     F01
C+  KZMSA     (0C36)   5143     kzmsa1[3] 4.3     F01
E+  DEMNA     (0C03)   060B     demna0   6.8

C1 XMI
1+  KZMSA     (0C36)   5356     kzmsa2[4] 5.6     F03
2+  KZMSA     (0C36)   5343     kzmsa3[5] 4.3     F03
8+  DWLMA     (102A)   A5A6     dwlma1   N/A     A
Function?
The following list describes the callouts in Example 4-13:
Update the firmware for
kzmsa2.
[Return to example]
Display the configuration to verify that the firmware has been updated. [Return to example]
kzmsa0
and
kzmsa1
are still at firmware revision 4.3.
[Return to example]
kzmsa2
is
now at firmware revision 5.6.
[Return to example]
kzmsa3
is still
at firmware revision 4.3.
[Return to example]
Use the LFU utility
modify kzmsa
#
command to display detailed information about a specific KZMSA and to:
Change the SCSI ID
Enable or disable the fast SCSI option for a particular channel
Enable or disable the
Disable Reset
option
Example 4-14
shows how to use the LFU utility
modify
command to display detailed information, set the
SCSI ID,
enable fast SCSI bus speed, and enable the
Disable Reset
option for
kzmsa2.
Function?  modify kzmsa2    [1]
kzmsa2
Local Console: ENABLED
Log Selftest Errors: ENABLED
Log NRC 53C710 RBD Errors: ENABLED
Log XMI RBD Errors: ENABLED
Log XZA RBD Errors: ENABLED
RBD Error Logging: DISABLED
RBD Error Frame Overflow: DISABLED Read Only
Hard Error Frame Overflow: DISABLED Read Only
Soft Error Frame Overflow: DISABLED Read Only
FW Update Error Frame Overflow: DISABLED Read Only
Disable Reset Channel 0: DISABLED  [2]
Disable Reset Channel 1: DISABLED  [2]
Chnl 0 Fast SCSI: DISABLED  [3]
Chnl 1 Fast SCSI: DISABLED  [3]
Channel_0 ID: 07  [4]
Channel_1 ID: 07  [4]
Module Serial Numbers: *SG90XXX455*
Do you wish to modify any of these parameters? [y/(n)] [Return]
Local Console: ENABLED Change? [y/(n)] [Return]
Log Selftest Errors: ENABLED Change? [y/(n)] [Return]

.
.
.
Disable Reset Channel 0: DISABLED Change? [y/(n)] y    [5]
Disable Reset Channel 1: DISABLED Change? [y/(n)] y    [5]
Chnl 0 Fast SCSI: DISABLED Change? [y/(n)] y    [6]
Chnl 1 Fast SCSI: DISABLED Change? [y/(n)] y    [6]
Channel_0 ID: 07 Change? [y/(n)] y    [7]
Valid ID is a value from 0 to 7.
Enter new Channel ID: 6    [7]
Channel_1 ID: 07 Change? [y/(n)] y [7]
Valid ID is a value from 0 to 7.
Enter new Channel ID: 6    [7]
Module Serial Numbers: *SG90XXX455* Change? [y/(n)] n
Local Console: ENABLED
Log Selftest Errors: ENABLED

.
.
.
Log NRC 53C710 RBD Errors: ENABLED
Log XMI RBD Errors: ENABLED
Log XZA RBD Errors: ENABLED
RBD Error Logging: DISABLED
RBD Error Frame Overflow: DISABLED Read Only
Hard Error Frame Overflow: DISABLED Read Only
Soft Error Frame Overflow: DISABLED Read Only
FW Update Error Frame Overflow: DISABLED Read Only
Disable Reset Channel 0: ENABLED [8]
Disable Reset Channel 1: ENABLED [8]
Chnl 0 Fast SCSI: ENABLED  [9]
Chnl 1 Fast SCSI: ENABLED  [9]
Channel_0 ID: 06 [10]
Channel_1 ID: 06 [10]
Module Serial Numbers: *SG909T1455*
Modify kzmsa2 with these parameter values? [y/(n)]  y    [11]
Function?  exit
The following list describes the callouts in Example 4-14:
Execute the LFU
modify
command to modify the options for
kzmsa2.
The present options are displayed first.
[Return to example]
The
Disable
Reset
option for both channels is disabled.
[Return to example]
The fast SCSI option is disabled for both channels. [Return to example]
The ID for both channels is 7. [Return to example]
Enable the
Disable
Reset
option for channels 0 and 1.
[Return to example]
Enable the
Fast
SCSI
option for channels 0 and 1.
[Return to example]
Change the SCSI ID for channels 0 and 1 to 6. [Return to example]
The LFU utility is set up to enable
the
Disable Reset
option.
[Return to example]
The LFU utility is set up to enable
the
Fast SCSI
option.
[Return to example]
The LFU utility is set up to set the SCSI ID for both channels to 6. [Return to example]
Entering
y
causes the options to be changed to the requested values.
[Return to example]
An ASE provides you with high data availability through service failover, disk mirroring, and fast file system recovery. TruCluster supports both the Logical Storage Manager (LSM) and RAID technology. You must determine the storage configuration that will meet your needs. Mirroring disks across two shared buses provides the most highly available data.
Chapter 2
describes the supported
storage shelves, disk devices, and controllers for DEC RAID subsystems.
See the TruCluster Software Products
Release Notes
to determine the latest
revisions of hardware and firmware.
To determine if your disk has the
correct firmware, use console commands or the
scu
utility, or examine the messages that are displayed
when you turn on the system.
Disk devices used on the shared bus must be located in a supported storage shelf. Before you connect a storage shelf to a shared SCSI bus, you must install the disks in the unit. For detailed information about installation and configuration, see your storage shelf (or DEC RAID subsystem) documentation.
The following sections describe how to prepare storage shelves for a shared SCSI bus.
A BA350 storage shelf provides access to SCSI devices through an 8-bit, single-ended, and narrow SCSI-2 interface. It can be used with single-ended devices to form a single-ended shared SCSI bus or it can be used with a DWZZA and connected to a differential shared SCSI bus.
The BA350 storage shelf is a single-ended, narrow device, and may be connected to one of the following single-ended, narrow devices:
PMAZC TURBOChannel SCSI controller
KZMSA XMI-to-SCSI adapter
BA350 or BA353 storage shelf
Single-ended end of a DWZZA
To connect a BA350 storage shelf directly to another single-ended, narrow device, see Figure 6-2 and follow these steps:
If the BA350 storage shelf is at the end of the single-ended bus, ensure that the BA350 SCSI terminator jumper (see Figure 2-1) is installed. If the BA350 storage shelf is in the middle of the single-ended bus, remove the BA350 internal termination.
Connect the BA350 to a single-ended, narrow device with a BN21R or BN23G cable. One cable will be connected to the BA350 (JA1) if it is on the end of the bus, two if it is in the middle of the bus.
Note
The adapter(s) not on the end of the shared SCSI bus must have their internal termination removed.
If the BA350 is connected directly to a single-ended device without the use of Y cables, the SCSI bus adapter termination is used to terminate the shared SCSI bus. Devices will not be able to be removed from the shared bus for maintenance purposes.
Install the disks in the BA350 storage shelf.
Figure 6-2 shows a sample Available Server configuration with two systems and a BA350 on a single-ended shared SCSI bus. Figure 6-3 shows an Available Server configuration with two BA350 storage shelves.
To prepare a BA350 storage shelf for connection to a differential shared SCSI bus, follow these steps:
Ensure that the BA350 storage shelf's internal termination and jumper is installed (see Figure 2-1).
Obtain the SCSI signal converter that you want to use, either a DWZZA-AA or a DWZZA-VA.
Ensure that the DWZZA single-ended termination jumper, J2, is installed. Remove the termination from the differential end by removing the five 14-pin differential terminator resistor SIPs.
Attach a trilink connector to the differential side of the DWZZA-AA or DWZZA-VA signal converter.
Attach the SCSI signal converter to the BA350 storage shelf as follows:
If you are using a DWZZA-VA signal converter, install it in slot 0 (see Figure 4-4).
If you are using a DWZZA-AA signal converter, use a BN21R or BN23G cable to connect the BA350 shelf's input connector, JA1, to the single-ended side of the DWZZA-AA. This connection forms a single-ended bus segment that must be terminated at both ends and must adhere to SCSI bus length restrictions. See Table 3-1 for the bus length restrictions.
Connect the trilink connector or Y cable to another trilink connector or Y cable with BN21K or BN21L cables, forming the differential shared SCSI bus segment.
If the BA350 is on the end of the shared SCSI bus, terminate the bus by installing an H879-AA on one side of the trilink connector or Y cable.
Install the disks in the BA350 storage shelf. The SCSI IDs for disks in a BA350 storage shelf correspond to their slot location.
Figure 4-4 shows a BA350 storage shelf with a DWZZA-VA signal converter installed in disk slot 0. A trilink connector is attached to the signal converter.
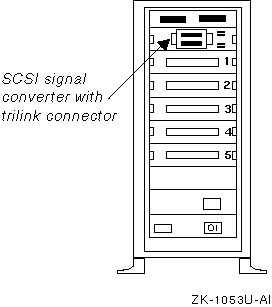
Figure 6-4 shows a configuration with a DEC 3000/500 with PMAZC TURBOchannel SCSI controller and a DEC 7000 in a differential Available Server configuration with a BA350 storage shelf.
Figure 6-6 shows an Available Server configuration with two systems and a BA350 with installed DWZZA-VA.
A BA353 storage shelf provides access to SCSI devices through an 8-bit, single-ended, narrow SCSI-2 interface. You can use it to house disks for use on a single-ended shared SCSI bus. With a DWZZA, it may be used along with a differential shared SCSI bus. The BA353 has limited use as it has only three slots, one of which may contain a DWZZA-VA.
The BA353 storage shelf is a single-ended, narrow device, so may be connected directly to one of the following single-ended, narrow devices:
PMAZC TURBOChannel adapter
KZMSA XMI-to-SCSI controller
BA350 or BA353 storage shelf
To connect a BA353 storage shelf in a configuration with a single-ended, narrow shared SCSI bus, follow these steps:
If the BA353 storage shelf is at the end of the shared bus, leave the SCSI output connector open to terminate the bus (see Figure 2-2).
Use a BN21R or BN23G cable to connect the BA353 storage shelf input connector to a single-ended, narrow device.
Install disks in the BA353, ensuring that each disk has a unique SCSI ID on the shared bus. The SCSI IDs for disks in a BA353 storage shelf are set by the device address switches on the rear of the shelf (see Figure 2-2).
Note
The adapter(s) not on the end of the shared SCSI bus must have their internal termination removed.
If the BA353 is connected directly to a single-ended device without the use of Y cables (and external termination), the SCSI bus adapter termination is used to terminate the shared SCSI bus. You will not be able to be disconnect devices from the shared bus for maintenance purposes.
The configuration shown in Figure 6-2 is similar to a single-ended shared SCSI bus using a BA353, just picture a BA353 instead of a BA350.
You must use a DWZZA-AA or DWZZA-VA to connect a BA353 storage shelf to a differential SCSI bus segment.
To prepare a BA353 storage shelf for connection to a differential shared SCSI bus, follow these steps:
Obtain a DWZZA-AA or a DWZZA-VA SCSI signal converter.
If you will use a DWZZA-VA:
Remove the DWZZA-VA differential termination by removing the five 14-pin differential terminator resistor SIPs. Remove the termination from the single-ended side by removing jumper J2.
Install the DWZZA-VA signal converter in any disk slot in the BA353 storage shelf.
Terminate the BA353 SCSI input connector using a 50-pin, high-density, single-ended terminator (12-37004-04).
If you are using a DWZZA-AA signal converter:
Ensure that jumper J2 is installed in the DWZZA-AA signal converter to enable the single-ended termination. Remove the differential termination by removing the five 14-pin differential terminator resistor SIPs.
Connect the DWZZA-AA single-ended side to the BA353 input connector with a BN21R or BN23G cable. This connection forms a single-ended bus segment that is terminated at one end by the DWZZA single-ended termination and on the other end by the BA353 output termination. The single-ended bus must adhere to SCSI bus length restrictions. See Table 3-1 for the length restrictions.
Ensure that the BA353 storage shelf's SCSI output connector is open. If two BA353's are daisy chained, ensure that the output connector on the last storage shelf is open.
Install disks in the BA353, ensuring that each disk has a unique SCSI ID on the shared bus. The SCSI IDs for disks in a BA353 storage shelf are set by the device address switches on the rear of the shelf (see Figure 2-2).
Attach a trilink connector or Y cable to the differential side of the DWZZA-AA or DWZZA-VA signal converter.
Connect the differential devices (using trilink connectors or Y cables) together with BN21K or BN21L cables to form the differential bus.
Attach H879-AA terminators to the trilink connectors or Y cables at the end of the differential bus.
A non-Ultra BA356 storage shelf provides access to SCSI devices through a 16-bit, single-ended, wide SCSI-2 interface. In a cluster configuration, you would not connect a non-Ultra BA356 directly to any single-ended device other than another non-Ultra BA356 or the single-ended side of a DWZZB.
To prepare a non-Ultra BA356 storage shelf for a differential shared SCSI bus configuration, follow these steps:
Ensure that the BA356 storage shelf's internal termination is enabled. (It is enabled as long as there is not a cable attached to the JB1 connector on the personality module.)
Install the disks in the shelf. Ensure that the switches on the personality module are all set off to allow the slot position to determine the SCSI bus ID. If you are daisy chaining two BA356 storage shelves, switches 1, 2, and 3 must be set to on in the second BA356. See the BA356 User's Guide for information about disk device addresses in BA356 configurations. Note that only eight devices are supported on a shared SCSI bus.
Obtain the SCSI signal converter that you want to use, either a DWZZB-AA or a DWZZB-VW.
Ensure that the DWZZB W1 and W2 jumpers are installed to enable the single-ended termination at one end of the bus. The other end of the BA356 single-ended SCSI bus is terminated on the personality module.
Remove the termination from the differential side of the DWZZB by removing the five 14-pin differential terminator resistor SIPs. The differential SCSI bus will be terminated external to the DWZZB.
If you are using a DWZZB-VW signal converter, install it in slot 0.
If you are using a DWZZB-AA signal converter, connect the single-ended side of the DWZZB-AA to the BA356 input connector, JA1, on the personality module with a BN21K or BN21L cable. Connector JA1 is on the left side of the personality module as you face the front of the BA356, and is hidden from normal view. This connection forms a single-ended bus segment that is terminated by the DWZZB single-ended termination and the BA356 termination on the personality module. The single-ended bus must adhere to SCSI bus length restrictions, including the length of the SCSI bus internal to the BA356. See Table 3-1 for the length restrictions.
Attach an H885 trilink connector or BN21W-0B Y cable to the differential side of the DWZZB-AA or DWZZB-VW signal converter.
Connect all trilink connectors or Y cables that will be used to form the differential shared SCSI bus to each other with BN21K or BN21L cables.
Attach an H879-AA to the two trilink connectors or Y cables on the end of the bus.
The configuration shown in Figure 6-6 is very similar to a configuration using a BA356 storage enclosure. Just visualize replacing the BA350 with a BA356, and replacing the DWZZA-VA with a DWZZB-VW.
An Ultra BA356 storage shelf is connected to a shared wide UltraSCSI bus, and provides access to UltraSCSI devices on the internal, single-ended wide UltraSCSI bus. The interface between the buses is the DS-BA35X-DA personality module, which is installed in the Ultra BA356.
To prepare an Ultra BA356 storage shelf for a differential shared SCSI bus configuration, follow these steps:
Disable the Ultra BA356 differential termination. Ensure that personality module (DS-BA35X-DA) switch pack 4 switches S4-1 and S4-2 are off (see Figure 3-3).
Note
S4-3 and S4-4 are not used on the DS-BA35X-DA.
Enable the device position in the Ultra BA356 to determine the SCSI ID. Ensure that all personality module switch pack 3 switches are off (see Figure 3-3).
Ensure that the BA35X-MJ jumper module is installed behind slot 6 (see Section 2.7.3.2 and Figure 2-3).
Install an H8861-AA VHDCI trilink on personality module connector JA1.
Cable and terminate the UltraSCSI bus as follows:
The Ultra BA356 is at the end of the shared SCSI bus:
Install an H8863-AA terminator on one side of the H8861-AA trilink.
Install a BN38C cable (an HD68 to a VHDCI) between the closest BN21W-0B Y cable and the H8861-AA trilink.
Connect two BN21W-0B Y cables from different systems with a BN21K or BN21L cable.
Terminate the other end of the shared SCSI bus by installing an H879-AA terminator on the BN21W-0B with an open connector.
The Ultra BA356 is in the middle of the shared SCSI bus:
Install BN38C cables (an HD68 to a VHDCI) between the H8861-AA trilink and adjacent BN21W-0B Y cables.
Connect the adjacent BN21W-0B Y cables with a BN21K or BN21L cable.
Terminate both ends of the shared SCSI bus by installing an H879-AA terminator on the open connector on the BN21W-0B Y cables at both ends of the bus.
A DEC RAID array controller provides high performance, high availability, and high connectivity access to SCSI devices through the shared SCSI buses.
Before you connect a DEC RAID controller to a shared SCSI bus, you must install and configure the disks that the controller will use, and ensure that the controller has a unique SCSI ID on the shared bus. For information about setting up a DEC RAID subsystem, see the following documentation as appropriate for your configuration:
DEC RAID Subsystem User's Guide
HS Family of Array Controllers User's Guide
RAID Array 310 Configuration and Maintenance Guide User's Guide
Configuring Your StorageWorks Subsystem HSZ40 Array Controllers HSOF Version 3.0
Working in DIGITAL UNIX Systems DIGITAL StorageWorks HSZ50 Array Controller HSOF 5.01 Configuration Manual
HSZ70 Array Controller HSOF Version 7.0 Configuration Manual
The HSZ10 controller uses only one SCSI ID and can be used in an ASE that uses only PMAZC TURBOChannel SCSI controllers. You can configure the HSZ20, HSZ40, and HSZ50 DEC RAID array controllers with one to four SCSI IDs. You can configure the HSZ70 DEC RAID array controller with one to seven SCSI IDs.
Because the HSZ10, HSZ20, HSZ40, and HSZ50 have a wide differential connection on the host side, you connect them to one of the following differential devices:
KZPSA or KZTSA adapter
Another HSZ10, HSZ20, HSZ40, or HSZ50
Differential side of a DWZZA or DWZZB SCSI signal converter (which can be connected to a KZMSA or PMAZC single-ended SCSI controller)
The HSZ70 is an UltraSCSI device, so it must be connected using Very High Density Cable Interconnect (VHDCI) components. You can use an HSZ70 on a shared SCSI bus with a KZPSA host adapter.
To connect an HSZ10, HSZ40, or HSZ50 controller to a shared SCSI bus, follow these steps:
Attach an H885 trilink connector to the DEC RAID controller port.
Use a BN21K or BN21L cable to connect the trilink connector to a BN21W-0B Y cable attached to a differential SCSI controller or the differential end of a signal converter.
Terminate the differential bus by attaching an H879-AA terminator to the H885 trilink connector or BN21W-0B Y cables at the end of the bus.
Ensure that all devices that make up the shared SCSI bus are connected, and that there is a terminator at each end of the shared SCSI bus.
Figure 6-7 shows two DEC 7000 systems with KZMSA XMI-to-SCSI adapters on a shared bus with an HSZ40.
To connect an HSZ70 DEC RAID controller to a shared UltraSCSI bus, follow these steps:
Attach an H8861-AA VHDCI trilink connector to each HSZ70 controller port.
Conect a BN37A cable between the H8861-AA trilinks on the HSZ70 controller ports.
Cable and terminate the Ultra SCSI bus as follows:
The HSZ70 is on the end of the shared SCSI bus:
Attach an H8863-AA terminator to the open connector of the H8861-AA trilink at the end of the shared SCSI bus.
Connect the closest BN21W-0B Y cable to the open connector on the H8861-AA trilink with a BN38C (HD68 to VHDCI) cable. If there is only one HSZ70 controller, the H8861-AA trilink also has an H8863-AA terminator.
Connect all pairs of BN21W-0B Y cables from different systems with BN21K or BN21L cables.
Terminate the other end of the shared SCSI bus by attaching an H879-AA terminator to the BN21W-0B Y cable with an open connector.
If the HSZ70 is in the middle of the shared SCSI bus:
Install a BN38C (HD68 to VHDCI) cable between the H8861-AA trilink open connectors and a BN21W-0B Y cable.
If there are more than two systems, connect the BN21W-0B Y cables to each other with BN21K or BN21L cables.
Attach H879-AA terminators to the open connectors of the BN21W-0B Y cables on each end of the shared SCSI bus.
Figure 6-8 shows two AlphaServer 8200 systems in an Available Server configuration with two HSZ70 DEC RAID controllers. Note that the SCSI bus adapters are KZPSA PCI-to-SCSI adapters. In this figure, the HSZ70s are on the end of the shared SCSI bus.
Figure 6-9 shows a figure similar to Figure 6-8 with two AlphaServer 8200 systems in an Available Server configuration with two HSZ70 DEC RAID controllers. As with Figure 6-8, the SCSI bus adapters are KZPSA PCI-to-SCSI adapters. In this figure, the HSZ70s are in the middle of the shared SCSI bus so the cables required are different.
To connect a SWXRA-Z1 (HSZ20 controller) to a shared SCSI bus, follow these steps:
Referring to the RAID Array 310 Deskside Subsystem (SWXRA-ZX) Hardware User's Guide, open the SWXRA-Z1 cabinet, locate the SCSI bus converter board, and:
Remove the five differential terminator resistor SIPs.
Ensure that the W1 and W2 jumpers are installed to enable the single-ended termination on one end of the bus.
Note
The RAID Array 310 SCSI bus converter board is the same logic board used in the DWZZB signal converter.
Attach an H885 trilink connector to the SCSI input connector (on the back of the cabinet).
Use a BN21K or BN21L cable to connect the trilink connector to a trilink connector or BN21W-0B Y cable attached to a differential SCSI controller, another storage shelf, or the differential end of a signal converter.
Terminate the differential bus by attaching an H879-AA terminator to the H885 trilink connector or BN21W-0B Y cable at each end of the shared SCSI bus.
Ensure that all devices that make up the shared SCSI bus are connected, and that there is a terminator at each end of the shared SCSI bus.
The topics in this section provide information on preparing the various tape devices for use on a shared SCSI bus with the TruCluster Production Server Software and TruCluster Available Server Software products.
Tape devices are only supported on shared SCSI buses with KZPSA PCI SCSI adapters.
Note
To achieve system performance capabilities, DIGITAL recommends placing no more than one TZ89 drive on a SCSI bus.
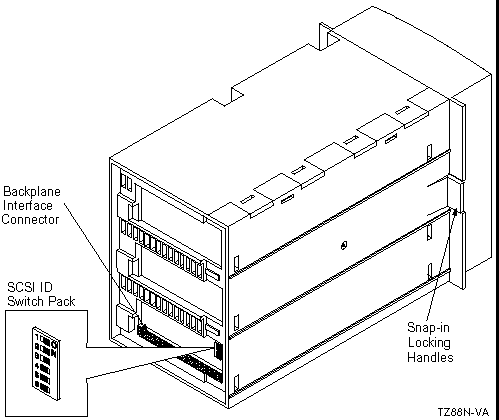
Two versions of the TZ88 are supported, the TZ88N-TA table-top standalone enclosure, and the TZ88N-VA StorageWorks Building Blocks (SBB) 5.25-inch carrier.
As with any of the shared SCSI devices, the TZ88N-TA and TZ88N-VA SCSI IDs must be set to ensure that no two SCSI devices on the shared SCSI bus have the same SCSI ID.
The following sections describe preparing the TZ88 in more detail.
You must set the TZ88N-VA switches before the tape drive is installed into the BA350 StorageWorks enclosure. The Automatic selection is normally used. The TZ88N-VA takes up three backplane slot positions. The physical connection is in the lower of the three slots. For example, if the tape drive is installed in slots 1, 2, and 3 with the switches in Automatic, the SCSI ID is 3. If the tape drive is installed in slots 3, 4, and 5 with the switches in Automatic, the SCSI ID is 5. The switch settings are shown in Table 4-9. Figure 4-5 shows the TZ88N-VA with the backplane interface connector and SCSI ID switch pack.
| SCSI ID | SCSI ID Selection Switches | |||||
| 1 | 2 | 3 | 4 | 5 | 6 | |
| Automatic [Footnote 11] | Off | Off | Off | On | On | On |
| 0 | Off | Off | Off | Off | Off | Off |
| 1 | On | Off | Off | Off | Off | Off |
| 2 | Off | On | Off | Off | Off | Off |
| 3 | On | On | Off | Off | Off | Off |
| 4 | Off | Off | On | Off | Off | Off |
| 5 | On | Off | On | Off | Off | Off |
| 6 | Off | On | On | Off | Off | Off |
| 7 | On | On | On | Off | Off | Off |
There are no special cabling requirements specific to the TZ88N-VA; it is installed in a BA350 StorageWorks enclosure. A DWZZA-VA installed in slot 0 of the BA350 provides the connection to the shared SCSI bus. The tape drive takes up three slots, so two SCSI IDs are unavailable for disks in this StorageWorks enclosure. Another BA350 may be daisy chained to allow the use of the SCSI IDs unavailable in the first StorageWorks enclosure due to the TZ88 tape drive.
You must remove the DWZZA-VA differential terminators. Ensure that DWZZA-VA jumper J2 is installed to enable the single-ended termination. The BA350 jumper and terminator must be installed.
A trilink connector on the DWZZA-VA differential end allows connection to the shared bus. An H879-AA terminator is installed on the trilink for the BA350 on the end of the bus to provide shared SCSI bus termination.
Figure 4-6 shows a Production Server configuration with two shared SCSI buses. The top shared bus has a BA350 with disks at SCSI IDs 1, 2, 4, and 5. The other BA350 contains a TZ88N-VA at SCSI ID 3.
The TZ88N-TA SCSI ID is set with a push-button counter switch on the rear of the unit. Push the button above the counter to increment the address; push the button below the counter to decrement the address until you have the desired SCSI ID selected.
You must connect the TZ88N-TA tabletop model to a single-ended segment of the shared SCSI bus. It is connected to a differential portion of the shared SCSI bus with a DWZZA-AA. Figure 4-8 shows a configuration of a TZ885 for use on a shared SCSI bus. You can replace the TZ885 shown in the illustration with a TZ88N-TA. To configure the shared SCSI bus for use with a TZ88N-TA follow these steps:
You will need one DWZZA-AA for each TZ88N-TA.
Ensure that the DWZZA jumper J2 is installed to enable the single-ended termination.
Remove the termination from the differential end by removing the five 14-pin SIP resistors.
Attach a trilink connector or Y cable to the differential end of the DWZZA-AA.
Connect the single-ended end of the DWZZA-AA to the TZ88N-TA with a BC19J cable.
Install a H8574-A or H8890-AA terminator on the other TZ88N-TA SCSI connector.
Connect a trilink or Y cable to the differential shared SCSI bus with BN21K or BN21L cables. Ensure that the trilink or Y cable at the end of the bus is terminated with an H879-AA terminator.
The single-ended SCSI bus may be daisy chained from one single-ended tape drive to another with BC19J cables as long as the SCSI bus maximum length is not exceeded. Ensure that the tape drive on the end of the bus is terminated with a H8574-A or H8890-AA terminator.
You can add additional TZ88N-TA tape drives to the differential shared SCSI bus by adding additional DWZZA-AA/TZ88N-TA combinations.
Note
Ensure that there is no conflict with tape drive, system, and disk SCSI IDs, and that you keep the number of SCSI devices to a maximum of eight.
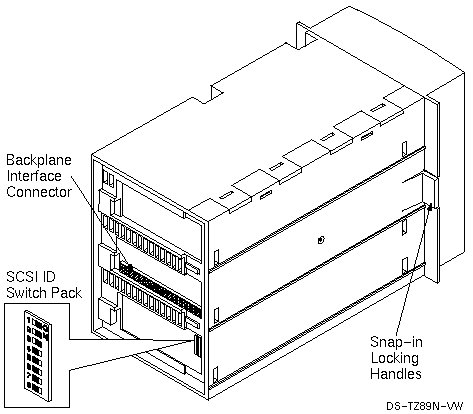
Like the TZ88, the TZ89 comes in either a tabletop (DS-TZ89N-TA) or a StorageWorks Building Block (SBB) 5.25-inch carrier (DS-TZ89N-VW). The SBB version takes up three slots in a BA356 StorageWorks enclosure.
The following sections describe how to prepare the TZ89 in more detail.
The DS-TZ89N-VW backplane connector makes a connection with the backplane in the middle of the three slots occupied by the drive. If the switches are set to automatic to allow the backplane position to select the SCSI ID, the ID corresponds to the backplane position of the middle slot. For example, if the DS-TZ89N-VW is installed in a BA356 in slots 1, 2, and 3, the SCSI ID is 2. If it is installed in slots 3, 4, and 5, the SCSI ID is 4. Figure 4-7 shows a view of the DS-TZ89N-VW showing the backplane interface connector and SCSI ID switch pack.
The SCSI ID is selected by switch positions, which must be selected before the tape drive is installed in the BA356. Table 4-10 shows the switch settings for the DS-TZ89N-VW.
| SCSI ID | SCSI ID Selection Switches | |||||||
| 1 | 2 | 3 | 4 | 5 | 6 | 7 | 8 | |
| Automatic [Footnote 12] | Off | Off | Off | Off | On | On | On | On |
| 0 | Off | Off | Off | Off | Off | Off | Off | Off |
| 1 | On | Off | Off | Off | Off | Off | Off | Off |
| 2 | Off | On | Off | Off | Off | Off | Off | Off |
| 3 | On | On | Off | Off | Off | Off | Off | Off |
| 4 | Off | Off | On | Off | Off | Off | Off | Off |
| 5 | On | Off | On | Off | Off | Off | Off | Off |
| 6 | Off | On | On | Off | Off | Off | Off | Off |
| 7 | On | On | On | Off | Off | Off | Off | Off |
| 8 | Off | Off | Off | On | Off | Off | Off | Off |
| 9 | On | Off | Off | On | Off | Off | Off | Off |
| 10 | Off | On | Off | On | Off | Off | Off | Off |
| 11 | On | On | Off | On | Off | Off | Off | Off |
| 12 | Off | Off | On | On | Off | Off | Off | Off |
| 13 | On | Off | On | On | Off | Off | Off | Off |
| 14 | Off | On | On | On | Off | Off | Off | Off |
| 15 | On | On | On | On | Off | Off | Off | Off |
No special cabling is involved with the DS-TZ89N-VW as it is installed in a BA356 StorageWorks enclosure. A DWZZB-VA installed in slot 0 of the BA356 provides the connection to the shared SCSI bus.
You must remove the DWZZB-VW differential terminators. Ensure that jumpers W1 and W2 are installed to enable the single-ended termination. The BA356 jumper must be installed and connector JB1 on the personality module must be left open to provide termination at the other end of the single-ended bus.
A trilink connector on the differential end of the DWZZB-VW allows connection to the shared bus. If the BA356 containing the DS-TZ89N-VW is on the end of the bus, install an H879-AA terminator on the trilink for that BA356 to provide termination for the shared SCSI bus.
Figure 4-6 shows a Production Server configuration with two shared SCSI buses. The bottom shared bus has a BA356 with disks at SCSI IDs 1, 3, 4, and 5. The other BA356 contains a DS-TZ89N-VW at SCSI ID 2.
The DS-TZ89N-TA has a push-button counter switch on the rear panel to select the SCSI ID. It is preset at the factory to 15. Push the button above the counter to increment the SCSI ID (maximum is 15); push the button below the switch to decrease the SCSI ID.
You must connect the DS-TZ89N-TA tabletop model to a single-ended segment of the shared SCSI bus. It is connected to a differential portion of the shared SCSI bus with a DWZZB-AA. Figure 4-8 shows a configuration of a T885 for use on a shared SCSI bus. Just replace the TZ885 in the figure with a DS-TZ89N-TA and the DWZZA-AA with a DWZZB-AA. Configure the shared SCSI bus for use with a DS-TZ89N-TA as follows:
You will need one DWZZB-AA for each DS-TZ89N-TA.
Ensure that the DWZZB jumpers W1 and W2 are installed to enable the single-ended termination.
Remove the termination from the differential end by removing the five 14-pin SIP resistors.
Attach a trilink connector or Y cable to the differential end of the DWZZB-AA.
Connect the DWZZB-AA single-ended end to the DS-TZ89N-TA with a BN21K or BN21L cable.
Install an H879-AA terminator on the other DS-TZ89N-TA SCSI connector.
Connect a trilink or Y cable to the differential shared SCSI bus with BN21K or BN21L cables. Ensure that the trilink or Y cable at the end of the bus is terminated with an H879-AA terminator.
The wide, single-ended SCSI bus may be daisy chained from one single-ended tape drive to another with BN21N or BN21L cables as long as the SCSI bus maximum length is not exceeded. Ensure that the tape drive on the end of the bus is terminated with an H879-AA terminator.
You can add additional DS-TZ89N-TA tape drives to the differential shared SCSI bus by adding additional DWZZB-AA/DS-TZ89N-TA combinations.
Note
Ensure that there is no conflict with tape drive, system, and disk SCSI IDs, and that you keep the number of SCSI devices on the shared SCSI bus to a maximum of eight.
The TZ885 DIGITAL Linear Tape subsystems combine a cartridge tape drive (TZ88) and an automatic cartridge loader. The TZ885 uses a removable magazine.
The TZ885 uses a five-cartridge (CompacTape IV) minitape library (magazine) with a 200-GB capacity (compressed). It is capable of reading/writing at approximately 10.8 GB per hour.
As with any of the shared SCSI devices, the TZ885 SCSI IDs must be set to ensure that no two SCSI devices on the shared SCSI bus have the same SCSI ID.
The following sections describe preparing the TZ885 in more detail.
To set the TZ885 SCSI ID from the Operators Control Panel (OCP), follow these steps:
Press and hold the Display Mode push-button (for about five seconds) until the SCSI ID SEL message is displayed:
SCSI ID SEL
SCSI ID 0
Press the Select push-button until you see the desired SCSI ID number in the display.
Press the Display Mode push-button again.
Issue a "bus reset" or turn the minilibrary power off and on again to cause the drive to recognize the new SCSI ID.
The TZ885 is connected to a single-ended segment of the shared SCSI bus. It is connected to a differential portion of the shared SCSI bus with a DWZZA-AA. Figure 4-8 shows a configuration of a TZ885 for use on a shared SCSI bus. The TZ885 in this figure has had the SCSI ID set to zero. To configure the shared SCSI bus for use with a TZ885, follow these steps:
You will need one DWZZA-AA for each TZ885 tape drive.
Ensure that the DWZZA jumper J2 is installed to enable the single-ended termination.
Remove the termination from the differential end by removing the five 14-pin SIP resistors.
Attach a trilink connector or Y cable to the differential end of the DWZZA-AA.
Connect the single-ended end of the DWZZA-AA to the TZ885 with a BC19J cable.
Install an H8574-A or H8890-AA terminator on the other TZ885 SCSI connector.
Connect a trilink or Y cable to the differential shared SCSI bus with BN21K or BN21L cables. Ensure that the trilink or Y cable at the end of the bus is terminated with an H879-AA terminator.
The single-ended SCSI bus may be daisy chained from one single-ended tape drive to another with BC19J cables as long as the SCSI bus maximum length is not exceeded. Ensure that the tape drive on the end of the bus is terminated with a H8574-A or H8890-AA terminator.
You can add additional TZ885 tape drives to the differential shared SCSI bus by adding additional DWZZA-AA/TZ885 combinations.
Note
Ensure that there is no conflict with tape drive, system, and disk SCSI IDs, and that you keep the number of SCSI devices to a maximum of eight.
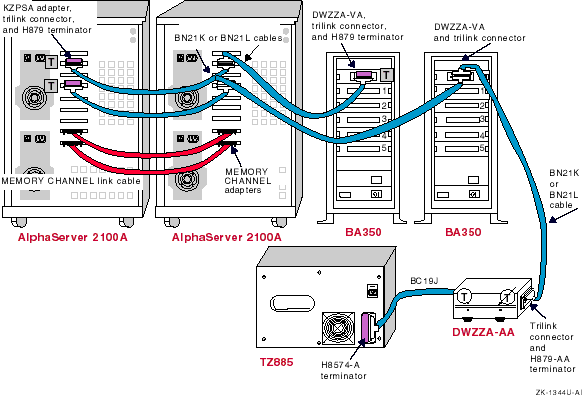
The DIGITAL UNIX base operating system supports Asynchronous Transfer Mode (ATM). TruCluster Available Server Software supports the use of LAN emulation (LANE) over ATM for client access and as the network for cluster communications. TruCluster Production Server Software supports the use of LAN emulation over ATM for client access.
This section provides an ATM overview, an example TruCluster configuration using ATM, an ATM adapter installation procedure, and information about verifying proper installation of fiber optic cables. See the Asynchronous Transfer Mode manual for information on configuring the ATM software.
In synchronous transfer methods, time-division multiplexing (TDM) techniques are used to divide the bandwidth into fixed-size channels dedicated to particular connections. If a system has nothing to transmit when its time slot comes up, that time slot is wasted. Also, if the system has lots of information to transmit, the system can only transmit when its turn comes up, even if other time slots are empty.
Asynchronous Transfer Mode (ATM) eliminates the inefficiencies of TDM technology by sharing network bandwidth among multiple logical connections. Instead of dividing the bandwidth into fixed-size channels dedicated to particular connections, ATM uses the entire bandwidth to transmit a steady stream of fixed-size (53 byte) cells. Each cell includes a 5-byte header containing an address to identify the cell with a particular logical connection.
If a connection needs more bandwidth, it is allocated more cells. When a connection is idle, it uses no cells and consumes no bandwidth. This feature makes ATM the ideal technology for transferring voice, video, and data through private networks and across public networks.
ATM is a connection-oriented, cell-switching and multiplexing technology. Cells transit ATM networks by passing through ATM switches, which analyze information in the header to switch the cell to the output interface that connects the cell to the next appropriate switch as the cell proceeds to its destination.
The ATM switch acts as a hub in the ATM network. All devices are attached to an ATM switch, either directly or indirectly.
Most data traffic in existing customer networks is sent over Local Area Networks (LANs) such as Ethernet or Token Ring networks. The services provided by the LANs differ from those of ATM, for example:
LAN messages are connectionless; ATM is a connection-oriented technology
Because a LAN is based on a shared medium, it is easy to broadcast messages
LAN addresses are based on hardware manufacturing serial numbers and are independent of the network topology
In order to use the large base of existing LAN application software, ATM defines a LAN Emulation (LANE) service that emulates services of existing LANs across an ATM network.
The LAN emulation environment groups hosts into an emulated LAN (ELAN) which has the following characteristics:
Identifies hosts through their 48-bit media access control (MAC) number
Supports multicast and broadcast services through point-to-multipoint connections or through a multicast server
Supports any protocol that uses an IEEE broadcast LAN
Provides the appearance of a connectionless service to participating end systems
One or more emulated LANs can run on the same ATM network. Each ELAN is independent of the others and users cannot communicate directly across emulated LAN boundries. Communication between ELANs is possible only through routers or bridges.
Each emulated LAN is composed of:
A set of LAN emulation clients (LECs): An LEC resides in each end system and performs data forwarding, address resolution, and control functions that provide a MAC-level emulated Ethernet interface to higher level software and other entities within the emulated LAN.
A LAN emulation service, which normally resides on an ATM switch and consists of:
LAN Emulation Configuration Server (LECS): An LECS implements the assignment of individual LAN emulation clients to different emulated LANs. It provides the client with the ATM address of the LAN emulation server.
LAN Emulation Server (LES): An LES implements the control coordination function for the emulated LAN by registering and resolving MAC addresses and route descriptors to ATM addresses.
Broadcast and Unknown Server (BUS): A BUS handles broadcast data sent by a LAN emulation client, all multicast data, and data sent by a LAN emulation client before the ATM address has been resolved.
Figure 4-9 shows an ATM network with two emulated LANs. Hosts A and B are LECs on ELAN1. Hosts C, D, and E are LECs on ELAN2. The LECS, the LES, and the Broadcast and Unknown Server are server functions resident on the ATM switch (even though they are shown separately).
TruCluster Available Server Software and TruCluster Production Server Software use LAN emulation over ATM as follows:
TruCluster Available Server Software: LAN emulation over ATM can be used as the primary or backup interconnect for communication between ASE members. LAN emulation over ATM may also be used for client system access.
TruCluster Production Server Software: LAN Emulation over ATM may be used for client system access (MEMORY CHANNEL is the cluster interconnect).
A typical TruCluster Available Server Software configuration using LAN emulation over ATM for client access is shown in Figure 4-10. In this configuration, each ASE server and all the clients on GIGAswitch/ATM A are on one emulated LAN. Each ASE server and all clients on GIGAswitch/ATM B are on another emulated LAN. Clients on one ELAN can communicate with clients on the other ELAN through the router.
Warning
Some fiber optic equipment can emit laser light that can injure your eyes. Never look into an optical fiber or connector port. Always assume the cable is connected to a light source.
Note
Do not touch the ends of the fiber optics cable. The oils from your skin can cause an optical power loss.
Use the following steps to install an ATMworks adapter. See the ATMworks 350 Adapter Installation and Service guide for more information. Be sure to use the antistatic ground strap.
Remove the adapter extender bracket if the ATMworks 350 is to be installed in an AlphaServer 2100 system.
Remove the option slot cover from the appropriate PCI or TURBOchannel slot.
Install the adapter module.
Install the multimode fiber optics (SC connectors) cables as follows:
Remove the optical dust caps.
Line up the transmit cable connector with the transmit port and the receive cable connector with the receive port and insert the SC connectors. The ATMworks transmit port is identified by an arrow exiting a circle. The receive port is identified by an arror entering a circle.
Listen for the click indicating that the connector is properly seated.
Note
Ensure that the bend radius of any fiber optic cable exceeds 2.5 cm (1 inch) to prevent breaking the glass.
When removing an SC connector, do not pull on the cable. Pull on the cable connector only.
To verify that the cables are connected correctly, see Section 4.7.4.
The fiber optic cables from some suppliers are not labeled or color coded, and as the system and ATM switch may be separated by a great distance, verifying that the cables are connected correctly may be difficult.
The ATMworks adapters start sending idle cells when the ATM driver is enabled. The adapter sends idle cells even when no data is being sent. ATM switches provide an indication that they are receiving the idle cells.
To verify that the fiber optic cables are properly connected, follow these steps:
Verify that both the transmit and receive connectors are seated properly at both the ATM adapter and the ATM switch.
Verify that the following ATM subsets have been installed with this command:
# /usr/sbin/setld -i | grep ATM
OSFATMBASE: ATM Commands
OSFATMBIN: ATM Kernel Modules
Additionally, after the ATM subsets have been installed, verify that a new
kernel has been built with the following kernel options selected
(/sbin/sysconfig -q atm):
Asynchronous Transfer Mode (ATM)
ATM UNI 3.0/3.1 Signalling for SVCs
LAN Emulation over ATM (LANE)
Enable the ATM driver with the following command:
# /usr/sbin/atmconfig up driver=driver_name
In the command,
driver_name
is
lta#
for the ATMworks 350.
The number sign (#) is the adapter number.
To enable
lta0
to initiate contact with the
network, enter the following command:
# /usr/sbin/atmconfig up driver=lta0
Check the ATM switch for an indication that it is receiving idle cells. The following table provides the indication for a few ATM switches. If you do not have one of these switches, check the documentation for your switch to determine how the switch indicates that it is cabled correctly.
| ATM Switch | Indicator | Comments |
| DIGITAL GIGAswitch | PHY | Illuminated green LED indicates that the switch is receiving idle cells from the ATM adapter. |
| Bay Networks® Centillion100 | En | Illuminated green LED indicates that the switch is receiving idle cells from the ATM adapter. |
| SynOptics® LattisCell 10114 | Link | Illuminated green LED indicates that the switch is receiving idle cells from the ATM adapter. |
| CISCO® Systems LightStream 1010 | TX | The switch starts transmitting data as soon as it receives idle cells. The green TX LED will flash on and off. |
| FORESystems® ForeRunner A S X200 | TX | The Yellow TX LED will be on steady. |
If you do not have an indication that confirms a correct cable connection, swap the transmit and receive connectors on one end of the cable and recheck the indicators.
If you still do not have a correct cable connection, you probably have a bad cable.
The ATMworks adapter has two LEDS that indicate the status of the adapter and its connections to the network, the Network LED, and the Module LED. The Network LED is labeled with a number sign (#) under the LED. The Module LED is labeled with an incomplete circle under the LED. The meaning of the LEDs is shown in Table 4-11.
| Network LED | Module LED | Description |
| Off | Off | PCI slot is not receiving power, or the ATMworks driver has not been loaded. |
| Off/Amber/Green | Green | ATMworks driver is loaded and the module is OK. |
| Amber | Amber | ATMworks adapter is in reset mode. |
| Off | Amber | The adapter diagnostics failed. |
| Green | Green/Off | A physical link connection has been made. |
| Amber | Green | There is no physical link connection. |