The
following seven GNUPro Toolkit tools can be run on native and
embedded targets.
-
gcc,
the GNUPro Toolkit compiler (see gcc,
the GNU compiler)
-
cpp, the GNU C preprocessor
(see cpp, the GNU preprocessor)
-
gas,
the GNUPro Toolkit assembler (see gas,
the GNU assembler)
-
ld,
the GNUPro Toolkit linker (see ld,
the GNU linker)
-
binutils,
the GNUPro Toolkit directory of utilities (see
binutils,
the GNU binary utilities)
-
gdb,
the GNUPro Toolkit debugger (see gdb,
the debugging tool)
-
Cygnus InsightTM
(see Cygnus Insight, a visual debugger)
-
CygwinTM,
the Win32 porting layer for UNIX applications (see
Cygwin:
a Win32 porting layer for UNIX applications)
-
libgloss,
the support library for embedded targets and
newlib,
the C library developed by Cygnus (see newlib
and libstdc++, the GNU libraries)
-
snavigator, or Source-Navigator,
a source code comprehension tool
See the following
documentation for more discussion on using the GNU tools. See also Using
the tools on native and embedded systems and GNUPro
Tools for Embedded Systems.
gcc
invokes all the required GNU passes for you with the following utilities.
-
cpp
The preprocessor which processes
all the header files and macros that your target requires.
-
gcc
The compiler which produces
assembly language code from the processed C files. For more information,
see Using GNU CC in
GNUPro
Compiler Tools.
-
gas
The assembler which produces
binary code from the assembly language code and puts it in an object file.
-
ld
The linker which binds the
code to addresses, links the startup file and libraries to the object file,
and produces the executable binary image.
When you compile C or C++ programs with GNU C, the
compiler quietly inserts a call at the beginning of main to a gcc
support subroutine called __main. Normally this is invisibleyou
may run into it if you want to avoid linking to the standard libraries,
by specifying the -nostdlib compiler option. Include -lgcc
at the end of your compiler command line to resolve this reference. This
links with the libgcc.a compiler support library. Putting it at
the end of your command line ensures that you have a chance to link first
with any of your own special libraries.
__main is the initialization routine for C++
constructors. Because GNU C is designed to interoperate with
GNU C++, even C programs must have this call: otherwise C++ object
files linked with a C main might fail. For more information
on gcc, see Using GNU CC
in GNUPro Compiler Tools.
There are several
machine-independent compiler switches, among
which are, notably,
-fno-exceptions (for C++), -fritti
(for C++) and -T (for linking).
You have four
implicit file extensions: .c , .C , .s , and
.S.
For more information, see Using
GNU CC in GNUPro Compiler Tools.
cpp,
the GNU preprocessor
cpp
merges in the #include files, expands
all macros definitions, and processes the #ifdef sections. To
see the output of cpp, invoke gcc with the -E
option, and the preprocessed file will be
printed on stdout.
There are two
convenient options to assemble handwritten files that require C-style preprocessing.
Both options depend on using the compiler driver program, gcc,
instead of calling the assembler directly.
-
Name
the source file using the extension .S (capitalized) rather than
.s.
gcc
recognizes files with this extension as assembly language requiring C-style
preprocessing.
-
Specify the "source language"
explicitly for this situation, using the gcc option, -xassembler-with-cpp
.
For more information
on cpp, see The
C Preprocessor in GNUPro Compiler Tools.
gas can be useful
as either a compiler pass or a source-level assembler. gas
emits a relocatable object file from the assembly
language source code. The object file contains the binary code and the
debug symbols. For more information on
gas,
see Using as in
GNUPro
Utilities.
ldresolves
the code addresses and debug symbols, links the startup code and additional
libraries to the binary code, and produces an executable binary
image. For more information on ld,
see Using ld in
GNUPro
Utilities.
binutils,
the GNU binary utilities
The following
are the binary utilities, although they are
not included on all hosts: ar, nm, objcopy,
objdump,
ranlib,
size,
strings,
and
strip.
For more information
on the GNU binary utilities, see Using
binutils
in GNUPro Utilities.
The most important of these
utilities are objcopy
and
objdump.
A few ROM monitors, such
as a.out, load executable binary
images, and, consequently, most load an S-record. An S-record is a printable
ASCII representation of an executable binary image.
S-records
are suitable both for building ROM images for standalone boards and for
downloading images to embedded systems. Use the following example's input
for this process.
objcopy
-O srec infile outfile
infile
in the previous example's input is the executable binary filename, and
outfile
is the filename for the S-record.
Most
PROM burners also read S-records or some similar
format. Use the following example's input to get a list of supported object
file types for your architecture.
For
more information on S-records, see the discussions
for FORMAT output-format in
the documentation for MRI
compatible script files and the discussion for BFD
in Using ld in
GNUPro Utilities. For more discussion of making an executable
binary image, see objcopy
in Using binutils
in GNUPro Utilities.
objdump displays information about one or more
object files. The options control what particular information to display.
This information is mostly useful to programmers who are working on the
compilation tools, as opposed to programmers who just want their program
to compile and work.
When
specifying archives, objdump shows information on each of the
member object files. objfile... designates the object files to
be examined.
A few of the
more useful options for commands are: -d,
-disassembleand
--prefix-addresses.
Displays the assembler mnemonics for the machine instructions
from objfile. This option only disassembles those sections
that are expected to contain instructions.
For disassembling, prints the complete address on each
line, starting each output line with the address it's disassembling. This
is the older disassembly format. Otherwise, you only get raw opcodes.
gdb,
the debugging tool
To run gdbon
an embedded target, use Cygnus Insight, or use a
gdb
backend with the gdb standard remote protocol or a similar protocol,
the following two types of gdb backend being the most common.
-
A gdb stub
This is an exception handler for breakpoints,
and it must be linked to your application. gdb stubs use the gdb
standard remote protocol.
-
An existing ROM monitor
used as a gdb backend
The most common approach means using the following processes.
-
With a similar protocol to the
gdb
standard remote protocol.
-
With an interface that uses the
ROM monitor directly. With such an interface,
gdb
only formats and parses commands.
For more information
on debugging tools, see Debugging
with GDB in GNUPro Debugging Tools and Working
with Cygnus Insight, the visual debugger.
The
following routines are always useful for debugging
a project in progress.
-
print()
Runs standalone in libglosswith
no newlibsupport. Many times
print()
works when there are problems that make printf() cause an exception.
-
outbyte()
Used for low-level debugging.
-
putnum()
Prints out values in hex
so they are easier to read.
Cygnus Insight, a visual debugger
GNUPro Toolkit provides the technology
and tools for effective, efficient debugging sessions with the standard
command-line based debugger, gdb. Also available is Cygnus Insight, a visual
debugger with a graphical user interface supporting a range of host systems
and target microprocessors, allowing development with complete access to
the program state, including source and assembly level, variables, registers
and memory.
Insight adds a series of intuitive
views into the debug process, and provides the developer with a wide range
of system information.
Source-Navigator, a source code comprehension
tool
Source Navigator is a source code comprehension
tool with which developers can extract information from existing code in
C, C++, Java, Tcl, [incr tcl] (the C++ extension for Tcl), FORTRAN,
Cobol, and assembly programs, using this information to build project databases.
The database represents internal program structures and relationships between
program components. Source Navigator then uses this database to query symbols
and relationships between components and graphically display them. Initialize
the Source-Navigator tool from a commandline interface by invoking the
following command:
snavigator
For a demonstration of using Source-Navigator,
see Source-Navigator demonstration. For more information
on Source Navigator, see the main Users Reference Guide
and Programmers Reference Guide documentation, accessible
by clicking on the Help
menus Contents
menu item while working with Source-Navigator.
newlib
and libstdc++,
the GNU libraries
GNUPro Toolkit
has the following libraries: newliband
libstdc++.
-
newlib
The Cygnus libraries, including the C library,
libc,
and the C math library, libm.
-
libstdc++
The C++ library.
CygwinTM:
a Win32 porting layer for UNIX applications
CygwinTM,
a full-featured Win32 porting layer for UNIX applications, is compatible
with all Win32 hosts (currently, these are Microsofts Windows NT/95/98
systems). See GNUPro Tools for Embedded
Systems to locate the following documentation, which discusses
porting the GNU development tools to the Win32 host while exploring the
development and architecture of the Cygwin library.
Cygwin was invented in 1995 by Cygnus
as part of the answer to the question of how to port the GNU development
tools to a Win32 host. The Win32-hosted GNUPro compiler tools that use
the Cygwin library are available for a variety of embedded processors as
well as a native version for writing Win32 applications.
Cross-development environment
Using GNUPro Toolkit in one of the
cross-development configurations usually requires some attention to setting
up the target environment.
A cross-development configuration can
develop software for a different target machine than the development tools
themselves (which run on the host)for example, a SPARCstation can generate
and debug code for a Motorola Power PC-based board. This process is known
as embedded development.
For GNUPro tools to work with a target
environment (except for real-time operating systems, which provide full
operating system support), set up the tools with the help of the following
documentation.
The C run-time environment (crt0)
To link and run C or C++ programs,
you need to define a small module (usually written in assembler as crt0.s)
to ensure that the hardware initializes for C conventions before calling
main.
There are some examples available in
the sources of GNUPro Toolkit for crt0.s code (along with examples
of system calls with sub-routines).
Look in the following path.
installdir/gnupro-99r1/src/newlib/libc/sys
installdir refers to
your installation directory, by default /usr/cygnus.
For example, look in .../sys/h8300hms
for Hitachi H8/300 bare boards, or in .../sys/sparclite for
the Fujitsu SPARClite board.
More examples are in the following
directory.
installdir/gnupro-99r1/src/newlib/stub
To write your own crt0.s module,
you need the following information about your target.
-
A memory map, showing the size of available memory and memory
location
-
The way the stack grows
-
The output format in use
At a minimum, your crt0.s
modulemust do the following processes.
-
Define the symbol, start (_start in assembler
code). Execution begins at this symbol.
-
Set up the stack pointer, sp. It is largely up to
you to choose where to store your stack within the constraints of your
targets memory map. Perhaps the simplest choice is to choose a fixed-size
area somewhere in the uninitialized data section (often called bss).
Remember that whether you choose the low address or the high address in
this area depends on the direction your stack grows.
-
Initialize all memory in the uninitialized-data (bss)
section to zero.
The easiest way to do this is with the help of a linker
script (see Linker scripts
in Using ld in
GNUPro Utilities). Use a linker script to define symbols
such as bss_start and bss_end to record the boundaries
of this section; then you can use a for loop to initialize all
memory between them in the crt0.s module.
-
Call main. Nothing else will!
A more complete crt0.s module might also do the
following processes.
-
Define an _ _exit
subroutine. This is the C name; in your assembler code. Use the label,
_ _exit, with two leading
underbars. Its precise behavior depends on the details of your system,
and on your choice. Possibilities include trapping back to the boot monitor,
if there is one; or to the loader, if there is no monitor; or even back
to the symbol, start.
-
If your target has no monitor to mediate communications with
the debugger, you must set up the hardware exception handler in the crt0.s
module. See The
GDB remote serial protocol in Debugging
with GDB in GNUPro Debugging Tools for details on
how to use the gdb generic remote-target facilities for this purpose.
-
Perform other hardware-dependent initialization; for example,
initializing an mmu or an auxiliary floating-point chip.
-
Define low-level input and output subroutines. For example,
the crt0.s module is a convenient place to define the minimal
assembly-level routines; see System
calls in GNUPro
C Library in GNUPro Libraries.
crt0,
the main startup file
The crt0
(C RunTime 0) file contains the initial startup
code.
Cygnus provides
a crt0 file, although you may want to write your own crt0
file for each target.
The crt0 file is usually written in assembler
as crt0.S, and its object gets linked in first and bootstraps
the rest of your application.
The crt0 file defines a special symbol like _start,
which is both the default base address for the application and the first
symbol in the executable binary image.
If you plan to use any routines
from the standard C library, youll also need to implement the functions
on which libgloss depends. The crt0 file accomplishes
the following results.
See also I/O support
code.
-
crt0
initializes
everything in your program that needs it.
This initialization section varies. If you
are developing an application that gets downloaded to a ROM monitor, there
is usually no need for special initialization because the ROM monitor handles
it for you. If you plan to burn your code in a ROM, the crt0 file
typically does all of the hardware initialization required to run an application.
This can include things like initializing serial ports and running a memory
check; however, results vary depending on your hardware.
The following is a typical
basic initialization of crt0.S.
1. Set up concatenation
macros.
#define CONCAT1(a, b) CONCAT2(a, b)
#define CONCAT2(a, b) a ## b
Later, you'll use these macros.
2. Set up label
macros, using the following example's input.
#ifndef __USER_LABEL_PREFIX__
#define __USER_LABEL_PREFIX__ _
#endif
#define SYM(x) CONCAT1 (__USER_LABEL_PREFIX__, x)
These macros make the code
portable between coff and a.out. coff always
has an __ (underline) prepended to the front of its global symbol
names. a.out has none.
3. Set up register
names (with the right prefix),
using the following example's input.
#ifndef __REGISTER_PREFIX__
#define __REGISTER_PREFIX__
#endif
/* Use the right prefix for registers. */
#define REG(x) CONCAT1 (__REGISTER_PREFIX__, x)
#define d0 REG (d0)
#define d1 REG (d1)
#define d2 REG (d2)
#define d3 REG (d3)
#define d4 REG (d4)
#define d5 REG (d5)
#define d6 REG (d6)
#define d7 REG (d7)
#define a0 REG (a0)
#define a1 REG (a1)
#define a2 REG (a2)
#define a3 REG (a3)
#define a4 REG (a4)
#define a5 REG (a5)
#define a6 REG (a6)
#define fp REG (fp)
#define sp REG (sp)
Register names are for portability
between assemblers. Some register names have a % or $
prepended to them.
4. Set up space
for the stack and grab a chunk of memory.
.set stack_size, 0x2000 .
comm SYM (stack), stack_size
This can also be done in
the linker script, although it typically gets done at this point.
5. Define an
empty space for the environment, using the following example's input.
.align 2
SYM (environ):
.long 0
This is bogus on almost any
ROM monitor, although it's best generally
set up as a valid address, then passing the address to main().
This way, if an application checks for an empty environment, it finds one.
6. Set up a few
global symbols that get used elsewhere.
.text
.global SYM (stack)
.global SYM (main)
.global SYM (exit)
.global __bss_start
This really should be __bss_start,
not SYM (__bss_start.
__bss_start needs
to be declared this way because its value is set in the linker script.
7. Set up the
global symbol, start, for the linker
to use as the default address for the .text section. This helps
your program run.
link a6, #-8
moveal #SYM (stack) + stack_size, sp
crt0
zeroes
the .bss section
Make sure the
.bss
section is cleared for uninitialized data, using the following example's
input. All of the addresses in the .bss section need to be initialized
to zero so programs that forget to check new variables' default values
will get predictable results.
moveal #SYM (end), a1
1:
movel #0, (a0)
leal 4(a0), a0
cmpal a0, a1
bne 1b
Applications can get wild
side effects from the .bss section being left uncleared, and it
can cause particular problems with some implementations of malloc()
.
crt0
calls
main()
If your ROM
monitor supports it, set up argc and argv for command
line arguments and an environment pointer before the call to main(),
using the following example's input.
For g++, the code
generator inserts a branch to __main at the top of your main()
routine. g++ uses __main to initialize its internal tables
and then returns control to your main() routine.
For crt0 to call
your main() routine, use the following example's input. First,
set up the environment pointer and jump to main(). Call the main
routine from the application to get it going, using the following example's
input with main (argc, argv, environ), using argvas
a pointer to NULL.
pea 0
pea SYM (environ)
pea sp@(4)
pea 0
jsr SYM (main)
movel d0, sp@-4
crt0
calls
(exit)
After main()
has run, the crt0 file cleans things up and returns control of
the hardware from the application. On some hardware there is nothing to
return to--especially if your program is in ROMand if that's the case,
you need to do a hardware reset or branch back to the original start address.
If you're using
a ROM monitor, you can usually call a user trap to make the ROM take over.
Pick a safe vector with no sides effects. Some ROM's have a built-in trap
handlerjust for
this case.
Implementing (exit)
here is easy. First, with _exit, exit from the application. Normally,
this causes a user trap to return to the ROM monitor for another run. Then,
using the following example's input, you proceed with the call.
SYM (exit):
trap #0
Both rom68kand
bugcan
handle a user-caused exception of 0 with no side effects. Although
the bug monitor has a user-caused trap that returns control to
the ROM monitor, the bug monitor
is more portable.
The
linker script
In the following path, find the example
linker scripts (hosttype signifies your host configuration
and targettype signifies the embedded configuration to
which you target):
/usr/cygnus/hosttype/targettype/lib/ldscripts/
In that directory, there will be files with the .x,
.xbn,
.xn,
.xr,
.xs,
and .xu extensions. These are examples of linker scripts.
The linker script
accomplishes the following processes to result.
-
Sets up the memory
map for the application.
When your application is
loaded into memory, it allocates some RAM, some disk space for I/O, and
some registers. The linker script makes a memory map of this memory allocation
which is important to embedded systems because, having no OS, you have
the ability then to manage the behavior of the chip.
-
For g++,
sets up the constructor
and destructor tables.
The actual section names
vary depending on your object file format. For a.out and coff,
the three main sections are .text,
.data and .bss.
-
Sets the default values
for variables
used elsewhere.
These default variables are
used by sbrk()and the crt0
file, typically called by _bss_startand _end.
There
are two ways to ensure the memory map is correct.
-
By having the linker create the
memory map by using the option, -Map.
-
By, after linking, using the
nm
utility to check critical addresses like start,
bss_end
and _etext.
The following
is an example of a linker script for an m68k-based target board.
1. Use the STARTUP
command, which loads the file so that it executes
first.
The m68k-coff configuration
default does not link in crt0.o because it assumes that a developer
has crt0. This behavior is controlled in the config file
for each architecture in a macro called STARTFILE_SPEC.
If STARTFILE_SPEC is set to NULL, gcc formats its command
line and doesn't add crt0.o. Any filename can be specified with
STARTUP,
although the default is always crt0.o .
If
you use only ld to link, you control whether or not to link in
crt0.o
on the command line.
If
you have multiple crt0 files, you
can leave STARTUP out, and link in crt0.o in the makefile
or use different linker scripts. Sometimes this option is used to initialize
floating point values or to add device support.
2. Using GROUP,
load the specified file.
In this case, the file is
a relocated library that contains the definitions for the low-level functions
needed by libc.a . The file to load could have also been specified
on the command line, but as it's always needed, it might as well be here
as a default.
3. SEARCH_DIRspecifies
the path in which to look for files.
4. Using _DYNAMIC,
specify whether or not there are shared dynamic libraries.
In the following example's case, there are no shared libraries.
5. Set _stack,
the variable for specifying
RAM for the ROM monitor.
6. Specify a
name for a section that can be referred to later in the script. In the
following example's case, it's only a pointer to the beginning of free
RAM space with an upper limit at 2M. If the
output file exceeds the upper limit, MEMORYproduces
an error message. First, in this case, we'll set up the memory map of the
board's stack for high memory for both the rom68k and mon68k
monitors.
{
ram : ORIGIN = 0x10000, LENGTH = 2M
}
The
following discusses setting up constructor and destructor tables for g++.
Set up the .text
section, using the following example's input.
{
.text :
{
CREATE_OBJECT_SYMBOLS
*(.text)
etext = .;
__CTOR_LIST__ = .;
LONG((__CTOR_END__ - __CTOR_LIST__) / 4 - 2)
*(.ctors)
LONG(0)
__CTOR_END__ = .;
__DTOR_LIST__ = .;
LONG((__DTOR_END__ - __DTOR_LIST__) / 4 - 2)
*(.dtors)
LONG(0)
__DTOR_END__ = .;
*(.lit)
*(.shdata) }
> ram
.shbss SIZEOF(.text) + ADDR(.text) : {
*(.shbss)
}
In
a coff file, all the actual instructions reside in .text
for also setting up the constructor and destructor tables for g++.
Notice that the section description redirects itself to the RAM variable
that was set up in Step 5 of the earlier process for the crt0
file, variable for
specifying RAM for the ROM monitor.
.data : {
*(.data)
CONSTRUCTORS
_edata = .;
} > ram
In a coff
file, this is where all of the initialized data goes. The default values
for _bss_start and _end are set here for use by the crt0
file when it zeros the .bss section.
.bss SIZEOF(.data) + ADDR(.data) :
{
__bss_start = ALIGN(0x8);
*(.bss)
*(COMMON)
end = ALIGN(0x8);
_end = ALIGN(0x8);
__end = ALIGN(0x8);
}
.mstack : { } > ram
.rstack : { } > ram
.stab . (NOLOAD) :
{
[ .stab ]
}
.stabstr . (NOLOAD) :
{
[ .stabstr ]
}
}
I/O
support code
Most applications
use calls to the standard C library. However, when you initially link libc.a,
several I/O functions are undefined. If you
don't plan on doing any I/O, you're OK; otherwise, you need to create two
I/O functions: open() and close(). These don't need to
be fully supported unless you have a file system, so they are normally
stubbed out, using kill().
sbrk()is
also a stub, since you can't do process control
on an embedded system, and it is only needed by applications that do dynamic
memory allocation. It uses the variable, _end,
which is set in the linker script.
The following
routines are also used for optimization.
-
-inbyte
Returns a single
byte from the console.
-
-outbyte
Used for low-level
debugging, takes an argument for print()
and prints a byte out to the console (typically used for ASCII text).
Memory
support
The following
routines are for dynamic memory allocation.
-
sbrk()
The functions, malloc(), calloc(),
and realloc() all call sbrk() at their lowest levels.
sbrk()
returns a pointer to the last memory address your application used before
more memory was allocated.
-
caddr_t
Defined elsewhere as char *.
-
RAMSIZE
A compile-time option that moves a pointer
to heap memory and checks for the upper limit.
Miscellaneous
support routines
The following
support routines are called by newlib,
although they don't apply to the embedded environment.
Checks for a terminal device.
-
kill()
-
getpd()
Can safely return
any value greater than 1, although the value doesnt effect anything in
newlib.
Source-Navigator demonstration
The following
documentation discusses the Source-Navigator
source code comprehension tool, using a tutorial to demonstrate the usage
of debugging the sources for a project, editing the source files and building
the project, the monopgame. In this
tutorial, you will create two targets, monop and initdeck,
and, with them, use many compiling, editing and debugging features of GNUPro
Toolkit. The result is making and running the monopprojects
game.
Invoke Source-Navigator with the following input, using a
shell windows commandline interface from the /usr/cygnus/gnupro/sn99r1/directory.
snavigator
For more information about using Source-Navigator, see its
online documentation from its Help
menu.
Creating the Source-Navigator
demonstration project
With Source-Navigator
active, create a new project.
1. Choose
File
-> New Project...
from the Symbol Browser
and define a new project, calling it monop.proj.
2.
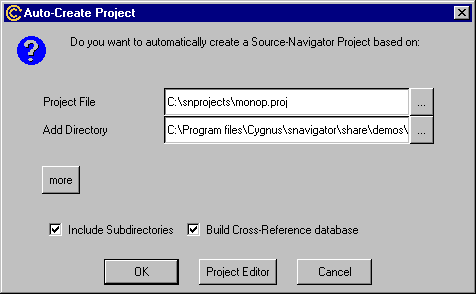
Under Add Directory,
click the ... button to select
the demos\monop directory. See Figure
4 for the result of defining the new projects name in the Auto-Create
Project window. Click OK
to build the project.
Building
the monop target
Having created
a project, you must then build its target components.
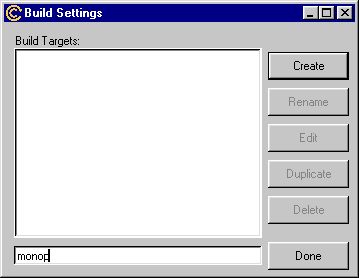
1. Choose
Tools
-> Build Settings...
to start the Build Settings
window.
2.
Enter monop as the name of the target. See Figure
5 for the result.
3.
Click Create.
The Edit Target
window appears.
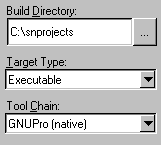
4.
In the Build Directory
field, click the ... button
and select the build directory for the monop project (see Figure
6).
5.
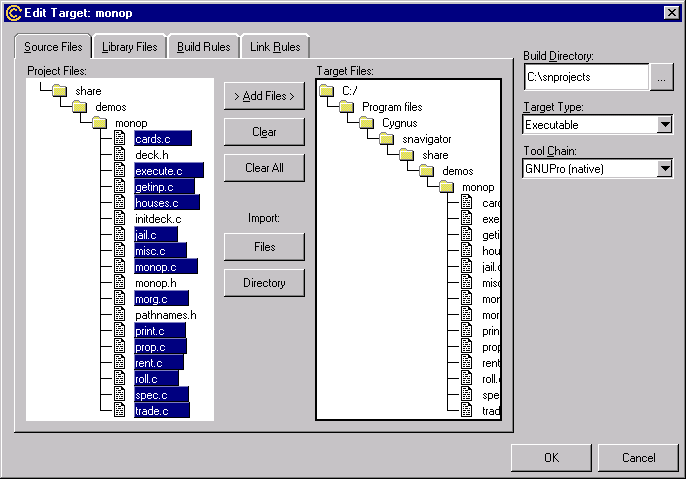
From Project Files
in the Edit Target
window for the monop project, select cards.c, execute.c,
getinp.c,
houses.c,
jail.c,
misc.c,
monop.c,
morg.c,
print.c,
prop.c,
rent.c,
roll.c,
spec.c,
and
trade.c files.
6.
Click the Add Files
button to copy the files to the Target
Files list. In Figure
7, see the result of moving the files from the Target
Files pane to the Project
Files pane.
NOTE:
To execute
the program correctly in UNIX, click the Link
Rules tab. Enter xterm -e bmonop in the Command
to launch Application field and click OK
to close the Link Rules
window.
7.
Click OK to close
the Edit Targetwindow.
Click Done to
close the Settings window. The target is created. Now
you need to debug and compile the program. See Debugging
and compiling the monop target.
Debugging
and compiling the monop target
To ensure that
a project can compile (or build),
you must first run through a debugging process before using the maketool
to create the project.
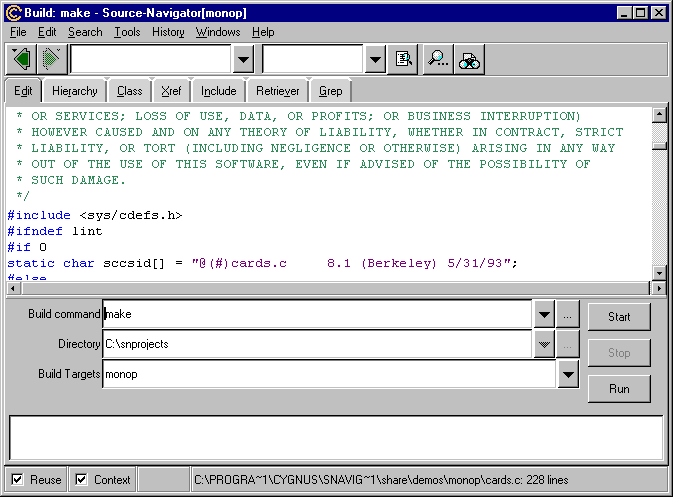
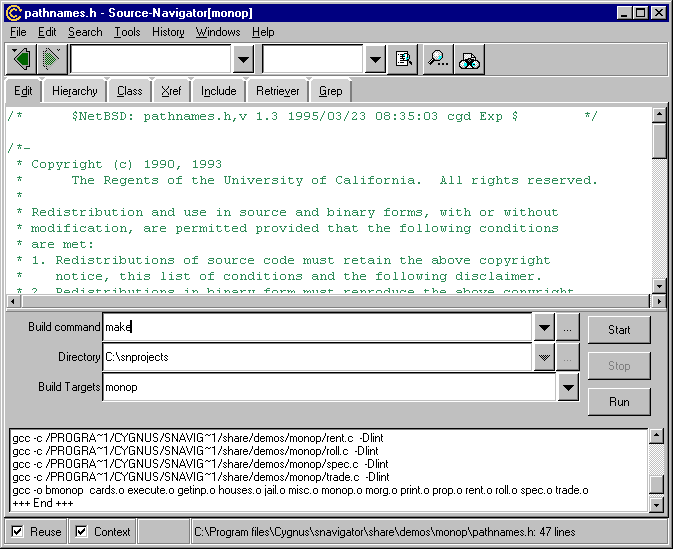
1. Select
Tools
-> Build from
the menu bar. The Buildwindow
opens.
2.
In Build Targets,
select monop from the target list. See Figure
8. Click Start.
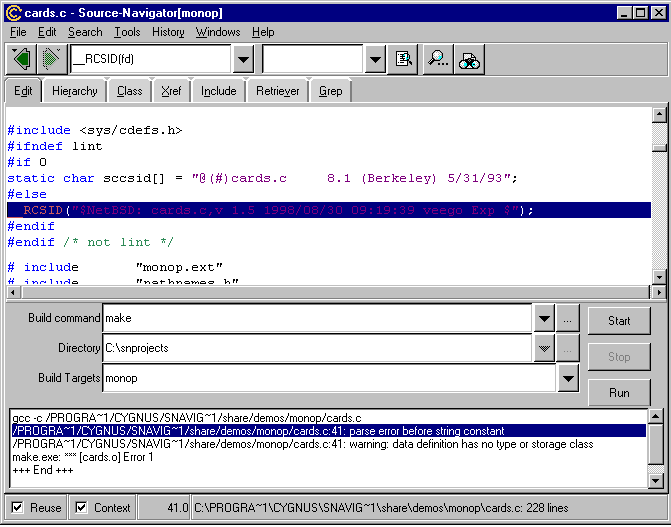
3.
In this tutorial, Source-Navigator generates some errors from the build.
For instance, lint needed to have a definition in the source code.
See Figure 9.
Creating the
lint
macro
To ensure that
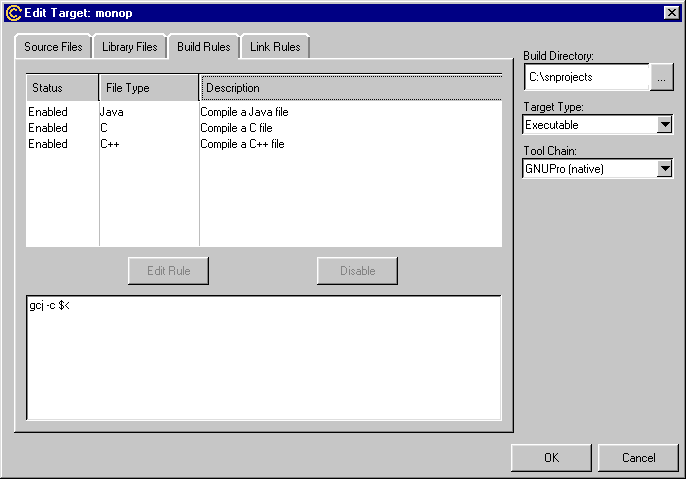
a project can build, edit the macro errors that the debugger finds.
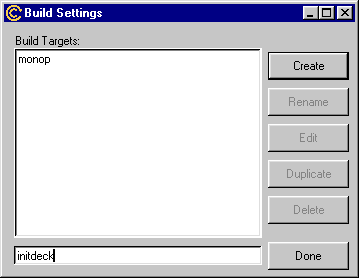
1. Choose
Tools
-> Build Settings...
to start the Edit Target
window. See Figure 10.
2.
Double-click
monop to edit it.
3.
Click the Build Rules
tab to modify the rules for the build.

4.
Because monop is written in C, double-click the C
rule in the File Type
column. The Build Rules Settings
window appears.
5.
Click the Defines
tab. Enter lint in the text entry box. See Figure
11.

6.
Click New to create
the macro.
7.
Click OK to close
the Build Rules Settings
window. Click OK
to close the Edit Target
window. Click Done
to close the Build Settings
window.
8.
Select Tools
-> Build from
the menu bar and select monop from the target list.
9.
monop
generates without errors. However, at runtime the program does not run
because we still need to define the path to the cards pack.
Creating the
_PATH_CARDS macro
Now, define
the other macro, _PATH_CARDS, to continue making the project work.
1. Choose
Tools
-> Build Settings...
to start the Edit Target
window.
2.
Double-click monop to edit it.
3.
Click the Build Rules
tab to modify the rules for the build. See Figure
12.
4.
Because monop is written in C, double-click the C
rule. The Build Rules Settingswindow
appears, as in Figure 13.
5.
Click the Defines
tab.
6.
Enter the following input in the dialog below the Macro
defines pane, replacing <project
directory> with your path to the demos\monop
directory:
_PATH_CARDS= " \ " <project directory>/cards.pck\ ""

Now,
GNUPro Toolkit uses an appropriate definition for the card pack macro,
_PATH_CARDS,
when running the monop program.
7.
Click OK to close
the Build Rules Settings
window. Click OK
to close the Edit Target
window. Click Done
to close the Build Settings window.
8.
Select Tools
-> Build from
the menu bar and select monop from the target list. Click Start
to perform the build.
9.
_PATH_CARDS="\"<build
directory>/cards.pack\"" is a macro. To ensure that this
change is picked up at compile time, perform a clean build of the monop
target project by selecting Tools->Clean
Build in the Build
window (see Figure 14).
A clean build is equivalent to
the make clean command.
10.
Click the Start
button to perform the build.
11.
Now, the monop project compiles without errors (see Figure
15).
Building
the initdeck target
Next, you need
to create another target to initialize the cards in the monop
game.
1. Choose
Tools
-> Build Settings...
to invoke the Build Target
window.
2.
Enter initdeck as the name of the target (see Figure
16).
Click
Create.
The Edit Target
window appears (see Figure 17).
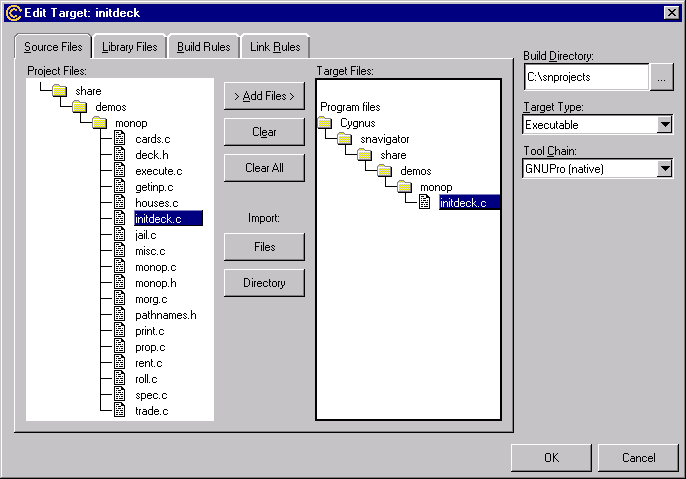
In
the Build Directory
field, click the ... button and select the monop directory.
From
Source
Files, select the initdeck.c file and click
the Add Filesbutton
to copy the file to the Target Files
list.
Click
OK
to close the
Edit Target
window. Click Done
to close the Build Settingswindow,
having defined and created the new target.
Debugging
the initdeck target
To ensure that
a project can build with the new target, edit the macro errors that the
debugger finds.
1. Build
the target by selecting Tools
-> Build from
the menu bar of the Build
window. Select initdeck from the target list, and click Start.
2.
initdeck
generates with errors. Again, we need to define the lint macro
and the path to the cards.
3.
Choose Tools
-> Build Settings...
to start the Build Settingswindow.
4.
Double-click initdeck to edit it.
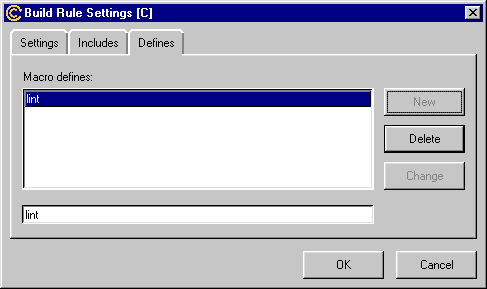
5.
Click the Build Rules
tab. Double-click the C
rule. The Build Rules Settings window
appears (see Figure 18). Click
the Defines tab.
Enter lint in the text entry box.
6.
Click New to create
the macro. Enter the following input in the dialog below the Macro
defines pane, replacing <project
directory>
with your path to the demos\monop
directory (see Figure 19 as an example):
_PATH_CARDS= " \ " <project directory>/cards.pck\ ""

Now,
GNUPro Toolkit uses an appropriate definition for the card pack when running
the monop program.
Click
OK to close the Build Rules Settings
window. Click OK
to close the Edit Target
window. Click Done
to close the Build Settings
window, having modified the target for the project.
Open
a shell window and copy the cards.inp file in the demos\monopdirectory
into the build directory (see Figure 20
for an example of the copy command in a Command.com
shell window that a Windows NT developer could use; UNIX users would use
the cp command in a shell window).
Select
Tools->
Build
from the menu bar and select initdeck from the target list.
To
ensure that the macro changes are picked up at compile time, perform a
clean build of the initdeck target by selecting Tools
-> Clean Build
(see Figure 21).

Click
the Start button
to perform the build.
Now,
initdeck
compiles and links without errors. binitdeck is the name of the
working executable.
Click
the Run button
to run binitdeck which creates the cards used in the game.
A
shell window opens to build the cards (see Figure
22) and closes after the build is complete.

From
the Build Targets
field of the Build
window, select monop and click Run.
A
shell window opens and monop runs automatically. Enter the number
of players and their names. See Figure 23 for an example
in a shell window of a project that builds and is ready to run.
Use
the ? key
to get playing options for monop. Oh, have fun.
Top|Contents|Previous|Next