| Oracle Data Guard Concepts and Administration Release 2 (9.2) Part Number A96653-02 |
|


|
View PDF |
| Oracle Data Guard Concepts and Administration Release 2 (9.2) Part Number A96653-02 |
|
|
View PDF |
A Data Guard configuration consists of one database that functions in a primary role and one or more databases that function in a standby role. Typically, the role of each database does not change. However, if the primary database becomes unavailable or if hardware or software maintenance operations must be performed, you might need to change the role of one or more databases in the configuration.
The number, location, and type (physical or logical) of standby databases in the Data Guard configuration and the way in which changes to the primary database are propagated to each standby database determine, in advance, the role management options available to you in response to a planned or unplanned primary database outage.
This chapter describes the Data Guard role management services and operations that allow you to change and manage the roles of the databases in a Data Guard configuration. It contains the following topics:
A database operates in one of the following mutually exclusive roles: primary or standby. Data Guard allows you to change these roles dynamically by issuing the SQL commands described in this chapter, or by using Data Guard Manager, or by using the Oracle Data Guard broker command-line interface as described in the Oracle9i Data Guard Broker guide.
Oracle Data Guard supports two role transition operations. The first operation, a switchover, is a reversible role transition between the primary database and one of its standby databases. The second operation, a failover, transitions a standby database to the primary role in response to a failure of the primary database.
Each of these operations are described in more detail in Section 7.1.2 and Section 7.1.3. Section 7.1.1 helps you choose the role transition operation that best minimizes downtime and risk of data loss.
During any role transition, the amount of downtime required to complete the operation, the potential for data loss, and the effects on other standby databases in the configuration are determined by:
The goal is to perform the role transition as quickly as possible with little or no data loss. The decision tree presented in Figure 7-1 can help you choose the role transition operation that best minimizes downtime and risk of data loss.
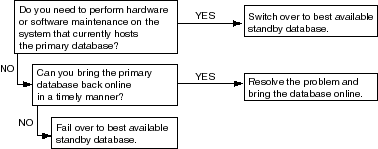
Text description of the illustration rms_decision.gif
In general, consider if it would be faster to repair the primary database than to perform a role transition. If you can repair the primary database, you also do not have to reconfigure client applications to connect to a new database. However, if the repair operation results in any data loss, you might need to re-create all other standby databases in the configuration from a backup copy of the repaired primary database.
If a role transition must be performed and the configuration contains physical standby databases, Oracle recommends that you perform the role transition using the best available physical standby database. Role transitions involving a logical standby database:
| See Also:
Section 10.1 for information about how to choose the best available physical or logical standby database. |
Once you determine the type of role transition you want to perform, proceed to one of the following sections:
During a switchover operation, there is no data loss, and the old primary database remains in the configuration as a standby database. A switchover is typically used to reduce primary database downtime during planned outages, such as operating system or hardware upgrades. A switchover operation takes place in two phases. In the first phase, the existing primary database is transitioned to a standby role. In the second phase, a standby database is transitioned to the primary role.
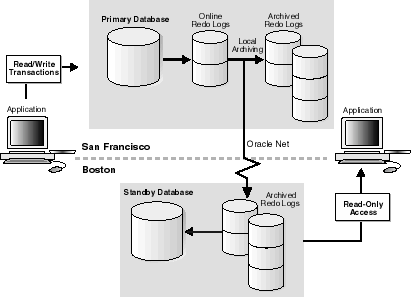
Figure 7-2 shows a two-site Data Guard configuration before the roles of the databases are switched. The primary database is in San Francisco, and the standby database is in Boston.
Text description of the illustration before.gif
Figure 7-3 shows the Data Guard environment after the original primary database was switched over to a standby database, but before the original standby database has become the new primary database. At this stage, the Data Guard configuration temporarily has two standby databases.
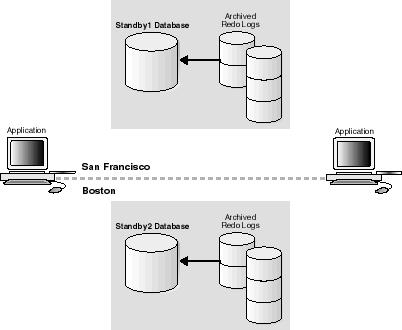
Text description of the illustration between.gif
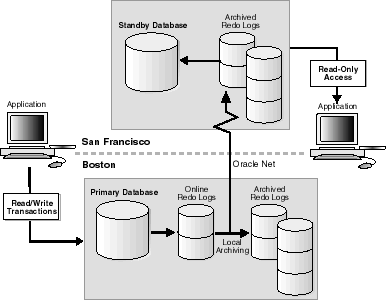
Figure 7-4 shows the Data Guard environment after a switchover took place. The original standby database became the new primary database. The primary database is now in Boston, and the standby database is now in San Francisco.
Text description of the illustration switch.gif
Although switchover operations can be performed between the primary database and either a logical or a physical standby database in the Data Guard configuration, a physical standby database is preferred (as described in Section 7.1.1). To minimize downtime, carefully plan each switchover operation so that the primary and standby databases involved have as small a transactional lag as possible.
Before starting a switchover operation:
Be sure you refer to Section 5.8.2, which describes how to configure initialization parameters on both the primary and standby databases so that your Data Guard configuration operates properly after a role transition.
Each location in the Data Guard configuration should have connectivity through Oracle Net to the primary database and to all associated standby databases.
For a Real Application Clusters database, only one primary instance and one standby instance can perform the switchover operation. Shut down all other instances before the switchover operation.
The standby database that you plan to transition to the primary role must be mounted before you begin the switchover operation. Ideally, the physical standby database will also be actively recovering archived redo logs when the database roles are switched. If the physical standby database is open for read-only access, the switchover operation still will take place, but will require additional time.
| See Also:
Section 6.2.2 for more information on managed recovery mode |
ARCHIVELOG mode.For switchover operations involving a physical standby database, refer to Section 7.2.1. For switchover operations involving a logical standby database, refer to Section 7.3.1. If you configured your environment using the Oracle Data Guard Broker distributed management framework, refer instead to the Oracle9i Data Guard Broker guide for information about how to use the Oracle Data Guard Manager Switchover Wizard to automate the switchover process.
During a failover operation, a standby database transitions to the primary role and the old primary database is rendered unable to participate in the configuration. Depending on the protection mode under which the old primary database was operating before the failover, there might be little or no data loss during a failover. A failover is typically used only when a primary database becomes unavailable and there is no possibility of restoring it to service within a reasonable amount of time. The specific actions performed during a failover vary based on if a logical or a physical standby database is involved in the failover operation, the state of the configuration at the time of the failover, and on the specific SQL commands used to initiate the failover.
Figure 7-5 shows the result of a failover operation from a primary database in San Francisco to a physical standby database in Boston.
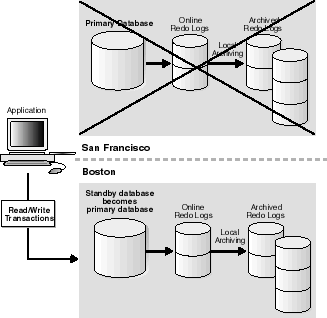
Text description of the illustration failover.gif
In general, before performing a failover operation, you should transfer as much of the available and unapplied primary database redo data as possible to the standby database by following the steps described in this section.
Before starting a failover operation:
| See Also:
Section 5.8.2 provides sample primary and standby initialization parameter files. |
Each location in the Data Guard configuration should have connectivity through Oracle Net to the primary database and to all associated standby databases.
For a Real Application Clusters database, only one standby instance can be active during the failover operation. Shut down all other instances before the failover operation.
SQL> ALTER DATABASE SET STANDBY DATABASE TO MAXIMIZE PERFORMANCE;
This is required because you cannot fail over to a physical standby database that is in maximum protection mode. In addition, if a primary database in maximum protection mode is still actively communicating with the standby database, issuing the ALTER DATABASE statement to change the standby database from maximum protection mode to maximum performance mode will not succeed. Because a failover operation irreversibly removes the original primary database from the Data Guard configuration, these features serve to protect a primary database operating in maximum protection mode from the effects of an unintended failover operation.
If you are performing a failover operation involving a physical standby database, refer to Section 7.2.2. If you are performing a failover operation involving a logical standby database, refer to Section 7.3.2.
This section describes how to perform switchovers and failovers involving a physical standby database and recovering from an unsuccessful switchover.
This section describes how to perform a switchover operation that changes roles between a primary database and a physical standby database. Always initiate the switchover operation on the primary database and complete it on the physical standby database. The following steps describe how to perform the switchover operation.
On the current primary database, query the SWITCHOVER_STATUS column of the V$DATABASE fixed view on the primary database to verify that it is possible to perform a switchover operation. For example:
SQL> SELECT SWITCHOVER_STATUS FROM V$DATABASE;
SWITCHOVER_STATUS
 -----------------
 TO STANDBY
 1 row selected
The TO STANDBY value in the SWITCHOVER_STATUS column indicates that it is possible to switch the primary database to the standby role. If the TO STANDBY value is not displayed, then verify that the Data Guard configuration is functioning correctly (for example, verify that all LOG_ARCHIVE_DEST_n parameter values are specified correctly).
| See Also:
Chapter 14 for information about other valid values for the |
To transition the current primary database to a physical standby database role, use the following SQL statement on the primary database:
SQL> ALTER DATABASE COMMIT TO SWITCHOVER TO PHYSICAL STANDBY;
After this statement completes, the primary database is converted into a standby database. The current control file is backed up to the current SQL session trace file before the switchover operation. This makes it possible to reconstruct a current control file, if necessary.
Shut down the former primary instance and restart it without mounting the database:
SQL> SHUTDOWN IMMEDIATE;
SQL> STARTUP NOMOUNT;
Mount the database as a physical standby database:
SQL> ALTER DATABASE MOUNT STANDBY DATABASE;
At this point in the switchover process, both databases are configured as standby databases (see Figure 7-3).
After you transition the primary database to the physical standby role and the switchover notification is received by the standby databases in the configuration, you should verify if the switchover notification was processed by the target standby database by querying the SWITCHOVER_STATUS column of the V$DATABASE fixed view on the target standby database.
For example:
SQL> SELECT SWITCHOVER_STATUS FROM V$DATABASE;
SWITCHOVER_STATUS
 -----------------
SWITCHOVER PENDING
1 row selected
The SWITCHOVER PENDING value of the SWITCHOVER_STATUS column indicates the standby database is about to switch from the standby role to the primary role. If the SWITCHOVER PENDING value is not displayed, then verify that the Data Guard configuration is functioning correctly (for example, verify that all LOG_ARCHIVE_DEST_n parameter values are specified correctly).
| See Also:
Chapter 14 for information about other valid values for the |
You can switch a physical standby database from the standby role to the primary role when the standby database instance is either mounted in managed recovery mode or open for read-only access. It must be mounted in one of these modes so that the primary database switchover operation request can be coordinated.
The SQL ALTER DATABASE statement used to perform the switchover automatically creates online redo logs if they do not already exist. This might significantly increase the time required to complete the COMMIT operation. Therefore, Oracle Corporation recommends that you always manually add online redo logs to the target standby database when you create it. Use one of the following methods to manually add the online redo logs if they do not already exist:
LOG_FILE_NAME_CONVERT initialization parameter to correctly associate the standby site path names to the new online redo logs (see Section 3.2.6).ALTER DATABASE ADD STANDBY LOGFILE statement.After you manually add the online redo logs, use the following SQL statement on the physical standby database that you want to transition to the primary role:
SQL> ALTER DATABASE COMMIT TO SWITCHOVER TO PRIMARY;
Shut down the target standby instance and restart it using the appropriate initialization parameters for the primary role:
SQL> SHUTDOWN;
SQL> STARTUP;
The target physical standby database is now transitioned to the primary database role.
Issue the following statement to begin managed recovery operations on the new physical standby database:
SQL> ALTER DATABASE RECOVER MANAGED STANDBY DATABASE DISCONNECT FROM SESSION;
Issue the following statement on the new primary database:
SQL> ALTER SYSTEM ARCHIVE LOG CURRENT;
This section describes how to perform failover operations involving a physical standby database.
During failover operations involving a physical standby database:
Before starting the failover operation, perform as many of the steps documented in Section 7.1.3.1 as possible to prepare the selected standby database for the failover operation, then proceed to Section 7.2.2.1 for the failover steps.
The following steps describe how to perform a failover to a physical standby database. Depending on the data protection mode in use, it might be possible to automatically recover all committed transactions.
The steps described in this section transition the selected physical standby database to the primary role so that any other physical or logical standby databases in the configuration will remain in the configuration and will not need to be shut down or restarted.
To determine if there are gaps at the target standby database in the archived redo logs received from the primary database, query the V$ARCHIVE_GAP view. This view contains the sequence numbers of the archived logs that are known to be missing for each thread. The data returned reflects the highest gap only. (Step 3 will provide instructions on how to resolve any additional gaps.)
For example:
SQL> SELECT THREAD#, LOW_SEQUENCE#, HIGH_SEQUENCE# FROM V$ARCHIVE_GAP;
THREAD#    LOW_SEQUENCE# HIGH_SEQUENCE#
---------- ------------- --------------
         1            90             92
In this example the gap comprises archive logs 90, 91, and 92 for thread 1. If possible, copy all of the identified missing archived redo logs to the target standby database from the primary database or from another standby database and register them. This must be done for each thread.
For example:
SQL> ALTER DATABASE REGISTER PHYSICAL LOGFILE 'filespec1';
To determine if there are any other missing archived redo logs, query the V$ARCHIVED_LOG view on all available databases in the configuration to obtain the highest sequence number for each thread.
For example:
SQL> SELECT UNIQUE THREAD# AS THREAD, MAX(SEQUENCE#)
  2> OVER (PARTITION BY thread#) AS LAST from V$ARCHIVED_LOG;

    THREAD       LAST
---------- ----------
         1        100
Copy any archived redo logs from the other available databases that contain sequence numbers higher than the highest sequence number available on the target standby database to the target standby database and register them. This must be done for each for each thread.
For example:
SQL> ALTER DATABASE REGISTER PHYSICAL LOGFILE 'filespec1';
The query executed in step 1 displays information for the highest gap only. After resolving that gap, you must repeat steps 1 and 2 until the query in step 1 returns no rows.
If your target standby database was configured with standby redo logs and you have not manually registered any partial archived redo logs, issue the following statement:
SQL> ALTER DATABASE RECOVER MANAGED STANDBY DATABASE FINISH;
Otherwise, you must issue the following statement:
SQL> ALTER DATABASE RECOVER MANAGED STANDBY DATABASE FINISH
  2> SKIP STANDBY LOGFILE;
Once the SQL ALTER DATABASE RECOVER MANAGED STANDBY DATABASE...FINISH statement completes successfully, transition the physical standby database to the primary database role by issuing the following SQL statement:
SQL> ALTER DATABASE COMMIT TO SWITCHOVER TO PRIMARY;
After issuing this SQL statement, you can no longer use this database as a standby database and subsequent redo logs from the original primary database cannot be applied. The standby redo logs were archived and should be copied to, registered, and recovered on all other standby databases derived from the original primary database. This will happen automatically if the standby destinations are correctly defined on the new primary database.
There is no need to shut down and restart other standby databases in the configuration that were not participants in the failover operation. During a failover, the original primary database is eliminated from participating in the configuration. To reuse the old primary database in the new configuration, you must re-create it as a standby database, using a backup copy of the new primary database.
Once the archived standby redo logs have been received and recovered on all standby destinations, the other standby databases in the configuration are ready to receive redo logs from the new primary database. If the new primary database does not define archived log destinations for the other standby databases, you must define and enable them. In addition, you may need to manually copy and register the resulting failover archived redo logs on each of the remaining standby databases in the configuration.
To manually register any copied archived redo logs that were not automatically applied, issue the following statement on each standby database for each copied log file:
SQL> ALTER DATABASE REGISTER LOGFILE 'filespec';
To complete the failover operation, you need to shutdown the new primary database and restart it in read/write mode using the proper traditional initialization parameter file (or server parameter file) for the primary role:
SQL> SHUTDOWN IMMEDIATE;
SQL> STARTUP;
| See Also:
Section 5.8.2 for complete information about how to configure initialization parameters on both the primary and standby databases so that your Data Guard configuration operates properly after a role transition |
Optionally, before issuing the STARTUP statement, you might want to back up the new primary database. This task, while not required, is a recommended safety measure, because you cannot recover changes made after the failover without a backup copy.
As a result of the failover operation, the original primary database can no longer participate in the Data Guard configuration, and all other standby databases are now receiving and applying redo data from the new primary database.
This section describes how to perform switchover and failover operations involving a logical standby database.
When you perform a switchover operation that changes roles between a primary database and a logical standby database, always initiate the switchover operation on the primary database and complete it on the logical standby database. The following steps describe how to perform the switchover operation.
To transition the primary database to a logical standby database role, issue the following SQL statement:
SQL> ALTER DATABASE COMMIT TO SWITCHOVER TO LOGICAL STANDBY;
This statement waits for all current update operations on the primary database to end and prevents any new users from starting update operations. It also puts a marker in the redo log file to provide a synchronization point for logical standby database operations. Executing this statement also will prevent users from making any changes to the data being maintained in the logical standby database. To ensure faster execution, ensure that the primary database is in a quiet state with no update activity before issuing the switchover statement (for example, have all users temporarily log off the primary database).
The primary database is transitioned to run in the standby database role.
When you transition a primary database to a logical standby database role, you do not have to shut down and restart the database.
Defer archiving redo logs for all remote database destinations:
SQL> ALTER SYSTEM SET LOG_ARCHIVE_DEST_STATE_2=DEFER SCOPE=BOTH;
To ensure that this change will persist if the database is later restarted, update the appropriate initialization parameter file or server parameter file. In general, when the database operates in the primary role, you must enable archiving redo logs to remote destinations, and when the database operates in the standby role, you must disable archiving redo logs to remote destinations.
On the logical standby database that you want to run in the primary role, use the following SQL statement to switch the logical standby database to the primary role:
SQL> ALTER DATABASE COMMIT TO SWITCHOVER TO PRIMARY;
There is no need to shut down and restart any logical standby databases that are in the Data Guard configuration. Other existing logical standby databases will continue to function normally after a switchover operation completes. All existing physical standby databases, however, are rendered unable to participate in the Data Guard configuration after the switchover.
Identify the initialization parameters that correspond to the new logical standby database and to all other remote logical standby destinations, and enable archiving redo logs for each of these destinations.
| See Also:
Section 7.1.2.1 which describes how to specify the |
For example, to enable archiving redo logs for the remote destination defined by the LOG_ARCHIVE_DEST_2 parameter, issue the following statement:
SQL> ALTER SYSTEM SET LOG_ARCHIVE_DEST_STATE_2=ENABLE SCOPE=BOTH;
To ensure that this change will persist if the new primary database is later restarted, update the appropriate traditional initialization parameter file or server parameter file. In general, when the database operates in the primary role, you must enable archiving redo logs to remote destinations, and when the database operates in the standby role, you must disable archiving redo logs to remote destinations.
On each logical standby database (including the former primary database and all other pre-existing logical standby databases), follow these steps to define a database link to the new primary database:
location1.)
Use the DBMS_LOGSTDBY.GUARD_BYPASS_ON procedure to bypass the database guard and allow modifications to the tables in the logical standby database. For example:
SQL> EXECUTE DBMS_LOGSTDBY.GUARD_BYPASS_ON; SQL> CREATE DATABASE LINK location1 2> CONNECT TOuser-nameIDENTIFIED BYpasswordUSING 'location1'; SQL> EXECUTE DBMS_LOGSTDBY.GUARD_BYPASS_OFF;
The database user account specified in the CREATE DATABASE LINK statement must have the SELECT_CATALOG_ROLE role granted to it on the new primary database.
| See Also:
Oracle9i Supplied PL/SQL Packages and Types Reference for more information about the |
On each logical standby database, verify that the database link was configured correctly by executing the following query using the database link:
SQL> SELECT * FROM DBA_LOGSTDBY_PARAMETERS@location1;
If the query succeeds, then you have verified that the database link created in step 1 can be used to complete the switchover.
On the new logical standby database (formerly the primary database) and on any other existing logical standby destinations, begin SQL apply operations:
SQL> ALTER DATABASE START LOGICAL STANDBY APPLY NEW PRIMARY location1;
In the example, location1 is the database link to the new primary database.
On the new primary database, enable archive logging and switch logs to ensure that all the standby databases begin receiving redo logs by executing the following SQL statements:
SQL> ALTER SYSTEM ARCHIVE LOG START;
SQL> ALTER SYSTEM SWITCH LOGFILE;
This section describes how to perform failover operations involving a logical standby database.
During failover operations involving a logical standby database:
Before starting the failover operation, perform as many of the steps documented in Section 7.1.3.1 as possible to prepare the selected standby database for the failover operation. Depending on the protection mode for the configuration and the attributes you chose for log transport services, it might be possible to automatically recover all or some of the primary database modifications.
To start the failover operation, perform the following steps.
Depending on the nature of the emergency, you might have access to the archived redo logs on the primary database or another standby database. If so, do the following:
On the logical standby database, query the DBA_LOGSTDBY_LOG view to determine which logs are missing and then register them. For example, the following query indicates there is a gap in the sequence of archived redo logs because it displays two files for THREAD 1 on the logical standby database. (If there are no gaps, the query will show only one file for each thread.) The output shows that the highest registered file is sequence number 10, but there is a gap at the file shown as sequence number 6:
SQL> COLUMN FILE_NAME FORMAT a55;
SQL> SELECT THREAD#, SEQUENCE#, FILE_NAME FROM DBA_LOGSTDBY_LOG L
  2> WHERE NEXT_CHANGE# NOT IN
  3> (SELECT FIRST_CHANGE# FROM DBA_LOGSTDBY_LOG WHERE L.THREAD# = THREAD#)
  4> ORDER BY THREAD#,SEQUENCE#;

   THREAD#  SEQUENCE# FILE_NAME
---------- ---------- -----------------------------------------------
         1          6 /disk1/oracle/dbs/log-1292880008_6.arc
         1         10 /disk1/oracle/dbs/log-1292880008_10.arc
To resolve the gap in archived redo logs, copy the archived redo logs with sequence numbers 7 and 11 (you copy the files that are one greater than each row shown in the query). Then, register these archived redo logs on the logical standby database. For example:
SQL> ALTER DATABASE REGISTER LOGICAL LOGFILE
  2> '/disk1/oracle/dbs/log-1292880008_7.arc';
Database altered.

SQL> ALTER DATABASE REGISTER LOGICAL LOGFILE
  2> '/disk1/oracle/dbs/log-1292880008_11.arc';
Database altered.
After you copy and register the missing archived redo logs to the logical standby system, query the DBA_LOGSTDBY_LOG view again to ensure there are no more gaps and that the next thread and sequence number needed by the logical standby database do not exist.
Depending on the nature of the emergency, online redo logs might be available on the primary database. If so, you should copy and register the missing online redo logs from the primary database and then apply them to the logical standby database.
If you register any online redo logs that have already been archived and registered on the logical standby database, the ORA-01289 message is returned. You can safely ignore this error message. For example:
SQL> ALTER DATABASE REGISTER LOGICAL LOGFILE
  2> '/disk1/oracle/dbs/online_log1.log';
ALTER DATABASE REGISTER LOGICAL LOGFILE '/disk1/oracle/dbs/online_log1.log'
*
ERROR at line 1:
ORA-01289: cannot add duplicate logfile

SQL> ALTER DATABASE REGISTER LOGICAL LOGFILE
  2> '/disk1/oracle/dbs/online_log2.log';
Database altered.
Depending on the nature of the emergency, you might not have access to any files on the primary database. To look for a partially filled archived redo log, query the DBA_LOGSTDBY_LOG view on the logical standby database in the same directory where the other archived redo logs are located. If a partially filled archived redo log exists, its sequence number will be one greater than the last registered archived redo log. For example:
SQL> COLUMN FILE_NAME FORMAT a55
SQL> SELECT THREAD#, SEQUENCE#, FILE_NAME FROM DBA_LOGSTDBY_LOG L
  2> ORDER BY THREAD#,SEQUENCE#;

   THREAD#  SEQUENCE# FILE_NAME
---------- ---------- -----------------------------------------------------
         1          3 /disk1/oracle/dbs/db1loga-1292880008_3.arc
         1          4 /disk1/oracle/dbs/archlogb-1292880008_4.arc
         1          5 /disk1/oracle/dbs/archlogb-1292880008_5.arc
         1          6 /disk1/oracle/dbs/archlogb-1292880008_6.arc
         1          7 /disk1/oracle/dbs/archlogb-1292880008_7.arc
         1          8 /disk1/oracle/dbs/archlogb-1292880008_8.arc
         1          9 /disk1/oracle/dbs/archlogb-1292880008_9.arc
         1         10 /disk1/oracle/dbs/archlogb-1292880008_10.arc

8 rows selected.
If a partially filled archived log exists, register it. For example:
SQL> ALTER DATABASE REGISTER LOGICAL LOGFILE
  2> '/disk1/oracle/dbs/log-1292880008_11.arc';

Database altered.
To turn off the apply delay interval, stop log apply services, and execute the DBMS_LOGSTDBY.APPLY_UNSET procedure. Then, restart log apply services.
Although the apply delay interval might have been set originally on the primary database, you must issue the following statements on the logical standby database to disable the apply delay interval because the primary database is no longer available:
SQL> ALTER DATABASE STOP LOGICAL STANDBY APPLY;
Database altered.

SQL> EXECUTE DBMS_LOGSTDBY.APPLY_UNSET('APPLY_DELAY');
PL/SQL procedure successfully completed.

SQL> ALTER DATABASE START LOGICAL STANDBY APPLY;
Database altered.
On the logical standby database that you are transitioning to the primary role, verify that the remaining archived redo logs were applied by querying the DBA_LOGSTDBY_PROGRESS view. For example:
SQL> SELECT APPLIED_SCN, NEWEST_SCN FROM DBA_LOGSTDBY_PROGRESS;

APPLIED_SCN NEWEST_SCN
----------- ----------
     190725     190725
When the APPLIED_SCN and NEWEST_SCN values are equal, all attainable data is applied and the logical standby database now contains as much data as possible from the primary database.
| See Also:
Chapter 9 and Chapter 10 for information about the |
Issue the following statements on the logical standby database (that you are transitioning to the new primary role) to stop SQL apply operations and activate the database in the primary database role:
SQL> ALTER DATABASE STOP LOGICAL STANDBY APPLY;
SQL> ALTER DATABASE ACTIVATE LOGICAL STANDBY DATABASE;
Depending on how much redo data you were able to apply to the new primary database, you might or might not be able to add existing logical standby databases back into the Data Guard configuration to serve as standby databases for the new primary database.
Follow these steps to define a database link to the new primary database that will be used during future switchover operations:
Use the DBMS_LOGSTDBY.GUARD_BYPASS_ON procedure to bypass the database guard and allow modifications to the tables in the logical standby database. For example:
SQL> EXECUTE DBMS_LOGSTDBY.GUARD_BYPASS_ON; SQL> CREATE DATABASE LINK location1 2> CONNECT TO<user-name>IDENTIFIED BY<password>USING 'location1'; SQL> EXECUTE DBMS_LOGSTDBY.GUARD_BYPASS_OFF;
The database user account specified in the CREATE DATABASE LINK statement must have the SELECT_CATALOG_ROLE role granted to it on the primary database.
| See Also:
Oracle9i Supplied PL/SQL Packages and Types Reference for more information about the |
On the logical standby database, verify that the database link was configured correctly by executing the following query using the database link:
SQL> SELECT * FROM DBA_LOGSTDBY_PARAMETERS@location1;
If the query succeeds, then you have verified that the database link created in step 1 can be used to perform a switchover.
Enable archiving redo logs to all remote logical standby destinations. For example:
SQL> ALTER SYSTEM SET LOG_ARCHIVE_DEST_STATE_2=ENABLE SCOPE=BOTH;
To ensure that this change will persist if the new primary database is later restarted, update the appropriate initialization parameter file or server parameter file. In general, when the database operates in the primary role, you must enable archiving redo logs to remote destinations, and when the database operates in the standby role, you must disable archiving redo logs to remote destinations.
Begin log apply services by issuing this SQL statement on all logical standby databases:
SQL> ALTER DATABASE START LOGICAL STANDBY APPLY NEW PRIMARY location1;
When this statement completes, all remaining archived redo logs will have been applied. Depending on the work to be done, this operation can take some time to complete.
If the ORA-16109 error is returned, you must re-create the logical standby database from a backup copy of the new primary database, and then add it to the Data Guard configuration.
The following example shows a failed attempt to start log apply services on a logical standby database in the new configuration where location1 points to the new primary database:
SQL> ALTER DATABASE START LOGICAL STANDBY APPLY NEW PRIMARY location1;
ALTER DATABASE START LOGICAL STANDBY APPLY NEW PRIMARY location1
                                                       *
ERROR at line 1:
ORA-16109: failed to apply log data from previous primary
|
 Copyright © 1998, 2002 Oracle Corporation. All Rights Reserved. |
|

