| Oracle9i Streams Release 2 (9.2) Part Number A96571-02 |
|


|
View PDF |
| Oracle9i Streams Release 2 (9.2) Part Number A96571-02 |
|
|
View PDF |
This chapter illustrates an example of a simple single source replication environment that can be constructed using Streams.
This chapter contains these topics:
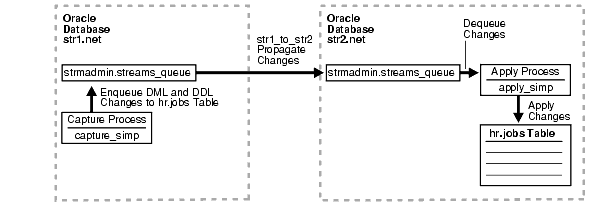
The example in this chapter illustrates using Streams to replicate data in one table between two databases. A capture process captures data manipulation language (DML) and data definition language (DDL) changes made to the jobs table in the hr schema at the str1.net Oracle database, and a propagation propagates these changes to the str2.net Oracle database. Then, an apply process applies these changes at the str2.net database. This example assumes that the hr.jobs table is read-only at the str2.net database.
Figure 21-1 provides an overview of the environment.
The following prerequisites must be completed before you begin the example in this chapter.
AQ_TM_PROCESSES: This parameter establishes queue monitor processes. Values from 1 to 10 specify the number of queue monitor processes created to monitor the messages. If AQ_TM_PROCESSES is not specified or is set to 0, then the queue monitor processes are not created. In this example, AQ_TM_PROCESSES should be set to at least 1 at each database.
Setting the parameter to 1 or more starts the specified number of queue monitor processes. These queue monitor processes are responsible for managing time-based operations of messages such as delay and expiration, cleaning up retained messages after the specified retention time, and cleaning up consumed messages if the retention time is 0.
GLOBAL_NAMES: This parameter must be set to true at each database that is participating in your Streams environment.JOB_QUEUE_PROCESSES: This parameter must be set to at least 2 at each database that is propagating events in your Streams environment. It should be set to the same value as the maximum number of jobs that can run simultaneously plus one. In this example, str1.net propagates events. So, JOB_QUEUE_PROCESSES must be set to at least 2 at str1.net.COMPATIBLE: This parameter must be set to 9.2.0 or higher at each database that is participating in your Streams environment.LOG_PARALLELISM: This parameter must be set to 1 at each database that captures events. In this example, this parameter must be set to 1 at str1.net.
| See Also:
"Setting Initialization Parameters Relevant to Streams" for information about other initialization parameters that are important in a Streams environment |
ARCHIVELOG mode. In this example, changes are produced at str1.net, and so str1.net must be running in ARCHIVELOG mode.
| See Also:
Oracle9i Database Administrator's Guide for information about running a database in |
str1.net database can communicate with the str2.net database.
strmadmin) at each database and prompts you for the tablespace you want to use for this user's data. Before you start this example, either create a new tablespace or identify an existing tablespace for the Streams administrator to use at each database. The Streams administrator should not use the SYSTEM tablespace.Complete the following steps to set up users and create queues and database links for a Streams replication environment that includes two Oracle databases.
/************************* BEGINNING OF SCRIPT ******************************
Run SET ECHO ON and specify the spool file for the script. Check the spool file for errors after you run this script.
*/

SET ECHO ON
SPOOL streams_setup_simple.out

/*
Connect to str1.net as SYS user.
*/

CONNECT SYS/CHANGE_ON_INSTALL@str1.net AS SYSDBA

/*
Create the Streams administrator named strmadmin and grant this user the necessary privileges. These privileges enable the user to manage queues, execute subprograms in packages related to Streams, create rule sets, create rules, and monitor the Streams environment by querying data dictionary views and queue tables. You may choose a different name for this user.
*/

GRANT CONNECT, RESOURCE, SELECT_CATALOG_ROLE
  TO strmadmin IDENTIFIED BY strmadminpw;

ACCEPT streams_tbs PROMPT 'Enter Streams administrator tablespace on str1.net: '

ALTER USER strmadmin DEFAULT TABLESPACE &streams_tbs
                     QUOTA UNLIMITED ON &streams_tbs;

GRANT EXECUTE ON DBMS_AQADM            TO strmadmin;
GRANT EXECUTE ON DBMS_CAPTURE_ADM      TO strmadmin;
GRANT EXECUTE ON DBMS_PROPAGATION_ADM  TO strmadmin;
GRANT EXECUTE ON DBMS_STREAMS_ADM      TO strmadmin;

BEGIN
  DBMS_RULE_ADM.GRANT_SYSTEM_PRIVILEGE(
    privilege    => DBMS_RULE_ADM.CREATE_RULE_SET_OBJ,
    grantee      => 'strmadmin',
    grant_option => FALSE);
END;
/

BEGIN
  DBMS_RULE_ADM.GRANT_SYSTEM_PRIVILEGE(
    privilege    => DBMS_RULE_ADM.CREATE_RULE_OBJ,
    grantee      => 'strmadmin',
    grant_option => FALSE);
END;
/
/*
Connect as the Streams administrator at the database where you want to capture changes. In this example, that database is str1.net.
*/

CONNECT strmadmin/strmadminpw@str1.net

/*
Run the SET_UP_QUEUE procedure to create a queue named streams_queue at str1.net. This queue will function as the Streams queue by holding the captured changes that will be propagated to other databases.
Running the SET_UP_QUEUE procedure performs the following actions:
streams_queue_table. This queue table is owned by the Streams administrator (strmadmin) and uses the default storage of this user.streams_queue owned by the Streams administrator (strmadmin).*/ EXEC DBMS_STREAMS_ADM.SET_UP_QUEUE(); /*
Create the database link from the database where changes are captured to the database where changes are propagated. In this example, the database where changes are captured is str1.net, and these changes are propagated to str2.net.
*/

CREATE DATABASE LINK str2.net CONNECT TO strmadmin IDENTIFIED BY strmadminpw
   USING 'str2.net';

/*
Connect to str2.net as SYS user.
*/

CONNECT SYS/CHANGE_ON_INSTALL@str2.net AS SYSDBA

/*
Create the Streams administrator named strmadmin and grant this user the necessary privileges. These privileges enable the user to manage queues, execute subprograms in packages related to Streams, create rule sets, create rules, and monitor the Streams environment by querying data dictionary views and queue tables. In this example, the Streams administrator will be the apply user for the apply process and must be able to apply changes to the hr.jobs table at str2.net. Therefore, the Streams administrator is granted ALL privileges on this table. You may choose a different name for the Streams administrator.
*/

GRANT CONNECT, RESOURCE, SELECT_CATALOG_ROLE
  TO strmadmin IDENTIFIED BY strmadminpw;

GRANT ALL ON hr.jobs TO strmadmin;

ACCEPT streams_tbs PROMPT 'Enter Streams administrator tablespace on str2.net: '

ALTER USER strmadmin DEFAULT TABLESPACE &streams_tbs
                     QUOTA UNLIMITED ON &streams_tbs;

GRANT EXECUTE ON DBMS_APPLY_ADM        TO strmadmin;
GRANT EXECUTE ON DBMS_AQADM            TO strmadmin;
GRANT EXECUTE ON DBMS_STREAMS_ADM      TO strmadmin;

BEGIN
  DBMS_RULE_ADM.GRANT_SYSTEM_PRIVILEGE(
    privilege    => DBMS_RULE_ADM.CREATE_RULE_SET_OBJ,
    grantee      => 'strmadmin',
    grant_option => FALSE);
END;
/

BEGIN
  DBMS_RULE_ADM.GRANT_SYSTEM_PRIVILEGE(
    privilege    => DBMS_RULE_ADM.CREATE_RULE_OBJ,
    grantee      => 'strmadmin',
    grant_option => FALSE);
END;
/
/*
Connect as the Streams administrator at str2.net.
*/

CONNECT strmadmin/strmadminpw@str2.net

/*
Run the SET_UP_QUEUE procedure to create a queue named streams_queue at str2.net. This queue will function as the Streams queue by holding the changes that will be applied at this database.
Running the SET_UP_QUEUE procedure performs the following actions:
streams_queue_table. This queue table is owned by the Streams administrator (strmadmin) and uses the default storage of this user.streams_queue owned by the Streams administrator (strmadmin).*/ EXEC DBMS_STREAMS_ADM.SET_UP_QUEUE(); /*
Check the streams_setup_simple.out spool file to ensure that all actions finished successfully after this script is completed.
*/

SET ECHO OFF
SPOOL OFF

/*************************** END OF SCRIPT ******************************/
Complete the following steps to specify the capture, propagation, and apply definitions for the hr.jobs table using the DBMS_STEAMS_ADM package.
/************************* BEGINNING OF SCRIPT ******************************
Run SET ECHO ON and specify the spool file for the script. Check the spool file for errors after you run this script.
*/

SET ECHO ON
SPOOL streams_share_jobs.out

/*
By default, the LogMiner tables are in the SYSTEM tablespace, but the SYSTEM tablespace may not have enough space for these tables once a capture process starts to capture changes. Therefore, you must create an alternate tablespace for the LogMiner tables.
Connect to str1.net as SYS user.
*/

CONNECT SYS/CHANGE_ON_INSTALL@str1.net AS SYSDBA

/*
Create an alternate tablespace for the LogMiner tables.
*/

ACCEPT tspace_name DEFAULT 'logmnrts' PROMPT 'Enter tablespace name (for
example, logmnrts): '

ACCEPT db_file_directory DEFAULT '' PROMPT 'Enter the complete path to the
datafile directory (for example, /usr/oracle/dbs): '

ACCEPT db_file_name DEFAULT 'logmnrts.dbf' PROMPT 'Enter the name of the
datafile (for example, logmnrts.dbf): '

CREATE TABLESPACE &tspace_name DATAFILE '&db_file_directory/&db_file_name'
  SIZE 25 M REUSE AUTOEXTEND ON MAXSIZE UNLIMITED;

EXECUTE DBMS_LOGMNR_D.SET_TABLESPACE('&tspace_name');

/*
Supplemental logging places additional information in the redo log for changes made to tables. The apply process needs this extra information to perform certain operations, such as unique row identification and conflict resolution. Because str1.net is the only database where changes are captured in this environment, it is the only database where you must specify supplemental logging for the hr.jobs table.
The following statement specifies an unconditional supplemental log group for the primary key column in the hr.jobs table.
*/

ALTER TABLE hr.jobs ADD SUPPLEMENTAL LOG GROUP log_group_jobs_pk
  (job_id) ALWAYS;

/*
Connect to str1.net as the strmadmin user.
*/

CONNECT strmadmin/strmadminpw@str1.net

/*
Configure and schedule propagation of DML and DDL changes to the hr.jobs table from the queue at str1.net to the queue at str2.net.
*/

BEGIN
  DBMS_STREAMS_ADM.ADD_TABLE_PROPAGATION_RULES(
    table_name              => 'hr.jobs',
    streams_name            => 'str1_to_str2',
    source_queue_name       => 'strmadmin.streams_queue',
    destination_queue_name  => 'strmadmin.streams_queue@str2.net',
    include_dml             =>  true,
    include_ddl             =>  true,
    source_database         => 'str1.net');
END;
/

/*
Configure the capture process to capture changes to the hr.jobs table at str1.net. This step specifies that changes to this table are captured by the capture process and enqueued into the specified queue.
*/

BEGIN
  DBMS_STREAMS_ADM.ADD_TABLE_RULES(
    table_name     => 'hr.jobs',
    streams_type   => 'capture',
    streams_name   => 'capture_simp',
    queue_name     => 'strmadmin.streams_queue',
    include_dml    =>  true,
    include_ddl    =>  true);
END;
/

/*
This example assumes that the hr.jobs table exists at both the str1.net database and the str2.net database, and that this table is identical at both databases. In this case, you can instantiate the table at the str2.net database by performing a metadata only export of the table at str1.net and then importing the resulting export dump file at str2.net. Performing this metadata only export/import records the instantiation SCN for the hr.jobs table at str2.net, which is required before an apply process at str2.net can apply changes to the table.
Open a different window and export the hr.jobs table at str1.net that will be instantiated at str2.net. Make sure you set the OBJECT_CONSISTENT export parameter to y and the ROWS export parameter to n when you run the export command. Also, make sure no DML or DDL changes are made to the hr.jobs table during the export.
The following is an example export command:
exp userid=hr/hr FILE=jobs_instant.dmp TABLES=jobs OBJECT_CONSISTENT=y ROWS=n
| See Also:
Oracle9i Database Utilities for information about performing an export |
*/

PAUSE Press <RETURN> to continue when the export is complete in the other window
that you opened.

/*
Transfer the export dump file jobs_instant.dmp to the destination database. In this example, the destination database is str2.net.
You can use binary FTP or some other method to transfer the export dump file to the destination database. You may need to open a different window to transfer the file.
*/

PAUSE Press <RETURN> to continue after transferring the dump file.

/*
In a different window, connect to the computer that runs the str2.net database and import the export dump file jobs_instant.dmp to instantiate the jobs table in the str2.net database. You can use telnet or remote login to connect to the computer that runs str2.net.
When you run the import command, make sure you set the STREAMS_INSTANTIATION import parameter to y. This parameter ensures that the import records export SCN information for each object imported.
The following is an example import command:
imp userid=hr/hr FILE=jobs_instant.dmp IGNORE=y COMMIT=y LOG=import.log
STREAMS_INSTANTIATION=y
| See Also:
Oracle9i Database Utilities for information about performing an import |
*/

PAUSE Press <RETURN> to continue after the import is complete at str2.net.
/*
When you instantiated that hr.jobs table at str2.net, the supplemental log group from str1.net for the table was retained. This log group is not needed at str2.net because no capture process captures changes to this table at str2.net. You can remove the log group to avoid extraneous information in the redo log at str2.net. Connect to str2.net as the hr user.
*/

CONNECT hr/hr@str2.net

/*
Drop the supplemental log group at str2.net.
*/

ALTER TABLE hr.jobs DROP SUPPLEMENTAL LOG GROUP log_group_jobs_pk;

/*
Connect to str2.net as the strmadmin user.
*/

CONNECT strmadmin/strmadminpw@str2.net

/*
Configure str2.net to apply changes to the hr.jobs table.
*/

BEGIN
  DBMS_STREAMS_ADM.ADD_TABLE_RULES(
    table_name      => 'hr.jobs',
    streams_type    => 'apply',
    streams_name    => 'apply_simp',
    queue_name      => 'strmadmin.streams_queue',
    include_dml     =>  true,
    include_ddl     =>  true,
    source_database => 'str1.net');
END;
/

/*
Set the disable_on_error parameter to n so that the apply process will not be disabled if it encounters an error, and start the apply process at str2.net.
*/

BEGIN
  DBMS_APPLY_ADM.SET_PARAMETER(
    apply_name  => 'apply_simp',
    parameter   => 'disable_on_error',
    value       => 'n');
END;
/

BEGIN
  DBMS_APPLY_ADM.START_APPLY(
    apply_name  => 'apply_simp');
END;
/

/*
Connect to str1.net as the strmadmin user.
*/

CONNECT strmadmin/strmadminpw@str1.net

/*
Start the capture process at str1.net.
*/

BEGIN
  DBMS_CAPTURE_ADM.START_CAPTURE(
    capture_name  => 'capture_simp');
END;
/

/*
Check the streams_share_jobs.out spool file to ensure that all actions finished successfully after this script is completed.
*/

SET ECHO OFF
SPOOL OFF

/*************************** END OF SCRIPT ******************************/
Complete the following steps to make DML and DDL changes to the hr.jobs table at str1.net and then confirm that the changes were captured at str1.net, propagated from str1.net to str2.net, and applied to the hr.jobs table at str2.net.
Make the following changes to the hr.jobs table.
CONNECT hr/hr@str1.net

UPDATE hr.jobs SET max_salary=9545 WHERE job_id='PR_REP';
COMMIT;

ALTER TABLE hr.jobs ADD(duties VARCHAR2(4000));
After some time passes to allow for capture, propagation, and apply of the changes performed in the previous step, run the following query to confirm that the UPDATE change was propagated and applied at str2.net:
CONNECT hr/hr@str2.net

SELECT * FROM hr.jobs WHERE job_id='PR_REP';
The value in the max_salary column should be 9545.
Next, describe the hr.jobs table to confirm that the ALTER TABLE change was propagated and applied at str2.net:
DESC hr.jobs
The duties column should be the last column.
|
 Copyright © 2002 Oracle Corporation. All Rights Reserved. |
|

