| Oracle® OLAP Application Developer's Guide 10g Release 1 (10.1) Part Number B10333-02 |
|


|
View PDF |
| Oracle® OLAP Application Developer's Guide 10g Release 1 (10.1) Part Number B10333-02 |
|
|
View PDF |
In this chapter, you will learn how to create new measures as a permanent addition to a standard form analytic workspace. Using the method described in this chapter, you can define custom measures that can store data (instead of calculating it on demand) and are indistinguishable from any other measures in the analytic workspace. However, the process is more complex than using DBMS_AW_UTILITIES or OLAP_EXPRESSION, as described in Chapter 7.
You can also populate the new workspace objects by using advanced calculation methods (such as forecasting or allocation) or by loading the data from external sources.
You will also learn various methods of executing OLAP DML commands.
This chapter contains the following topics:
Analytic Workspace Manager and the current generation of tools can only be used with database standard form analytic workspaces. As described in Chapter 8, database standard form (or simply, standard form) identifies the types of objects that must exist, the OLAP DML properties that must be assigned to them, and a variety of catalogs within the analytic workspace for registering workspace objects.
Conformity with this standard enables the tools to perform their jobs, such as aggregating and refreshing the data, and generating views and metadata. Otherwise, the tools have no means of identifying the function of workspace objects within a logical multidimensional model.
Over the life span of an analytic workspace, you may want to add measures from a new data source, or define a permanent custom measure using some of the more advanced calculation techniques, such as forecasting or allocation.
While you would need to refresh these measures manually, you would still want to use the aggregation and enablement tools with the new measures.
For the new measures to be accessible to the tools, you must take these steps:
Define the appropriate workspace objects (formulas, or measures, or both).
Attach OLAP DML properties to the objects with the appropriate values.
Register the objects in the standard form workspace catalogs.
This chapter explains how to perform these steps.
|
See Also:
|
When working with an analytic workspace, you can use any of these methods for issuing OLAP DML commands to the OLAP engine for execution:
Using dialogs in Analytic Workspace Manager, you can create analytic workspaces, and define and modify workspace objects such as dimensions, variables, models, and aggmaps.
Within OLAP Worksheet, you can open an interactive OLAP session in which to issue OLAP DML commands. You can run OLAP Worksheet from Analytic Workspace Manager. Note that when you attach a workspace in Analytic Workspace Manager, you can modify it using either the dialogs or OLAP Worksheet; they share the same session.
Within a SQL session (such as in SQL*Plus), you can embed OLAP DML commands in calls to the DBMS_AW.EXECUTE PL/SQL procedure.
This chapter identifies how to use the Analytic Workspace Manager dialogs as much as possible. As you become more familiar with the OLAP DML, you may find that the other methods are very useful.
When developing SQL- or Java-based applications, you can also embed OLAP DML in these ways:
In SQL programs, you can embed OLAP DML commands using the procedures in the DBMS_AW package.
In Java programs, you can embed OLAP DML commands using the SPLExecutor class in the OLAP API.
Both the DBMS_AW package and OLAP Worksheet enable you to intersperse SQL and OLAP DML commands within a single working environment.
|
See Also:
|
In Chapter 6, you learned to use the various wizards in Analytic Workspace Manager for creating and managing analytic workspaces. These wizards are available in the OLAP Catalog view. The Object View in Analytic Workspace Manager has property sheets and menus for defining all of the object types available in analytic workspaces. The wizards, property sheets, and menu choices send OLAP DML commands to the OLAP engine for execution.
For example, to create a dimension, you open the Create Dimension dialog and define the dimension using a property sheet. When you click the Create button, a DEFINE DIMENSION command in the OLAP DML is formulated and executed in your analytic workspace.
This method is particularly good for enhancing an analytic workspace that was generated by a wizard. You may want to create a formula or modify an aggmap. By selecting an object in the Object View, you can modify many of its characteristics in the property pages. Note that some characteristics cannot be changed after an object is created (such as the dimensions or data type of a variable), so those characteristics are dimmed.
If you need to populate any new objects, you can do so by executing the appropriate DML commands in OLAP Worksheet. When you run OLAP Worksheet from within Analytic Workspace Manager, you are accessing the same session. Any changes that you make in OLAP Worksheet are immediately reflected in Analytic Workspace Manager, and vice versa. In this environment, you can alternate between the graphical and command line interfaces within the same session.
For anyone who is already familiar with the OLAP DML or is doing extensive development work in an analytic workspace, OLAP Worksheet offers the most suitable environment. You can open an OLAP session and work interactively in the OLAP DML, using all facets of this feature-rich language. OLAP Worksheet provides an editor for writing programs, models, and aggmaps. You can also switch to a SQL mode and issue SQL commands against relational tables and views.
You can run OLAP Worksheet from Analytic Workspace Manager.
Open Analytic Workspace Manager.
Connect to your database.
From the Tools menu, select OLAP Worksheet.
The OLAP Worksheet window opens. If you have attached an analytic workspace in Analytic Workspace Manager, then that workspace is attached to your session in OLAP Worksheet.
To execute an OLAP DML command, type it in the input pane at the bottom of the window.
For example, to view the list of attached analytic workspaces, issue this command:
AW LIST
Note that the EXPRESS workspace must always be attached.
|
Note: Because OLAP Worksheet and Analytic Workspace Manager share the same session, you must be careful when moving between the two applications. Your actions in the Object View may have consequences on commands that you issue in OLAP Worksheet. Use theAW LIST command to check the order in which analytic workspaces are attached, since some commands, like LISTNAMES and DEFINE, operate only on the first workspace. Also issue a LIMIT NAME TO ALL command before using commands like EXPORT, which use the status of the NAME dimension. |
Use the Edit window to change the content of a program, model, or aggmap. Alternatively, you can use the property pages in Analytic Workspace Manager to edit these objects, but you cannot execute them there.
You cannot change the contents of a dimension, variable, relation, valueset, or other data container using the editor.
To add contents to a program object, issue this command to open the edit window:
EDIT program_name
For example, EDIT CREATE_MEASURE.
PROGRAM is the default object type; you must specify the other types. For example, you would issue a command such as EDIT AGGMAP units_cube_aggmap to edit an aggregation map.
Type the OLAP commands that you want in the program.
When you are done editing the program, from the editor's File menu, choose Save, then Close.
To compile and execute the program, issue these commands:
CALL program_name
Note: The COMPILE command is optional because the program will compile automatically. However, a separate COMPILE command is useful for quickly identifying syntax errors in the OLAP DML commands.
To issue SQL commands, from the Options menu, select SQL Mode. To resume issuing OLAP DML commands, clear SQL Mode.
Example 9-1 shows a sample session in which a program named CREATE_MEASURE is created, compiled, and executed within OLAP Worksheet
The DBMS_AW.EXECUTE procedure enables you to issue OLAP DML commands at any time within a SQL session. To see the output of the OLAP DML commands, issue this SQL command once during your session:
SET SERVEROUT ON FORMAT WRAPPED
Following is the basic format of DBMW_AW.EXECUTE, in which you can substitute one or more OLAP DML commands, separated by semicolons, between the single quotes.
EXECUTE DBMS_AW.EXECUTE('dml_command_1; dml_command_2; dml_command_n');
In the following example, the first command opens the GLOBAL analytic workspace. The second command sets the focus on a measure named SALES_PP and assigns an equation to it.
EXECUTE DBMS_AW.EXECUTE('AW ATTACH global RW');
EXECUTE DBMS_AW.EXECUTE('-
     CONSIDER sales_pp; EQ LAG(sales, 1, time, LEVELREL time_levelrel)');
You can define the contents of a program in a text file, which you can easily modify. Follow these steps:
Define a database directory object if you have not done so already.
CREATE DIRECTORY directory AS 'path_name';
GRANT permission ON DIRECTORY directory TO users;
Open an analytic workspace if you have not done so already.
EXECUTE DBMS_AW.EXECUTE('AW CREATE aw_name ');
or
EXECUTE DBMS_AW.EXECUTE('AW ATTACH aw_name RW');
It is a good practice to develop your OLAP DML programs in a separate analytic workspace from your data.
Create a program object and, optionally, document it by attaching a description. The following syntax defines a new program.
EXECUTE DBMS_AW.EXECUTE('DEFINE object PROGRAM; LD object description');
Open a text editor and create a file with the following contents:
CONSIDER program_name
PROGRAM
     .
     .                 " OLAP DML commands
     .
END
Tip: If your operating system permits you to open multiple windows, you can use one window for your SQL session and another for editing the text file.
Execute the text file.
EXECUTE DBMS_AW.EXECUTE('INFILE directory/filename');
Compile and execute the program.
EXECUTE DBMS_AW.EXECUTE('CALL program_name');
Example 9-2 shows a sample session in which a program named CREATE_MEASURE is created, compiled, and executed within a SQL session.
Example 9-2 Creating an OLAP DML Program in SQL*Plus
% sqlplus
     .
     .
     .
SQL> CREATE DIRECTORY olapfiles AS '/users/oracle/olapfiles';
SQL> GRANT all ON DIRECTORY olapfiles TO ALL;
SQL> EXECUTE DBMS_AW.EXECUTE('AW ATTACH global_programs RW');
SQL> EXECUTE DBMS_AW.EXECUTE('DEFINE create_measure PROGRAM; LD Get measures');

-- Create a file named getmeas.inf in directory olapfiles with the
-- contents of the program. Start with the template and edit it for
-- the sample data.

SQL> EXECUTE DBMS_AW.EXECUTE('INFILE olapfiles/getmeas.inf');
SQL> EXECUTE DBMS_AW.EXECUTE('CALL create_measure');
Most of the variables in your analytic workspace are created from the base-level data in your source star or snowflake schema. However, you may want to store the results of your analysis in a variable. For example, if you generate a forecast, you must identify a target variable in which to store the forecast.
In a standard form workspace, a logical measure is implemented with a variable and a formula, as described in Chapter 8. To add a custom measure in database standard form, you need to create these objects manually. Afterward, the enablers will include the custom measures in the views exactly the same was as the other measures. For applications, the original measures and the custom measures will be indistinguishable.
If you just want to define a formula for calculating a custom measure on the fly from existing measures in your analytic workspace, you can bypass this step. You can define as many custom measures you wish from the same measure variables.
However, if you want to store the results of a forecast or other analysis, or load data from other sources, then take these steps to define a measure variable in Analytic Workspace Manager.
|
Tip: To define a variable just like another one in a cube (including data type), right-click that variable from the Object View and choose Create Like. Then you can just modify the new variables properties as shown in Table 9-1. For an example of this method, refer to "Creating New Variables in GLOBAL". |
Open the Object View and expand the folder for your analytic workspace.
Right-click the Variable folder and choose Create Variable.
The Create Variable dialog is displayed.
On the Basic page, specify a name, description, and data type for the variable. To conform with the other variable names in the workspace, the name should end with _VARIABLE, and may begin with the cube name (such as SALES_CUBE_). Click Help for more information about these choices.
On the Dimensions page, select the dimensions for the variable and list them in the appropriate order.
Note: The correct order is very important for performance.
If you will add this measure to an existing cube, then dimension it the same as the other variables in the cube. In most cases, the Time dimension is first, followed by a composite of all the other dimensions. Otherwise, click Help for information about ordering the dimensions.
On the Properties page, define the properties listed in Table 8-11. If you are adding the measure to an existing cube, then you can duplicate many of the property settings of the other variables. Otherwise, search Help for information about segment size.
From the File menu, choose Save to update the analytic workspace and all objects in the current schema.
Populate the variable, either by performing calculations on existing measures in your analytic workspace, or from external data sources, as described in Chapter 11.
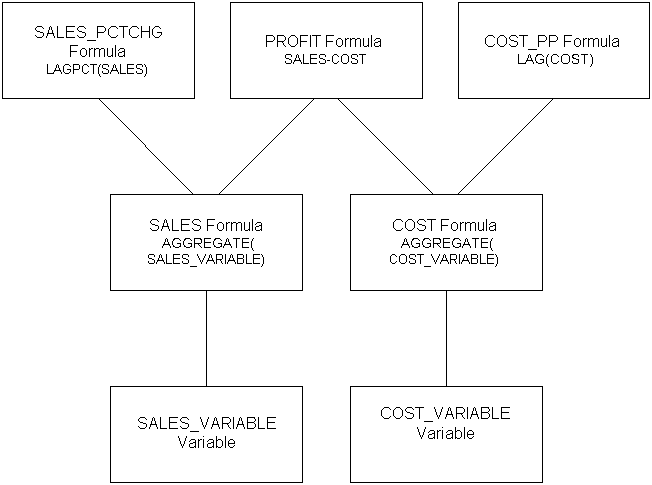
A single variable can be the source of data for numerous formulas. Applications run their queries against formulas (or relational views of the formulas), not against variables. Thus the names of the formulas are the names of the measures.
Every data variable has a corresponding formula that aggregates data at runtime by using an AGGREGATE function in its equation. You can create additional formulas for manipulating the data, and thus add information-rich data to your analytic workspace, by using the wealth of functions and operators available in the OLAP DML. Figure 9-1 shows the relationships among these workspace objects.
|
Note: If the source variable already has a formula defined, then the easiest way to add another formula is to right-click the existing formula in the Object View and choose Create Like. Then you can replace the expression and modify the new formula's properties. For an example of this method, refer to "Creating Measure Formulas". |
Take these steps to define a formula:
Open the Object View and expand the folder for your analytic workspace.
Right-click the Formulas folder and choose Create Formula.
The Create Formula dialog is displayed.
On the Basic page, specify a name, description, and data type for the formula. Choose the same data type for the formula as the source variable. Click Help for more information about these choices.
On the Dimensions page, select the dimensions for the formula and list them in the appropriate order.
List the base dimensions of the source variable. Do not specify the composite, but the dimensions that compose the composite in the order in which they are listed. Reflecting the dimension order of the source variable in the formula is important for good performance.
For example, if the source variable is dimensioned by TIME and UNITS_CUBE_COMPOSITE, then dimension the formula by TIME, CUSTOMER, PRODUCT, and CHANNEL (in that order), because UNITS_CUBE_COMPOSITE is dimensioned by CUSTOMER, PRODUCT, and CHANNEL.
You can see the dimensions of a composite by selecting the composite from the Dimensions folder and looking at its Dimensions property sheet.
On the Expression page, type the equation for the formula.
For aggregation, call the AGGREGATE function using this basic syntax:
AGGREGATE(variable USING aggmap)
Refer to the Oracle OLAP DML Reference for the full syntax of AGGREGATE and other data manipulation functions.
On the Properties page, define the properties listed in Table 8-12.
Delete these properties: SOURCE_CUBENAME, SOURCE_NAME, SOURCE_OWNER.
These properties identify a relational data source for a measure, and so are not relevant in this context.
Tools such as the enablers and refresh wizards in Analytic Workspace Manager use metadata that is stored within the workspace to identify objects. The metadata is stored in standard form catalogs, which are implemented as dimensions, variables, and valuesets. After you create a new measure, you must register it in several catalogs. Since registration involves adding data to workspace objects, you must use OLAP Worksheet and the OLAP DML to register a measure.
Registration of a new measure involves four catalogs. You can examine their property sheets in Analytic Workspace Manager, or you can issue this command in OLAP Worksheet to see their definitions:
DESCRIBE all_measures all_descriptions aw_names cube_measures
The ALL_MEASURES dimension is a list of all measures in the analytic workspace. The REPORT command shows the contents of data containers, such as dimensions and measures. It has this basic syntax:
REPORT object
To see the contents of the ALL_MEASURES dimension, issue this OLAP DML command:
REPORT W 60 all_measures
The W parameter specifies the column width of the report.
The MAINTAIN command enables you to add, remove, and reorder the members of a dimension. It has this basic syntax:
MAINTAIN dimension ADD member
The names of the measures have this detailed format:
schema.cube.formula.MEASURE
To add the name of a measure to the ALL_MEASURES dimension, use this command syntax:
MAINTAIN ALL_MEASURES ADD 'detailed_measure_name'
For example:
MAINTAIN ALL_MEASURES ADD 'GLOBAL.UNITS_CUBE.PROFIT.MEASURE'
|
Note: The OLAP DML interprets upper- and lower-case letters the same for commands and workspace object names, so thatMAINTAIN ALL_MEASURES, maintain all_measures, and mAiNtAiN all_MEASures are interpreted identically. However, text strings (including dimension members) are case-sensitive, so that 'global.units_cube.profit.measure' and 'Global.Units_Cube.Profit.Measure' are not the same value. Text strings are always enclosed in single quotes. |
Issue another REPORT command to make sure that the change was made correctly, then issue these commands to save it:
UPDATE; COMMIT
The UPDATE command copies your changes to the LOB table where the analytic workspace is stored. The COMMIT command issues a SQL COMMIT and saves all changes to the database for the session. You must issue both these commands, in this order, for changes to an analytic workspace to be saved for future sessions.
The ALL_DESCRIPTIONS variable stores the short, long, and plural descriptions of each dimension member, which can be used for display. ALL_DESCRIPTIONS is dimensioned by ALL_OBJECTS, ALL_DESCTYPES, and ALL_LANGUAGES.
ALL_OBJECTS is a concat dimension, which means that it is composed of two or more other dimensions in a concatenated list of dimension members. ALL_OBJECTS is composed of ALL_DIMENSIONS, ALL_CUBES, ALL_MEASURES, ALL_HIERARCHIES, ALL_LEVELS, and ALL_ATTRIBUTES. Maintenance and selection of dimension members is performed on these base dimensions rather than directly on the ALL_OBJECTS concat dimension.
ALL_DESCTYPES lists LONG, SHORT, and PLURAL as its members. Objects dimensioned by ALL_DESCTYPES can provide multiple descriptors of these types.
ALL_LANGUAGES lists the languages supported in the analytic workspace. It initially has the database language, such as AMERICAN_AMERICA. If additional languages are added to ALL_LANGUAGES, objects dimensioned by it can provide text in multiple languages.
In analytic workspaces, all of the data for an object is initially selected, or in status. To view or manipulate a subset of the data, you must use the LIMIT command to restrict the number of active values. The LIMIT command is similar to a WHERE clause in a SQL SELECT statement. However, in an analytic workspace, the selection persists for subsequent commands until you explicitly change the selection.
LIMIT operates on dimensions, and has many options for selecting dimension members. The most basic form of the LIMIT command is:
LIMIT dimension TO values|position
where values is one or more dimension members, and position is a member's numeric order (1, 2, and so forth) or a keyword (such as FIRST or LAST).
|
Note: If your dimension members are integers, then be sure to specify them correctly in theLIMIT syntax. In a dimension with a TEXT data type, '1' (with quotes) identifies the member whose value is 1, while 1 (without quotes) identifies the first member in the dimension list. |
By limiting the dimensions of a variable, you restrict the number of its cells for use by subsequent commands.
To see the contents of ALL_DESCRIPTIONS, issue OLAP DML commands such as these:
LIMIT all_languages TO 1
REPORT W 65 DOWN all_objects w 20 ACROSS all_desctypes: all_descriptions
One method of limiting a concat dimension is to limit a base dimension, then limit the concat dimension to the status of the base dimension. For example, to view only the descriptions of the first two dimensions, issue commands like these:
LIMIT all_dimensions TO FIRST 2
LIMIT all_objects TO all_dimensions
LIMIT all_languages TO 1
REPORT W 65 DOWN all_objects w 20 ACROSS all_desctypes: all_descriptions
Although you can use the LIMIT command to restrict a variable to a single active cell, qualified data references (QDRs) are used more often for this purpose. QDRs operate independent of the current status of the dimensions, and are in effect only for the duration of a command. If a dimension is omitted from a QDR, the first value in status is used, so LIMIT can be used to simplify the syntax of a QDR for a multidimensional variable.
variable(dimension 'member', dimension 'member'...)
For example, the following command shows the short description of UNITS_CUBE:
LIMIT all_measures TO 'GLOBAL_AW.UNITS_CUBE.UNITS.MEASURE'
LIMIT all_objects TO all_measures
report all_descriptions(all_desctypes 'SHORT', all_languages 'AMERICAN_AMERICA')
Limiting dimension members is particularly important when manually setting the values of a variable. You use the assignment operator (=) to assign the value of an expression to the current selection of cells.
Use commands such as these to add descriptions of your new measure:
LIMIT all_languages TO 1
LIMIT all_measures TO 'detailed_measure_name'
LIMIT all_objects TO all_measures
all_descriptions(all_desctypes, 'SHORT')= 'short description'
all_descriptions(all_desctypes, 'LONG')= 'long description'
all_descriptions(all_desctypes, 'PLURAL')= 'plural description'
Issue another REPORT command to make sure that the changes were made correctly, then issue these commands to save them:
UPDATE; COMMIT
The AW_NAMES variable identifies the full name of objects in the analytic workspace, which correspond to the detailed names of the ALL_OBJECTS dimension. Full workspace object names have this format:
schema.workspace!object
For example, GLOBAL_AW.GLOBAL!SALES.
To see the contents of AW_NAMES, issue this OLAP DML command:
REPORT W 60 DOWN all_objects W 35 aw_names
Use commands such as these to add the workspace name of a new measure:
LIMIT all_measures TO 'detailed_measure_name'
LIMIT all_objects TO all_measures
aw_names = 'full workspace object name'
Issue another REPORT command to make sure that the changes were made correctly, then issue these commands to save them:
UPDATE; COMMIT
The CUBE_MEASURES valueset identifies the measures in each cube. It is dimensioned by ALL_CUBES and contains values of the ALL_MEASURES dimension.
The VALUES function returns the contents of a valueset. To see the contents of CUBE_MEASURES, issue this OLAP DML command:
REPORT W 35 DOWN all_cubes W 55 VALUES(cube_measures)
Use commands such as these to add a measure to an existing cube:
LIMIT all_cubes TO cube
LIMIT cube_measures ADD 'detailed measure name'
For example:
LIMIT all_cubes TO 'UNITS_CUBE'
LIMIT cube_measures ADD 'GLOBAL.UNITS_CUBE.PROFIT.MEASURE'
Issue another REPORT command to make sure that the changes were made correctly, then issue these commands to save them:
UPDATE; COMMIT
"Identifying Required Business Facts" identifies the business measures required by the Global Corporation. Only three measures were acquired from the star schema: Units, Unit Price, and Unit Cost. The remaining business measures can be calculated from those three.
Custom measures can either be solved at run-time or stored in variables. Run-time calculations do not require disk storage space and do not extend the processing time required for data maintenance. However, they may slow performance. You need to decide which measures to calculate on the fly and which, if any, to store.
Many of the required business measures are based on sales, extended cost, and margin, as shown in Table 9-1. Because these three calculated measures are used so heavily, the example stores them in variables. The other measures can be implemented as formulas and calculated on demand.
Table 9-1 Custom Measures for the GLOBAL Analytic Workspace
| Required Business Measures | Object Name in GLOBAL Analytic Workspace | Expression |
|---|---|---|
| Sales | SALES |
UNITS * UNIT_PRICE |
| Extended Cost | EXTENDED_COST |
UNITS * UNIT_COST |
| Margin | MARGIN |
SALES - EXTENDED_COST |
| Change in sales from prior period (month, quarter, or year) | SALES_PP |
LAG(sales, 1, time, LEVELREL time_levelrel) |
| Percent change in sales from prior period | SALES_PCTCHG_PP |
LAGPCT(sales, 1, time, LEVELREL time_levelrel) * 100 |
| Product share | SHARE_SALES_PROD |
(sales/sales(product '1')) * 100 |
| Channel share | SHARE_SALES_CHAN |
(sales/sales(channel '1')) * 100 |
| Market share | SHARE_SALES_CUST |
(sales/sales(customer '1')) * 100 |
| Extended margin change from prior period | MARGIN_PP |
LAG(margin, 1, time, LEVELREL time_levelrel) |
| Extended margin percent change from prior period | MARGIN_PCTCHG_PP |
LAGPCT(margin, 1, time, LEVELREL time_levelrel) * 100 |
| Extended margin, percent of total product sales | MARGIN_PCT_SALES |
(margin/sales(product '1')) * 100 |
| Units sold, change from prior period | UNITS_PP |
LAG(units, 1, time, LEVELREL time_levelrel) |
| Margin per unit | UNIT_MARGIN |
margin/units |
The variables for Sales, Extended Cost, and Margin will have the same dimensions as Units, and will be added to the Units cube.
Follow these steps to create SALES_VARIABLE.
In the Object View of Analytic Workspace Manager, expand the Variables folder for the GLOBAL analytic workspace.
Right-click UNITS_VARIABLE, and choose Create Like from the menu.
The Create Like dialog is displayed.
Type SALES_VARIABLE in the Destination Name box, and click OK.
SALES_VARIABLE is added to the list in the Variables folder.
Click SALES_VARIABLE to display it in the property viewer. On the Properties page, make the following changes to the settings:
AW$PARENT_NAME: Change to SALES.
AW$SEGWDTH_CMD: Change the variable name to SALES_VARIABLE.
Click Apply to save changes to the property pages.
Repeat these steps for EXTENDED_COST_VARIABLE and MARGIN_VARIABLE.
To save the new definitions, choose Save from the File menu.
The following commands calculate data just at the base level so that the new variables can be aggregated separately. The ACROSS command loops over the dimension members currently in status.
A hyphen at the end of a line continues a command to the next line.
|
Note: The data inSALES_VARIABLE, EXTENDED_COST_VARIABLE, and MARGIN_VARIABLE must be refreshed manually each time the source variables are refreshed. Commands like the following can be copied into an OLAP DML program and executed as part of the refresh process. |
" Select base level dimension members
LIMIT time TO time_levelrel 'Month'
LIMIT channel TO channel_levelrel 'CHANNEL'
LIMIT product TO product_levelrel 'ITEM'
LIMIT customer TO customer_levelrel 'SHIP_TO'

" Populate variables using calculations
ACROSS time units_cube_composite DO -
     'extended_cost_variable = units_variable * unit_cost_variable'
ACROSS time units_cube_composite DO -
     'sales_variable = units_variable * unit_price_variable'
ACROSS time units_cube_composite DO -
     'margin_variable = sales_variable - extended_cost_variable'

" Save the new variables
UPDATE
COMMIT
Follow these steps to create and register the SALES formula. Repeat them for EXTENDED_COST and MARGIN.
In the Object View of Analytic Workspace Manager, expand the Formulas folder for the GLOBAL analytic workspace.
Right-click UNITS, and choose Create Like from the menu.
The Create Like dialog is displayed.
Type SALES in the Destination Name box, and click OK.
SALES is added to the list in the Formulas folder.
Click SALES and make these changes to the property pages:
On the Expression page, change UNITS_VARIABLE to SALES_VARIABLE in the AGGREGATE function call.
On the Properties page, change the values of AW$LOGICAL_NAME and SOURCE_NAME to SALES.
Click Apply to save changes to the property pages.
To save the new definitions, choose Save from the File menu.
To register the SALES measure, open OLAP Worksheet and issue the following commands:
" Add SALES to the ALL_MEASURES dimension
MAINTAIN ALL_MEASURES ADD 'global_aw.units_cube.sales.measure'

" Add descriptions to the ALL_DESCRIPTIONS variable
LIMIT all_measures TO 'global_aw.units_cube.sales.measure'
LIMIT all_objects TO all_measures
LIMIT all_languages TO 1
all_descriptions(all_desctypes, 'SHORT')= 'Sales'
all_descriptions(all_desctypes, 'LONG')= 'Sales as Units * Price'
all_descriptions(all_desctypes, 'PLURAL')= 'Sales'

" Add measure name to the AW_NAMES variable

aw_names = 'GLOBAL_AW.GLOBAL!SALES'

" Add measure to the CUBE_MEASURES valueset
LIMIT all_cubes TO 'GLOBAL_AW.UNITS_CUBE.CUBE'
LIMIT cube_measures ADD 'GLOBAL_AW.UNITS_CUBE.SALES.MEASURE'

" Save these changes
UPDATE
COMMIT
After you have created a standard form measure, you can aggregate it the same as any other measure. Because the new measures were added to an existing cube, you can either modify an existing aggregation plan or create a new one for the new measures. Follow these steps:
In the OLAP Catalog View, expand the Cubes folder sufficiently to see UNITS_CUBE in the GLOBAL analytic workspace.
To modify an existing aggregation plan, do the following:
Expand the Aggregation Plans folder under UNITS_CUBE and right-click the plan.
Choose Edit from the menu.
Add SALES, EXTENDED_COST, and MARGIN to the plan.
or
To create a new aggregation plan, right-click UNITS_CUBE and choose Create Aggregation Plan Using Wizard. Follow the steps of the wizard, and choose Help for additional information.
To deploy the aggregation plan, right-click it and choose Deploy Aggregation Plan from the menu.
Choose Save from the File menu.
The remaining measures can be calculated at runtime using any of the available methods. The following steps create a new formula object and register it as a measure, using the method described in this chapter. Alternatively, you can use the DBMS_AW_UTILITIES package to define permanent custom measures, as described in Chapter 7.
To define the SALES_PP measure, take these steps:
In the Object View, right-click the SALES formula and choose Create Like from the menu.
Type SALES_PP as the destination name in the Create Like dialog.
Click the new SALES_PP formula and make these changes to the property pages:
On the Properties page, change AW$LOGICAL_NAME and SOURCE_NAME to SALES_PP.
On the Expression page, replace the AGGREGATE function with this LAG function:
LAG(sales, 1, time, LEVELREL time_levelrel)
Register SALES_PP the same as the other measures.
Repeat these steps for the other measures listed in Table 9-1.
The previous examples showed how to define measures manually using Analytic Workspace Manager. Another option is to use an OLAP DML program. Example 9-3 shows a sample program for adding measures. It takes three arguments:
The name of the measure
The name of the source variable
The name of the cube for the measure
This is the command to run the program:
CALL create_measure('display_name' 'source_variable')
For example, CALL create_measure('Sales' 'sales_variable')
All of the other information is provided in local variables at the beginning of the program. If you use this program as a template for creating measures in your own analytic workspace, then either change the settings of these local variables or change the variables to command-line arguments.
This is the basic sequence of the program:
Checks that the source variable exists and creates it if it does not. The program does not populate the variable; it just creates the object definition.
Creates a formula with an AGGREGATE function in the equation. You can alter the equation at any time.
Registers the new measure in the database standard form catalogs.
Comments are used throughout the program to help you understand how it works. You will also see these symbols:
" (double quote) begins or ends a comment' (single quote) encloses literal text& (ampersand) substitutes the value of an expression for the expression itself\ (backslash) identifies the next character as literal, not part of command syntax= (equal) sets the variable on the left to the value of the expression on the right- (hyphen) continues command onto next line: (colon) follows the name of label used to redirect processingFor the full syntax and usage of the commands and functions in this program, refer to the Oracle OLAP DML Reference.
Example 9-3 DML Program for Adding Measures to UNITS_CUBE
DEFINE CREATE_MEASURE PROGRAM
PROGRAM
ARG _displayname          text
ARG _measvar              text
ARG _cube                 text
VARIABLE _schema          text
VARIABLE _aw              text
VARIABLE _fullname        text
VARIABLE _measure         text
VARIABLE _datatype        text
VARIABLE _dims            text
VARIABLE _segwidth        text
VARIABLE _aggmap          text
VARIABLE _createdby       text
VARIABLE _fullmeas        text

TRAP ON OOPS              "Redirect processing on error to OOPS label

" Check for measure name argument on command line
IF _displayname EQ na
  THEN SIGNAL noarg 'You must supply a measure name.'
  ELSE _measure = UPCASE(_displayname)

IF _measvar EQ na
  THEN _measvar = JOINCHARS(_measure, '_VARIABLE')

IF _cube EQ na
  THEN _cube = 'UNITS_CUBE'
  ELSE _cube = UPCASE(_cube)

" Change these local variables for your data
_schema = 'GLOBAL_AW'                " Name of the schema that owns the analytic workspace
_aw = 'GLOBAL'                       " Name of the analytic workspace
_segwidth = '85 1000000'             " Segment size appropriate for measures in this cube
_aggmap = JOINCHARS(_cube '_AGGMAP_AWCREATEDDEFAULT_1')  " Name of default aggmap for cube
_datatype = 'DECIMAL'

_createdby = 'AW$CREATE'
_fullname = UPCASE(JOINCHARS(_schema, '.', _cube, '.', _measvar))
_dims = OBJ(PROPERTY, 'SYS_DIMS', _cube)
_fullmeas = UPCASE(JOINCHARS(_schema, '.', _cube, '.', _measure, '.MEASURE'))

" Redirect processing to FORMULA label if variable already exists
IF EXISTS(_measvar)
 THEN GOTO FORMULA

" Define the variable
&JOINCHARS('DEFINE ', _measvar, ' VARIABLE ' , _datatype , ' <', _dims, '>')

" Set Database Standard Form metadata required to register a measure variable
&JOINCHARS('CONSIDER ', _measvar)
PROPERTY 'AW$CLASS' 'EXTENSION'
PROPERTY 'AW$CREATEDBY' _createdby
PROPERTY 'AW$LASTMODIFIED' JOINCHARS(today , '_' , tod)
PROPERTY 'AW$PARENT_NAME' _measure
PROPERTY 'AW$ROLE' 'VARIABLE'
PROPERTY 'AW$STATE' 'CREATED'
PROPERTY 'AW$SEGWDTH_CMD' JOINCHARS(-
     'CHGDFN ' , _schema , '.' , _aw , '!' , _measure , ' SEGWIDTH ' , _segwidth)

FORMULA:
" Check if the measure is already defined
IF EXISTS(_measure)
   THEN SIGNAL measexists JOINCHARS(_measure ' already exists.')
" Create the formula
&JOINCHARS('DEFINE ' , _measure , ' FORMULA ' , _measvar)
" Define the calculation equation
&JOINCHARS('EQ AGGREGATE(', _schema, '.', _aw, '!', _measvar, ' USING ', _aggmap, ')' )

" Set properties needed by the BI Beans enablement process
&JOINCHARS('CONSIDER ' , _measure)
PROPERTY 'AW$CLASS' 'IMPLEMENTATION'
PROPERTY 'AW$COMPSPEC' _aggmap
PROPERTY 'AW$CREATEDBY' _createdby
PROPERTY 'AW$LASTMODIFIED' JOINCHARS(TODAY , '_' , TOD)
PROPERTY 'AW$LOGICAL_NAME' _measure
PROPERTY 'AW$PARENT_NAME' _cube
PROPERTY 'AW$ROLE' 'MEASUREDEF'
PROPERTY 'AW$STATE' 'CREATED'

" Register measure in standard form catalogs
&JOINCHARS('MAINTAIN all_measures ADD ', '\'', _fullmeas, '\'')
&JOINCHARS('all_descriptions(all_objects \'<ALL_MEASURES: ' , _fullmeas ' >\' all_desctypes \'SHORT\') = \'' , _displayname , '\'')
&JOINCHARS('aw_names(all_objects \'<ALL_MEASURES: ' , _fullmeas ' >\') = \'', _schema, '.', _aw, '!', _measure, '\'')
&JOINCHARS('LIMIT all_cubes to \'', _schema, '.', _cube, '.CUBE\'')
&JOINCHARS('LIMIT cube_measures add  ' '\'', _fullmeas, '\'')
RETURN

OOPS:
show 'Program ended in an error.'
END
|
 Copyright © 2002, 2003 Oracle Corporation All Rights Reserved. |
|