| Oracle Workflow Developer's Guide Release 2.6.4 Part Number B15853-01 |
|


|
View PDF |
| Oracle Workflow Developer's Guide Release 2.6.4 Part Number B15853-01 |
|
|
View PDF |
| Oracle Workflow Developer's Guide Release 2.6.4 Part Number B15853-01 |
 Contents |
 Previous |
 Next |
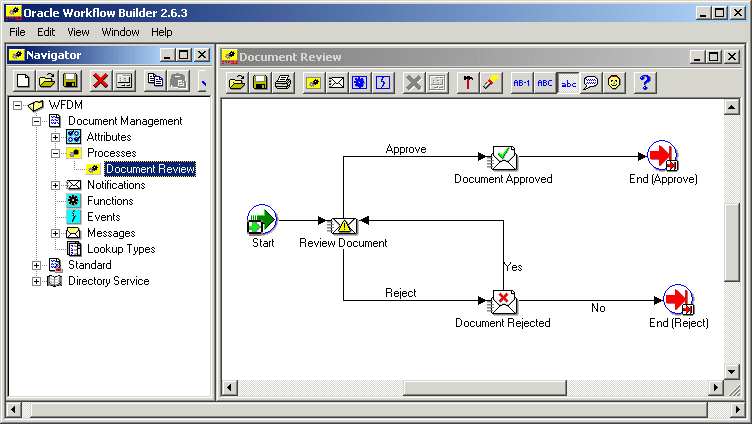
The process window in Oracle Workflow Builder graphically represents the activities (icons) and transitions (arrows) for a particular process. Each activity is a node, a logical step that contributes toward the completion of a process.
You can drag and drop activities from the navigator tree into the process window or create activities directly in the process window. The properties for an activity node may be viewed or edited by double clicking on the node in the process window with the select mouse button. You define transitions between activities by drawing arrows from one node to the next using the secondary mouse button.
Notification, function, event, and process activities make up the nodes of a process. If a process contains a process activity in its diagram, that process activity is known as a subprocess. There is no restriction on the depth of this hierarchy. To display the subprocess diagram in a process window, double-click on the subprocess activity node in the parent process window.
Transitions appear as arrows in your diagram and represent the completion of one activity and the activation of another. For an activity that completes with a result type of <None>, any transition that you draw from it simply appears as an arrow to the next activity, indicating that as long as the originating activity completes, the process transitions to the next activity.
For an activity that has a defined result type, you must associate the transition arrow that you create with one of the activity's possible results. The result that the activity returns when it completes then determines what the next eligible activity is, as defined by the results-based transitions that originate from the completed activity. For example, "Notify Approver" with a result of 'REJECTED' transitions to "Reject Requisition." See: Requisition Process Activities.
You can also create a <Default>, <Any>, or <Timeout> transition for an activity that has a defined result type. The Workflow Engine follows a <Default> transition if no other transition matching the completion result exists. The Workflow Engine follows an <Any> transition regardless of what completion result the activity returns. This allows you to include a generic activity in the process that the Workflow Engine executes in parallel with the result-specific activity. The Workflow Engine follows a <Timeout> transition if the notification activity times out before completion. See: Setting Up Background Engines, Oracle Workflow Administrator's Guide.
Activities can have multiple transitions for a single result to create parallel branches.
Draw a <Timeout> transition from a notification activity to some other activity to force the process to perform the other activity if the notification activity does not complete by a specified period of time. See: To Define Nodes in a Process.
When an activity times out, Oracle Workflow marks the activity as timed out and then cancels any notification associated with the timed out activity. The Notification System sends a cancellation message to the performer only if the canceled notification was expecting a response and the performer's notification preference is to receive e-mail.
Note: If you are using the version of Oracle Workflow embedded in Oracle Applications, you can optionally use the WF: Mailer Cancellation Email profile option to prevent notification mailers from sending any notification cancellation messages. See: Setting Up Notification Mailers, Oracle Workflow Administrator's Guide.
Processing then continues along the <Timeout> transition as indicated by your process definition. If a timed out activity does not have a <Timeout> transition originating from it, Oracle Workflow executes the error process associated with the timed out activity or its parent process(es). See: To Define Optional Activity Details.
Note: You must have a background engine set up to process timed out activities. See: Setting Up Background Engines, Oracle Workflow Administrator's Guide.
You can create multiple transitions to a single activity in a process diagram. Sometimes these multiple transitions indicate that there are multiple ways that the process can transition to this one node and you may want the node to execute just once.
In other cases, the multiple transitions may indicate that the activity may be transitioned to multiple times because it is the starting point of a loop. In these cases, you want the activity to be reexecuted each time it is revisited.
The On Revisit flag for an activity determines whether the activity reexecutes when it is revisited more than once. It is an important flag to set for the pivot activity of a loop. On Revisit is set initially in an activity's Details property page. However, for each usage of an activity in a process, you may change On Revisit for that node in the activity's Node property page. You can also use the standard Loop Counter activity as the initial activity in a loop to control how many times a process can transition through a loop. See: Looping, Oracle Workflow API Reference and Loop Counter Activity.
Suggestion: If you have multiple incoming transitions from parallel branches, you should always use an And, Or, or custom join activity to merge those branches. This is especially true if after merging the parallel branches, you want to create a loop in your process. By using a joining activity to merge parallel branches and designating the following activity as the start of the loop, you create a less complicated process for the engine to execute. See: Standard Activities.
Each process has to have a Start activity that identifies the beginning point of the process. You may designate any node from which it is logical to begin the process as a Start activity. When initiating a process, the Workflow engine begins at the Start activity with no IN transitions (no arrows pointing to the activity). If more than one Start activity qualifies, the engine runs each possible Start activity and transitions through the process until an End result is reached. The engine may execute acceptable Start activities in any order. Processes may contain multiple branches that each have an End activity. When the Workflow Engine reaches an End activity, the entire process ends even if there are parallel branches still in progress.
An End activity should return a result that represents the completion result of the process. The result is one of the possible values from that process activity's result type.
Start activities are marked with a small green arrow, and End activities by a red arrow, that appear in the lower right corner of the activity node's icon in the process window.
This section discusses how to draw and define a workflow process in the process window:
To Add Nodes to a Workflow Process
To begin drawing a process diagram, you must first display the process window for your process activity. To display a process window, you can do one of several things:
Double-click on a predefined process activity on the navigator tree.
Select a predefined process activity and press Ctrl + E.
Select a predefined process activity and choose Process Details from the Edit menu.
Use the Quick Start Wizard to create a new process activity. See: To Use the Quick Start Wizard.
A process window opens with the name of your process in the window title.
Sample Oracle Workflow Builder Process Window
Create a new node in a process by using one of the following methods:
Drag and drop a notification, function, event, or process activity from the navigator tree into the process window. The activity you drag must belong to the same data store as the process you are dragging it to.
Note: If you want to drag an activity into a process, where the activity is in a different data store than the process you are dragging it to, then you must first copy the item type that the activity belongs to into the same data store as the process.
Choose the New Function, New Process, New Event, or New Notification toolbar button to create a new activity. See: Process Window Toolbar.
Choose New Function, New Process, New Event, or New Notification from the right mouse button menu while your cursor is in the process window to create a new activity node. An activity property page appears for you to select the activity for this node. See: To Define Nodes in a Process.
In the process window, you can display information about an activity by moving your mouse over the activity. The Label Name, Internal Name, Display Name, Comment and Performer, appear in a "tool-tip"-style display.
If you single click on an activity node in the process window, Oracle Workflow Builder expands the navigator tree and highlights the master activity of the node you select.
Create an arrow (transition) between two activity nodes by holding down your right mouse button and dragging your mouse from a source activity to destination activity.
If the source activity has no result code associated with it, then by default, no label appears on the transition. If you specifically choose to show the label for such a transition, the label <Default> appears. See: To Create and Edit a Transition.
If the source activity has a result code associated with it, then a list of lookup values appears when you attempt to create a transition to the destination activity. Select a value to assign to the transition. You can also select the values <Default>, <Any>, or <Timeout> to define a transition to take if the activity returns a result that does not match the result of any other transition, if the activity returns any result, or if the activity times out, respectively.
You can also drag and drop a lookup code from the navigator tree onto an existing transition in the process window to change the result of that transition. The lookup code you drag and drop must belong to the same data store and same lookup type as the lookup code you replace.
You can select an entire region of a process diagram, containing multiple activity nodes and transitions, and make a copy of the selection by holding down the Control or Shift key as you drag the selection to a new position in the process window.
Attention: Oracle Workflow does not support reusing a subprocess activity multiple times within a process hierarchy. If you wish to use a subprocess more than once in a process, you must create a distinct copy of the subprocess for each instance needed.
Turn on grid snap from the View menu to snap your activity icons to the grid when you complete your diagram. Grid snap is initially turned on by default until you change the setting, at which point the latest setting becomes your default.
To Define Nodes in a Process
Open the process window for your process activity.
To create a new function, notification, event, or process node, first select the New Function, New Notification, New Event, or New Process icon from the process window toolbar. Next, click on the position within the process window where you want to place this new node. The property page for the new node appears.
Note: You can also create a new node by dragging and dropping a predefined activity from the navigator tree into the process window. This automatically populates the node's property page with predefined information. Double-click on the node and skip to Step 5 to further edit its property page.
In the Item Type field, select the item type that you want this activity node to be associated with.
Choose one of the following methods to define the remaining information for the node.
Select either the internal name or display name of a predefined activity. Oracle Workflow Builder then populates all the fields with predefined information from the master activity as shown in the Navigator window.
Alternatively, choose the New button to define a new activity. To complete the following tabs of the property page, refer to the sections listed:
Process - To Create a Process Activity
Function - To Create a Function Activity
Notification - To Create a Notification Activity
Event - To Create an Event Activity
Details - To Define Optional Activity Details
Roles - The information in this tab is currently not supported.
Caution: Any changes that you make to the any of the above tabs automatically propagate to the master activity and affect all other instances of that activity. Only changes that you make to the Node and Node Attributes tabs, and to the Event Details tab for an event activity, are local and specific to the current node activity.
Select the Node tab to specify information that is specific to this node. Specify a Label for the node. Since an activity can be used more than once in any given process, the Label field lets you give a unique name to the instance of this particular activity in the process. By default, the label name is the activity name, but if the activity is used more than once in the process, -N is appended to the activity name, where N represents the 'Nth' instance of the activity in use.
Attention: When you call most Oracle Workflow APIs, you must pass the activity's label name and not its activity name. See: Workflow Engine APIs, Oracle Workflow API Reference.
Node Tab
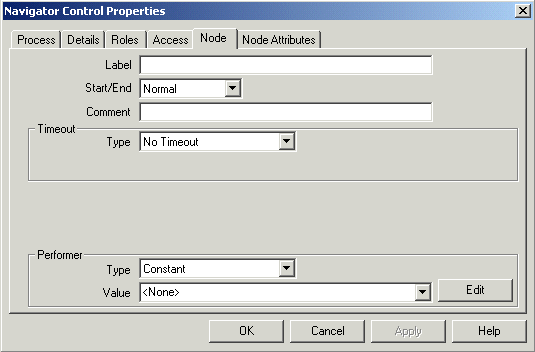
Indicate if the current node is a start or end activity in your process, by choosing 'START' or 'End', respectively. 'NORMAL' is the default if it is neither. You may have multiple START and END nodes in your process.
A Start activity is marked (Start) and has a small green arrow in its activity icon, and an End activity is marked (End) and has a red arrow in its activity icon.
Attention: The Start/End field is always set to Normal by default for all activity nodes. Even if you use the Standard Start or Standard End activity, you must manually edit the Start/End field to be either Start or End, respectively.
For an END node, you must also select a value for the final process result if the overall process activity has a result type associated with it. The list of values for the final process result is derived from the lookup type specified as the process activity's result type.
You can provide a comment to yourself about this node.
For a notification that requires a response, a process activity that is a subprocess within another process, an event activity with an event action of Receive, or a blocking function activity, specify whether the activity must be completed by some specified time. If the activity is not completed by a given time, you can redirect the parent process to transition to a different activity. See: Timeout Transitions.
Choose 'No Timeout' if the activity does not have to be completed by a given time.
Choose 'Relative Time' if you want the activity to be completed by some constant relative time. You can enter any combination of days, hours and minutes to specify when the activity times out. The value you enter is interpreted as a relative offset from the begin date of the activity, in the unit of minutes. A relative timeout value of zero means no timeout.
Choose 'Item Attribute' if you want the activity to be completed by some relative time that is computed dynamically at runtime. Note that you must first create an item attribute of type number to store the computed timeout value and reference that predefined item attribute here. See: Item Type Attributes and To Define an Item Type or Activity Attribute.
Attention: The dynamic timeout value stored in this attribute is interpreted as a relative offset from the begin date of the activity, in the unit of minutes. A null timeout value or a value of zero means no timeout.
For a notification activity node, or for an event activity node with an event action of Send, you can override the priority assigned to the activity's message. Choose 'Default' to keep the default priority of the message.
Choose 'Constant' to override the default priority with the new specified priority level.
Choose 'Item Attribute' to override the default priority with a new priority level that is dynamically determined at runtime. Note that you must first create an item attribute of type number to store the computed priority value and reference that predefined item attribute here. See: Item Type Attributes and To Define an Item Type or Activity Attribute.
Note: The computed priority value can be any number between 1-99. Oracle Workflow automatically converts the number to a priority level as follows: 1-33 = High, 34-66=Normal, and 67-99=Low.
For a notification activity node, specify the performer of the activity. The performer is the role to whom the notification is sent. You may either select a constant role name or an item type attribute that dynamically determines the role at runtime. Note that you must first create an item attribute of type role to store the computed role name and reference that predefined item attribute here. See: Item Type Attributes, To Define an Item Type or Activity Attribute, and Referencing Roles.
Note: If you set the Performer Type to Constant and you are connected to the database and have loaded roles from the database, you can select a constant role name from the Performer poplist. If you are working in a .wft file data store without any open connection to the database, you can directly type in a valid role display name in the Performer field. When you upload the file to a database, the role will be resolved to the appropriate role data stored in the database based on the role display name you entered.
Note: When you assign a notification to a multi-user role, the Workflow Engine keeps track of the individual from that role that actually responds to the notification. See: Respond API, Oracle Workflow API Reference.
Note: Although Oracle Workflow Builder allows you to specify a performer for any type of node activity, Oracle Workflow only considers the value of Performer for notification activity nodes.
Choose Apply to save your changes, OK to save your changes and close the property page or Cancel to cancel your changes and close the property page.
When you save and close your property page, the activity node appears in the position you specified in the process window. If this is a new activity you created, a corresponding master activity is also created under the appropriate branch in the navigator tree.
If the node is an event activity, you can specify additional required event information by choosing the Event Details tab. See: To Define Event Details for an Event Node.
If the node is a function, notification, or event activity and the activity has activity attributes, you can assign values to those activity attributes by choosing the Node Attributes tab. See: To Define Activity Attribute Values.
If the node is a process activity, then a small subprocess overlay icon appears over the upper right corner of process activity icon. The subprocess overlay icon identifies the node as a subprocess within the process diagram.
To Define Event Details for an Event Node
The event action defined for the event activity determines which event details you must define for an event node. For each event detail, it is either required or optional to use an item type attribute to store or retrieve the detail information. Note that you must first create item type attributes of the appropriate types before you can reference those predefined item attributes here. The item type attributes you use for event details must be associated with the same item type as the event activity itself. See: Item Type Attributes, To Define an Item Type or Activity Attribute, Event Activity, and To Create an Event Activity.
Display the property pages of an event activity node. Select the Event Details tab.
For an activity with the event action Receive, enter the following event details:
Event Name - Optionally select an item type attribute of type text where you want to store the event name that the node receives.
Note: The event activity can only receive events that match its event filter. Additionally, if the event activity has a #BUSINESS_KEY attribute, it can only receive an event whose event key matches its #BUSINESS_KEY value. See: To Create an Event Activity.
Event Key - Optionally select an item type attribute of type text where you want to store the event key that the node receives.
Event Message - Optionally select an item type attribute of type event where you want to store the event message that the node receives.
Event Details Tab for a Receive Event Activity
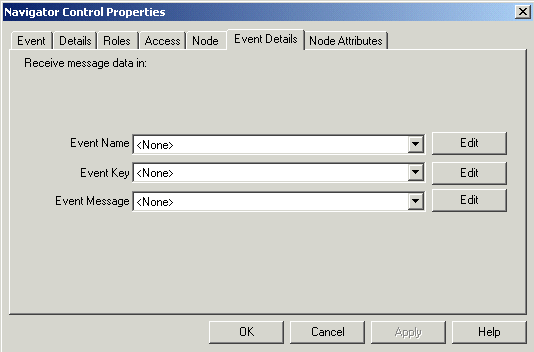
Note: When the activity receives an event, the Workflow Engine stores the event name, event key, and event message in the item type attributes you specify, and also sets any parameters in the event message parameter list as item type attributes for the process, creating new item type attributes if a corresponding attribute does not already exist for any parameter.
Additionally, if the event was originally raised by a Raise event activity in another workflow process, the item type and item key for that process are included in the parameter list within the event message. In this case, the Workflow Engine automatically sets the specified process as the parent for the process that receives the event, overriding any existing parent setting. See: SetItemParent, Oracle Workflow API Reference.
For an activity with the event action Raise, enter the following event details:
Event Name - Enter the name of the event that the node raises. You can either specify a constant event name or select an item type attribute of type text that dynamically determines the event name at runtime.
Note: You can only raise an individual event. You cannot raise event groups.
Event Key - Select the item type attribute of type text that contains the event key for the event that the node raises.
Event Data - Optionally select an item type attribute that contains the event data for the event that the node raises. You can store event data in item type attributes of type text, number, date, lookup, role, or attribute. The maximum length of the data you can enter in a text attribute is 4000 bytes. If the event data exceeds 4000 bytes, you should assign a generate function in the event definition to generate the event data, rather than providing the event data through a text attribute. See: To Define an Event.
You must not specify an item type attribute of type event for the Event Data field, since the event data is only a part of the complete event message structure which is the format for the event attribute type. If you want to use the event data stored within an existing event message, leave the Event Data field unspecified and instead define the #EVENTMESSAGE2 activity attribute for the raise event activity.
Event Details Tab for a Raise Event Activity
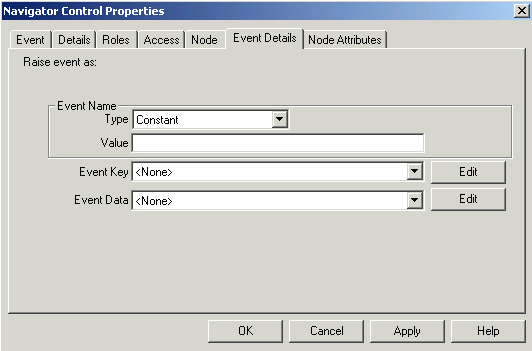
Note: The Event Name and Event Key are required for a Raise event activity.
Note: In addition to these event details, you can use the activity attributes for a Raise event activity node to specify parameters that you want to include in the parameter list for the event message. If the event message is later received by another process, the Workflow Engine sets the event parameters as item type attributes for that process. See: To Define Activity Attribute Values.
Also, a Raise event activity automatically sets the item type and item key for the current workflow process in the parameter list for the event message. If the event message is later received by another process, the Workflow Engine uses that item type and item key to automatically set the process that raised the event as the parent for the process that receives the event. See: SetItemParent, Oracle Workflow API Reference.
If you want to raise the new event using the event data and parameter list from an existing event message, you can also define a special activity attribute named #EVENTMESSAGE2 for the raise event activity. Set the existing event message as the value of the #EVENTMESSAGE2 attribute, which must be an attribute of type event. If this attribute is defined, the activity retrieves the event data and parameter list from the specified event and sets them into the new event message before it is raised.
If you also specified event data in the node's event details, however, the activity sets that event data into the event, overriding any event data from the #EVENTMESSAGE2 attribute. If you specified any additional parameters in activity attributes for the raise event activity, the activity also sets those parameters into the parameter list for the event message, overriding the values of any parameters with the same names from the #EVENTMESSAGE2 attribute.
For an activity with the event action Send, enter the following event details:
Event Message - Select the item type attribute of type event that contains the event message that the node sends.
Event Name - Optionally enter the name of the event that the node sends. You can either specify a constant event name or select an item type attribute of type text that dynamically determines the event name at runtime. The event name that you enter here overrides the previous event name value in the event message.
Event Key - Optionally select an item type attribute of type text that contains the event key of the event that the node sends. The event key that you enter here overrides the previous event key value in the event message.
Out Agent - Optionally enter the outbound agent from which the node sends the event. Specify both the agent name and the system name for the agent using the following format:
<agent_name>@<system_name>
You can either specify a constant Out Agent name or select an item type attribute of type text that dynamically determines the Out Agent name at runtime. The Out Agent that you enter here overrides the previous outbound agent value in the event message.
To Agent - Optionally enter the inbound agent to which the node sends the event. Specify both the agent name and the system name for the agent using the following format:
<agent_name>@<system_name>
You can either specify a constant To Agent name or select an item type attribute of type text that dynamically determines the To Agent name at runtime. The To Agent that you enter here overrides the previous inbound agent value in the event message.
Event Details Tab for a Send Event Activity

Note: The Event Message is required for a Send event activity. Additionally, you must either include a To Agent or a From Agent within the event message, or specify a To Agent or an Out Agent in the event details for this node. If you neither specify an inbound agent nor an outbound agent, the event cannot be sent.
Note: If no correlation ID is initially specified in the event message, Oracle Workflow automatically sets the correlation ID to the item key of the process.
Choose Apply to save your changes, OK to save your changes and close the property page, or Cancel to cancel your changes and close the property page.
To Define Activity Attribute Values
Activity attribute values for a function or notification activity are used by the PL/SQL stored procedure that the activity calls. Activity attribute values for a raise event activity are set as parameters in the parameter list for the event message, except for the special #EVENTMESSAGE2 activity attribute. If the #EVENTMESSAGE2 attribute is defined, the raise event activity retrieves the event data and parameter list from the specified existing event and sets them into the new event message before it is raised. For a receive event activity, the special #BUSINESS_KEY attribute is used to determine whether the activity is eligible to receive an event sent from the Event Manager based on whether the business key value matches the event key. See: To Define an Item Type or Activity Attribute.
Display the property pages of an activity node. Select the Node Attributes tab.
Node Attributes Tab

Select an attribute.
In the Value region, enter the value for this attribute. The value can be a constant or a value stored in an item type attribute.
The value you enter must match the data type of the activity attribute, and of the actual activity parameter itself as it is defined in the PL/SQL function associated with the activity, if there is one. The attribute type is displayed along with the name, description, value type, and value of each attribute in the attributes summary region.
Choose Apply to save your changes, OK to save your changes and close the property page or Cancel to cancel your changes and close the property page.
To Create and Edit a Transition
To create a transition between two activities, hold down your right mouse button and drag your mouse from a source activity to a destination activity.
Note: Overlapping transitions appear in a different color than single, non-overlapping transitions.
To reposition a transition label, simply select the label with your mouse and drag it to its new position. The label snaps onto the transition.
You can bring up the following menu of editing options at any time by selecting a transition with your mouse and clicking on the right mouse button:
Delete Transition - deletes the selected transition.
Locked - toggles between locking and unlocking the transition from further edits. If a transition is locked, you cannot add or delete vertex points along the transition, but you can delete the transition.
Hidden Label - toggles between displaying and hiding the transition label.
Straighten - straightens the transition by removing the extra vertex points that can cause bends in the transition.
Results... - if the transition has a result assigned to it, use this option to change the result label on the transition. An additional menu appears that lists the possible result labels you can choose.
To bend a transition, create a vertex point by selecting the transition and dragging the transition as you hold down your left mouse button. You can reposition any vertex point to create a bend in the transition.
You can create a transition that loops back to its source activity node in one of two ways:
Hold down your right mouse button and drag your mouse from a source activity back to itself to create a self loop.
From a source activity node, create a transition to another arbitrary activity node. Add a vertex point to create a bend in the transition. Then select and drag the arrowhead of the transition back to the source activity node. Create additional vertex points as necessary to improve the visual display of the looping transition.
To remove a single vertex point from a transition, select the vertex and drag it over another vertex to combine the two points.
To Display a Process Overview
Place your cursor in the process window and choose Overview from the right mouse button menu.
An Overview dialog window of your process appears.
Overview Window
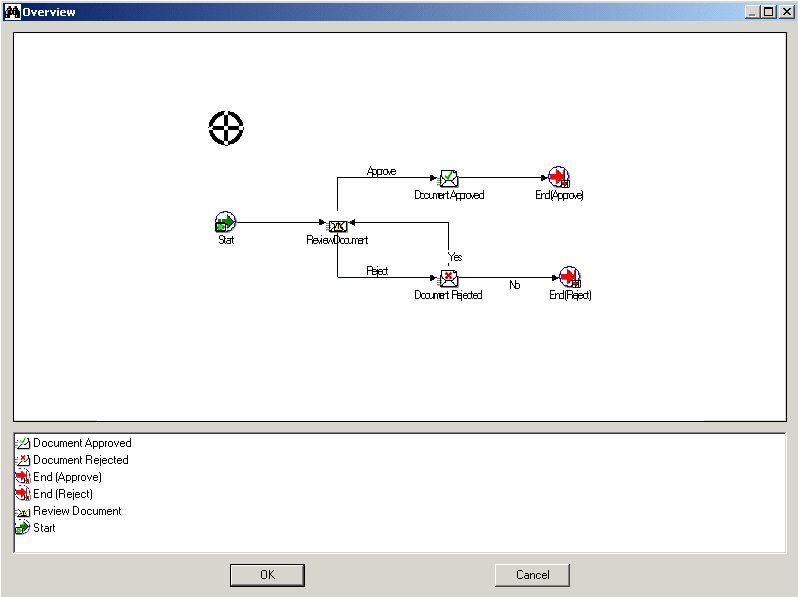
The upper pane of the window shows a size-reduced sketch of your entire process, while the bottom pane is a list of the activities in your process.
You can resize the Overview dialog window to get a better view of the process sketch.
A cross hairs cursor that you can drag appears in the process sketch pane. Use the cross hairs cursor to pinpoint an area in your process that you want the process window to display.
Single click on an activity in the lower pane to move the cross hairs cursor to that activity within the sketch. Choose OK to close the dialog window and to jump to that activity in the process window.
You can also drag and double-click on the cross hairs cursor in the upper pane to close the dialog window and to jump to the resulting region in the process window.
To Print a Process
Display the process window containing the process you wish to print.
With the process window selected as the active window, choose Print Diagram from the File menu or from the right mouse button menu.
The Print Diagram option captures your process diagram as a picture (metafile), enlarges it to the correct size to print and sends it to a printer. If your diagram is large, it may span more that one page when printed. However, depending on the printer driver you use, you may get a Print dialog box that lets you scale your image down to one page for printing.
Note: If your process diagram uses a font that the printer cannot find, your printer driver may either substitute a similar font or not print any text.
To Copy a Process Diagram to the Clipboard
Display and make the process window containing the process you wish to copy active.
Choose Copy Design from the Edit menu or from the right mouse button menu.
This copies the process to the clipboard in the form of a metafile and a bitmap diagram.
To paste the metafile-version or bitmap-version of the process diagram into another application window, you should consult the other application's documentation on how to paste metafiles or bitmaps.
To edit a bitmap image, you must paste the image into an application that can edit bitmaps.
To Validate a Process Definition
Choose Verify from the File menu to validate all process definitions for the currently selected data store.
The following list is an example of some of the validation that the Verify command performs:
Checks that a process has at least one Start and one End activity.
Verifies that a process does not contain itself as a process activity.
Restricts the same subprocess from being used twice in a process.
Validates that all possible activity results are modelled as outgoing transitions. If an activity completes with a result that is not associated with an outgoing transition, and a <Default> transition doesn't exist for that activity, the activity enters an 'ERROR' state.
Validates that activity nodes marked as END nodes do not have any outgoing transitions.
Validates that a notification activity's result type matches the lookup type defined for the message's 'RESULT' message attribute.
Verifies that message attributes referenced in a message body for token substitution exist in the message definition.
For processes that reference objects from another item type, verifies that the requisite item attributes associated with the referenced item type exist.
Attention: You should always validate any new process definition you create as it helps you to identify any potential problems with the definition that might prevent it from executing successfully.
Related Topics
To Find an Object in the Navigator Tree
Using the Edit Button in a Property Page
You can modify the font that is used by the windows in Oracle Workflow Builder. Any change you make applies to all windows within the program.
To Modify Fonts
Choose Font from the View menu to display the Fonts property page.
Fonts Property Page
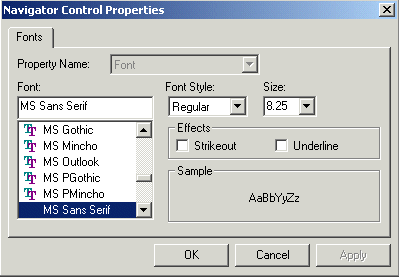
Select the font to use as the label for your icons. This font is used for all icons in Workflow Builder. The Sample region shows the appearance of the font you select.
Choose the font style: Regular, Bold, Italic or Bold Italic. Some fonts have a limited selection of font styles.
Indicate the font size to use. Some fonts have a limited selection of font sizes.
Select the Underline or Strikeout check boxes to apply that effect.
Choose OK when you are done. These font settings take effect immediately and are also used the next time you start Oracle Workflow Builder.
You can create a shortcut to Oracle Workflow Builder on your Windows desktop. The shortcut can start Oracle Workflow Builder by automatically connecting to a designated data store and opening specific process windows from that data store.
To Create an Oracle Workflow Builder Shortcut
Start Oracle Workflow Builder.
Choose Open from the File menu to open a data store.
Optionally expand the Process branch and double-click on one or more process activities to open the process windows for those processes.
Choose Create Shortcut from the File menu.
Enter a name for the shortcut, as you want it to appear on your desktop.
When you double-click on the new shortcut icon on your desktop, it automatically starts Oracle Workflow Builder opening the data store that was selected and any process windows that were open when you created the shortcut.
If the data store for the shortcut is a database, the shortcut will prompt you for the password to the database.
Oracle Workflow roles are stored in the database, in the Oracle Workflow directory service. Currently, new workflow roles cannot be created in Oracle Workflow Builder, but Oracle Workflow Builder can display and reference the roles stored in a database.
One example of how roles are referenced in a workflow process is when you include a notification activity in a process as a node. You must assign that node to a performer. The performer can be a designated role or an item type attribute that dynamically returns a role. To assign a performer to a role, you must initially load the roles from your Oracle Workflow database into your Oracle Workflow Builder session. See: Setting Up an Oracle Workflow Directory Service, Oracle Workflow Administrator's Guide and To Define Nodes in a Process.
Note: Referencing roles in a workflow process is currently supported in Oracle Workflow Builder, although the Roles tab page seen in the property pages of certain workflow objects will not be supported until a future release. The purpose of the Roles tab page is to give a role access to a certain object.
Ad Hoc Users and Roles
Oracle Workflow allows you to create new ad hoc users and roles within a workflow process, to add to your directory service. To do so, you define a function activity that makes a server-side call to the appropriate WF_DIRECTORY API and include that function activity in your process diagram. See: Standard API for PL/SQL Procedures Called by Function Activities and Workflow Directory Service APIs, Oracle Workflow API Reference.
To Load Roles
If you are not connected to an Oracle Workflow database, choose Open from the File menu to connect to the database and open your item type.
Choose from the File menu, Load Roles from Database. A Role Selection window appears. You can enter search criteria using SQL query syntax in the Find Roles field to find a subset of roles, or just choose Find without specifying any search criteria to identify all roles. The Role Selection window finds the roles you specify and displays them in the Query Results list box.
Role Selection Window
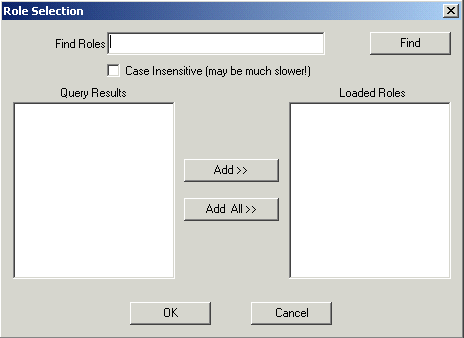
Select the roles you want to load from the Query Results list and choose Add to add them to the Loaded Roles list. Alternatively, just choose Add All to add all the roles in the Query Results list to the Loaded Roles list. Choose OK to load the selected roles into Oracle Workflow Builder and make them available to the workflow objects in your open item type.
The workflow objects that need to reference role information contain specific fields in their property pages. These fields are poplist fields that display the list of roles you loaded from the database, such as the Performer fields in the Node property page.
Node Property Page
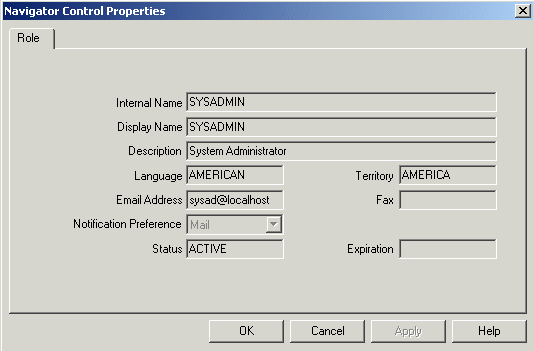
When you select a role from one of these poplist fields, you can also choose the Edit button to the right of the field to display the property sheet of the selected role.
The Role property page that appears lists read-only information about that role.
Note: When you reopen a saved process definition in Oracle Workflow Builder, any role information that the process references automatically gets loaded even if you open the process definition from a file and are not connected to the database.
To Display the Directory Service in Oracle Workflow Builder
Once you load your roles from the database in Oracle Workflow Builder, you can display your directory service information in the navigator tree. See: To Load Roles.
Expand the Directory Service branch in the navigator tree. All the roles that you loaded from the database appear.
Double-click on a role to display read-only information about that role, including the role's internal name, display name, description, language, territory, e-mail address, fax number, notification preference, status, and expiration date. Note that the Directory Service branch does not currently allow you to view the participant users of a role.
Role Property Page
A workflow process begins when an application calls the Workflow Engine CreateProcess() and StartProcess() APIs or when a Business Event System subscription sends an event to launch the process. A subprocess is started when the Workflow Engine transitions to a process activity that represents the subprocess.
To launch a workflow process using the Business Event System
Define a business event.
Define a subscription to this business event. In the subscription properties, specify the workflow item type and process that you want to launch.
By default, Oracle Workflow uses the event key as the item key for the workflow process that is launched. If you want to generate the item key based on a custom rule, create a function that populates the correlation ID in the event message with the item key you want, and assign that function as the subscription's rule function.
Note: The item key for a process instance can only contain single-byte characters. It cannot contain a multibyte value.
Add the Raise() API to your custom application code at the point where you want to launch the workflow process.
Related Topics
Workflow Engine APIs, Oracle Workflow API Reference
Raise, Oracle Workflow API Reference
