| Oracle® HTML DB 2 Day Developer Release 2.0 Part Number B16376-01 |
|
|
View PDF |
| Oracle® HTML DB 2 Day Developer Release 2.0 Part Number B16376-01 |
|
|
View PDF |
In an Oracle HTML DB application, a report is the formatted result of a SQL query. You can generate reports in three ways:
Running a built-in wizard
Defining a report region based on a SQL query
Creating a report region based on a PL/SQL function returning a SQL query
This tutorial illustrates how to create a report in which the results depend on the form input, or a parameterized report. In this exercise, you create a report region based on a SQL query which references the value of a form item within the application.
This section contains the following topics:
Figure 2-1 is an example of a form in which the report results are based on user input. In this example, this user populates the form by making a selection from the Show list. The easiest way to create this type of report in Oracle HTML DB is to define a report region based on a SQL query.
Oracle HTML DB installs with a number of demonstration applications. In this exercise you will create a tabular form within the demonstration application, Sample Application.
To see if Sample Application is installed:
Log in to Oracle HTML DB.
Click the down arrow on the right side of the Application Builder icon.
From the menu, select Demonstrations.
The Demonstration Applications page appears, displaying links to the following applications:
Locate Sample Application and check the Status column:
If the Status column displays Installed, return to the Workspace home page.
If the Status column displays Not Installed, select Install in the Action column.
Follow the on-screen instructions.
First, you create a new blank page and within Sample Application.
To create a new page:
Navigate to the Workspace home page.
Click the Application Builder icon.
Select Sample Application.
Click the Create Page button.
On Create Page, select Blank Page and click Next.
For Page, enter 700 and click Next.
In Name, enter Ordered Products and click Next.
For Tabs, accept the default, No, and click Next.
Review your selections and click Finish.
On the Success Page, click Edit Page.
The Page Definition for page 700 appears.
Next, you need to create a report.
To create a the query region to contain the report:
Under Regions, click the Create icon.
Select Report and click Next.
For Report Implementation, select SQL Report and click Next.
For Display Region Attributes:
For Title, enter Ordered Products.
Accept the remaining default values and click Next.
Enter following SQL query:
SELECT p.category,
       p.product_name,
       i.quantity  FROM demo_product_info p,
       demo_order_items i
WHERE p.product_id = i.product_id
  AND ( p.category = :P700_SHOW or :P700_SHOW = 'ALL' )
Click Create Region.
The previous SQL query references an item named P700_SHOW.
To create the select list P700_SHOW:
Under Items, click the Create icon.
For Select Item Type, select Select List and click Next.
For Select List Control Type, accept the default of Select List and click Next.
For Item Name, enter P700_SHOW and click Next.
On Identify List of Values:
For Named LOV, select CATEGORIES.
For Null Text, enter:
- All Categories -
For Null Value, enter:
ALL
Click Next.
For Identify Item Attributes, accept the defaults and click Next.
Click Create Item.
For the report to be driven by the Product Category select list (the form input), you need to submit the page. To accomplish this, you need add a button.
To add a button to submit the page:
Under Buttons, click the Create icon.
Select the region Ordered Products and click Next.
On Identify Button Position, select Create a button displayed among this region's items and click Next.
For Button Name, enter P700_GO.
Click Create Button.
To run the page:
Click the Run Page icon.
If prompted to enter a username and password:
For User Name, enter either demo or admin.
For Password, enter the name of the current workspace using all lowercase letters.
Click Login.
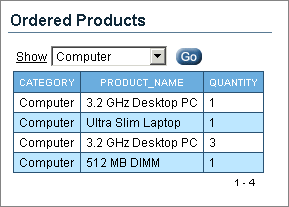
When the Order Products page appears, select Computer from the Show menu and click Go.
As shown in Figure 2-2, notice that making a selection from the Show menu populates the form.
Figure 2-2 Form Results Being Populated from a Select List
